Abschnitte in der Seitenleiste anpassen
Die Funktion ist nur für kostenpflichtige Pläne verfügbar.
Wir alle haben Spaß daran, unsere Arbeitsbereiche im Büro individuell zu gestalten. Deshalb wollten wir unseren Pumble-Benutzern die Möglichkeit anbieten, auch ihre Online-Arbeitsbereiche anzupassen.
Mit Pumble kannst du deine Seitenleiste mit diesen drei Optionen anpassen:
- Benutzerdefinierte Abschnitte für Kanäle erstellen
- Kanäle oder DMs (Direktnachrichten) in benutzerdefinierte Abschnitte verschieben
- Deine gesamte Seitenleiste anpassen
Kanäle sortieren #
Die Kanäle werden standardmäßig alphabetisch sortiert.
Wenn du viele Kanäle hast, empfehlen wir dir für eine einfachere Navigation, die Kanäle, die du am häufigsten verwendest, in benutzerdefinierte Abschnitte zu verschieben.
Um dies einzurichten, solltest du zuerst benutzerdefinierte Abschnitte erstellen und dann auf den Kanalnamen klicken und den Kanal in den Abschnitt verschieben, in dem der Kanal platziert werden soll.
Benutzerdefinierte Abschnitte #
Die benutzerdefinierten Abschnitte werden zur einfachen Navigation durch Kanäle oder Direktnachrichten verwendet. Diese dienen zur Gruppierung von ähnlichen Kanälen und DMs und sind nur für Benutzer sichtbar, die diese Abschnitte erstellt haben.
Sieh dir unser Kurzvideo an oder lies unsere Anleitungen unten, um zu erfahren, wie benutzerdefinierte Abschnitte erstellt werden können.
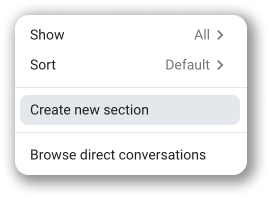
So erstellst du einen benutzerdefinierten Abschnitt:
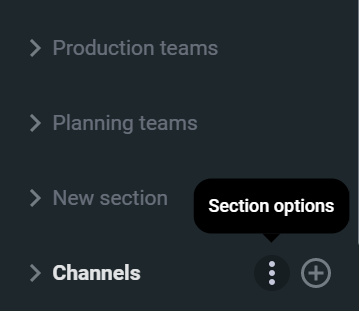
- Klicke auf das Dreipunkt-Menü neben dem Abschnitt Kanäle oder Direktnachrichten in der Seitenleiste
- Wähle Neuen Abschnitt erstellen
- Gib den Abschnittsnamen ein
Dies ist nützlich, wenn du Abschnitte für mehrere Chats mit Benutzern innerhalb einer Arbeitsgruppe erstellen möchtest.


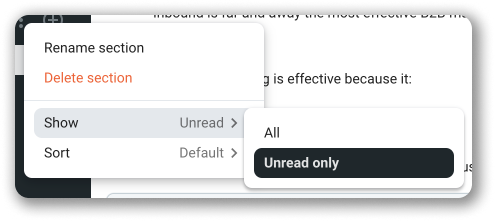
Um den Abschnitt weiter zu entlasten, kannst du nur Kanäle mit ungelesenen Nachrichten anzeigen.
- Klicke auf das Dreipunkt-Menü neben dem Abschnitt Kanäle
- Bewege den Mauszeiger über die Option Anzeigen
- Wähle Nur Ungelesenes

Kanäle/DMs in Abschnitte verschieben #
Du kannst Kanäle und DMs am einfachsten verschieben, indem du alle Unterhaltungen per Drag und Drop in einen Abschnitt in deiner Seitenleiste bewegst.
So verschiebst du einen Kanal/eine DM in einen vorhandenen Abschnitt:
- Klicke mit der rechten Maustaste darauf
- Bewege den Mauszeiger über Kanal verschieben / Unterhaltung verschieben
- Wähle den Abschnitt aus dem Dropdown-Menü
Kanäle/Unterhaltungen werden in den Abschnitt deiner Wahl verschoben.
So verschiebst du einen Kanal/eine DM in einen nicht vorhandenen Abschnitt: #
- Klicke mit der rechten Maustaste darauf
- Bewege den Mauszeiger über Kanal verschieben / Unterhaltung verschieben
- Wähle In neuen Abschnitt verschieben aus dem Dropdown-Menü
- Gib den Abschnittnamen im Popup-Fenster NEUEN ABSCHNITT ERSTELLEN ein
Ein neuer Abschnitt wird erstellt und der Kanal/die Unterhaltung wird dort verschoben.
Du kannst denselben Schritten folgen, wenn du eine Unterhaltung aus Abschnitten entfernen möchtest.
Abschnitte umbenennen und löschen #
Um einen Abschnitt zu umbenennen/löschen, solltest du einfach mit der rechten Maustaste auf den Abschnittsnamen klicken und Umbenennen / Löschen wählst.
Im Popup-Fenster kannst du einen neuen Namen eingeben und dann diesen bestätigen, indem du auf die lila Schaltfläche Umbenennen / löschen klickst.
Abschnitte sortieren #
Die Reihenfolge von Abschnitten kann einfach geändert werden.
Um dies zu aktivieren, solltest du auf den Abschnitt klicken und zur Stelle deiner Wahl ziehen.
Anwendungsfälle #
Für Direktnachrichten kannst du beispielsweise einen Abschnitt mit dem Namen Entwickler erstellen, in dem du deine privaten Chats mit jedem Benutzer, der Entwickler ist, sortieren kannst. Wenn du mit einem Entwickler im privaten Chat kommunizieren möchtest, hilft dir dies, eine bestimmte Person einfach zu finden.
In Kanälen kannst du zum Beispiel einen Abschnitt namens Teams planen erstellen, in dem du alle Kanäle zur Planung von Aktivitäten für deine Projekte sortierst. Wenn du etwas in diesen Kanälen veröffentlichen möchtest, kannst du den Kanal einfach finden.
Deine Seitenleiste anpassen #
Die Funktion ist für alle Pläne verfügbar, einschließlich des kostenlosen Plans.
Zusätzlich zur Erstellung von Kanälen und DMs in der Seitenleiste kannst du die Hauptabschnitte auswählen, die in der Seitenleiste angezeigt werden sollen, was dir ermöglicht, deine Pumble-Schnittstelle nach deinen Wünschen anzupassen.
So tust du es:
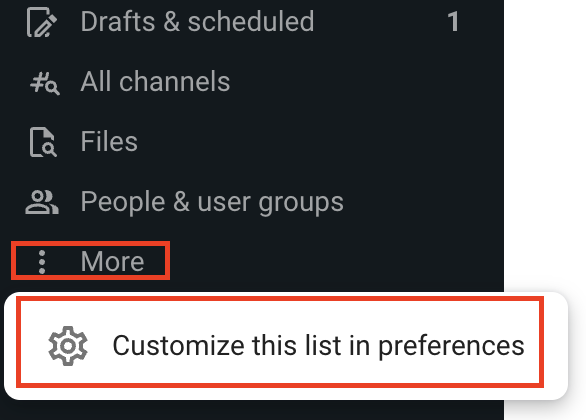
- Klicke auf Weiter in der linken Seitenleiste

- Wähle Diese Liste in Einstellungen anpassen
Oder
- Klicke auf dein Profilsymbol in der rechten oberen Ecke
- Wähle Einstellungen
- Öffne in Einstellungen den Abschnitt Seitenleiste
- Markiere die Checkboxen, um auszuwählen, was in deiner Seitenleiste angezeigt werden soll
Die Änderungen werden sofort angewendet.
Die unmarkierten Boxes (die in der Seitenleiste nicht angezeigt werden sollten) werden im Dropdown-Menü in der linken Seitenleiste über Mehr zugänglich.