Importer des données à partir d’un fichier CSV
Si vous migrez vers Pumble depuis une autre plateforme, comme Slack ou Microsoft Teams, vous avez la possibilité de transférer le contenu de votre espace de travail. Cela se fait en important un fichier CSV dans Pumble.
Importer un fichier CSV dans Pumble #
Téléverser le fichier #
- Cliquez sur les trois points à côté du nom de votre espace de travail
- Passez la souris sur Paramètres de l’espace de travail
- Sélectionnez Paramètres généraux dans le menu déroulant
- Ouvrez la section Importation et exportation
- Cliquez sur Importer dans la section CSV
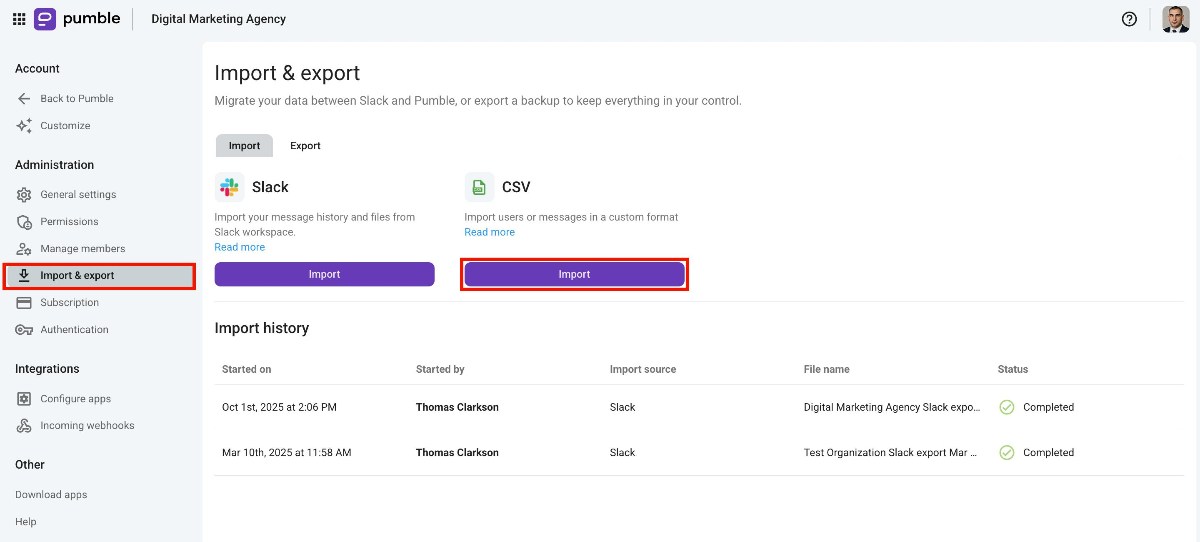
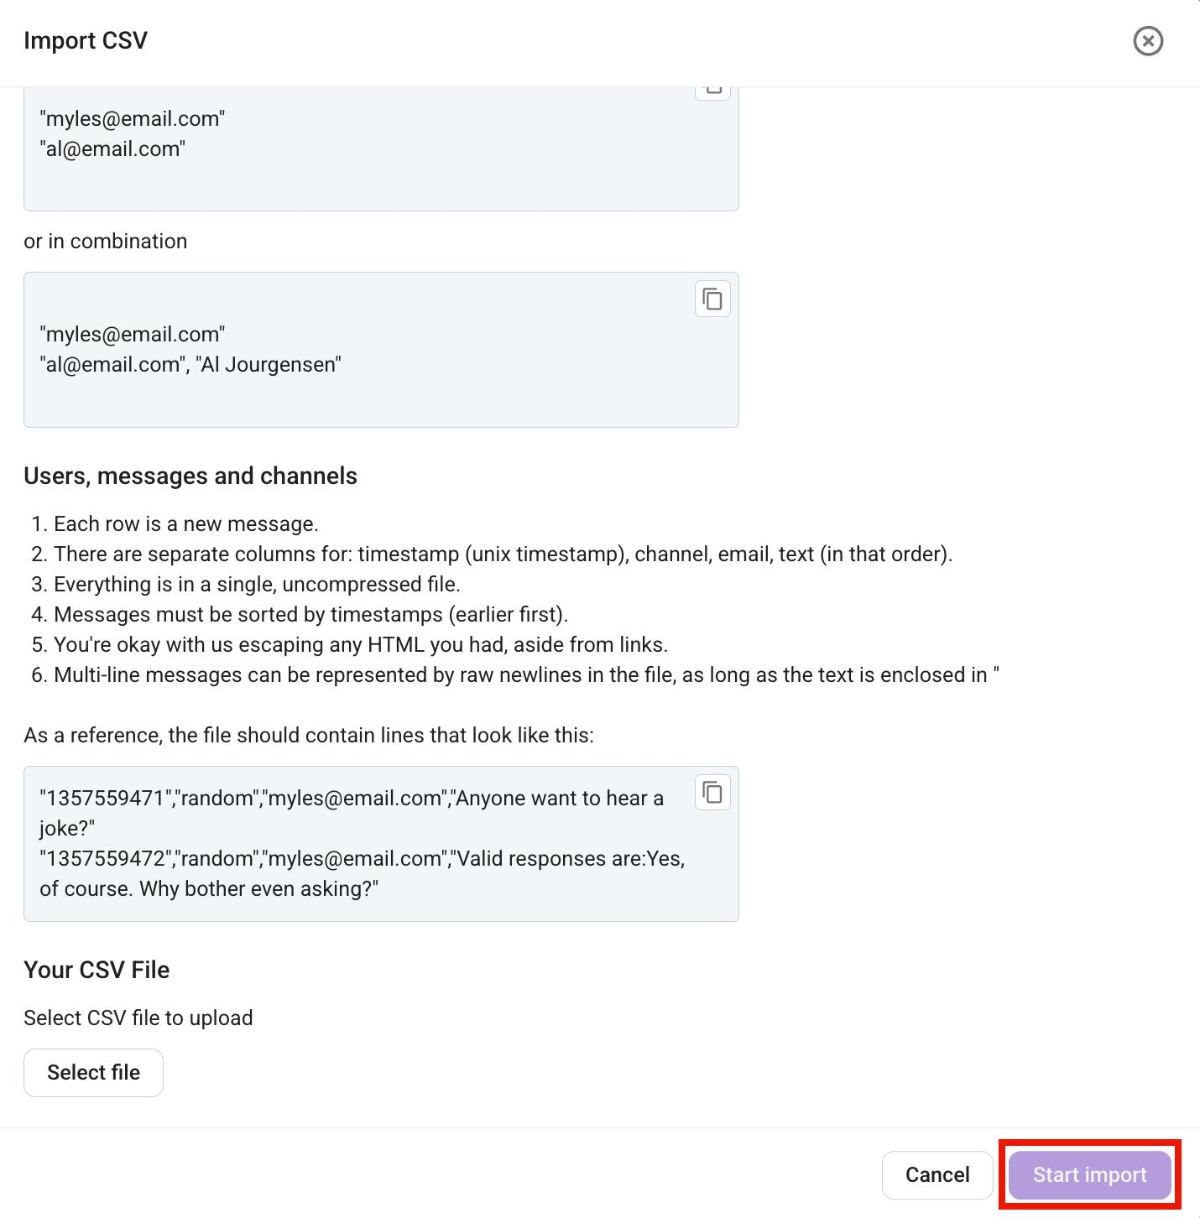
- Téléversez le fichier CSV
- Cliquez sur Démarrer l’importation
Si un utilisateur Pumble existe déjà avec la même adresse email que celle figurant dans le fichier d’importation, le compte existant lui sera automatiquement associé.
Mapper les données #
Afin de compléter l’importation à partir de CSV, vous devez mapper les utilisateurs et les canaux. Voici comment procéder :
Étape 1 : Cliquez sur le menu déroulant à côté du nom de l'utilisateur dans la section Mappage et sélectionnez l'une des options :
- Aucune action (Tout est bon) – Si le nom d’utilisateur du fichier CSV est associé à un nom d’utilisateur correct existant sur Pumble
- Ignorer cet utilisateur – Si vous ne souhaitez pas importer cet utilisateur particulier à partir du fichier CSV
- Mapper à un autre utilisateur – Modifiez le nom de l’utilisateur auquel vous associez un utilisateur du fichier CSV, et sélectionner l’utilisateur dans la liste déroulante
Les utilisateurs dont les noms d’utilisateurs CSV ne correspondent pas sont dans la section Non mappés. Gérez-les individuellement ou en lot.
Étape 2 : Cliquez sur le menu déroulant à côté de Actions par lots et sélectionnez l'une des actions suivantes à appliquer à tous les utilisateurs non mappés :
- Créer et inviter un utilisateur – L’utilisateur recevra une invitation à rejoindre l’espace de travail de Pumble
- Associer manuellement des utilisateurs (pas d’actions par lots) – Sélectionnez les utilisateurs dans la liste déroulante pour les associer manuellement
- Créer des utilisateurs désactivés, sans inviter personne – Ajoutez tous les utilisateurs à Pumble avec le statut d’utilisateur désactivé
- Ne pas créer d’utilisateurs, en laissant les messages en tant que messages robots – Importez uniquement les messages en tant que messages robots
- Ignorer les utilisateurs, sans importer leurs messages – Ignorez l’importation des utilisateurs et de leurs messages
Ou
Cliquez sur le menu déroulant à côté du nom de l'utilisateur dans la section Non mappé et sélectionnez l'une des options :
- Créer et inviter un utilisateur – L’utilisateur recevra une invitation à rejoindre l’espace de travail de Pumble
- Associer à un utilisateur existant – Sélectionnez l’utilisateur dans le menu déroulant pour l’associer manuellement
- Créer des utilisateurs désactivés, sans inviter personne – Ajoutez tous les utilisateurs à Pumble avec le statut d’utilisateur désactivé
- Ne pas créer d’utilisateurs, en laissant les messages en tant que messages robots – Importez uniquement les messages en tant que messages du robot Pumble
- Ignorer les utilisateurs, sans importer leurs messages – Ignorez l’importation des utilisateurs et de leurs messages
Tous les utilisateurs non mappés qui sont créés, invités ou ajoutés comme désactivés doivent être associés à une adresse email.
Tout comme les utilisateurs, les canaux sont affichés comme mappés ou non mappés, selon qu'il existe déjà ou non des canaux publics portant le même nom sur Pumble.
Étape 1 : Cliquez sur le menu déroulant à côté du nom du canal dans la section Mappé et sélectionnez l’une des options suivantes :
- Aucune action (tout va bien) – Laissez le canal automatiquement mappé au canal du même nom sur Pumble
- Ajouter à un autre canal – Les messages de ce canal sont importés vers un autre canal (public) que vous sélectionnez dans le menu déroulant
- Ignorer le canal (ne pas importer) – Ignorez l’importation du canal
Les canaux dont les noms dans le fichier CSV ne correspondent à aucun élément apparaîtront dans la section Non mappés. Il est possible d’effectuer une action en bloc sur tous les canaux non mappés ou de les gérer individuellement.
Étape 2 : Cliquez sur le menu déroulant à côté de Actions en bloc et sélectionnez l’une des actions suivantes à appliquer à tous les canaux non mappés :
- Mapper manuellement les canaux (pas d’actions en bloc) – Sélectionnez les canaux dans le menu déroulant pour les mapper manuellement (seuls les canaux publics peuvent être sélectionnés)
- Créer tous les nouveaux canaux publics
- Créer tous les nouveaux canaux privés
- N’importer aucun canal
Ou
Cliquez sur le menu déroulant à côté du nom du canal dans la section Non mappé et sélectionnez l'une des options suivantes :
- Créer un nouveau canal public
- Créer un nouveau canal privé
- Ajouter à un canal existant – Sélectionnez les canaux dans le menu déroulant pour les mapper manuellement (seuls les canaux publics peuvent être sélectionnés)
- Ignorer le canal (ne pas importer)
Étape 3 : Cliquez sur Continuer pour poursuivre l’importation.
Étape 4 : Prévisualisez toutes les données que vous avez mappées et cliquez sur Poursuivre l’importation pour terminer le processus.
Limites et règles pour l’importation à partir d’un fichier CSV #
Vous pouvez importer des données dans Pumble à l’aide de fichiers .CSV ou .TXT, selon vos besoins.
Importer des utilisateurs en bloc #
Utilisez cette option pour ajouter plusieurs utilisateurs sans emails d’invitation. Idéal pour configurer canaux et groupes avant l’arrivée de l’équipe. Nécessite uniquement des adresses email et/ou noms d’utilisateur, sans horodatage, canal ou contenu de message.
Importer l’historique complet des messages #
Utilisez cette option pour déplacer des conversations existantes vers Pumble. Votre fichier doit contenir quatre colonnes dans cet ordre :
- Horodatage – Doit être trié du plus ancien au plus récent
- Canal – Nom du canal
- Utilisateurs – Adresse email de l’expéditeur
- Texte – Contenu du message
Conseils sur le formatage #
- Toutes les données doivent être regroupées dans un seul fichier non compressé
- Pour les messages comportant plusieurs lignes, placez le texte entre guillemets doubles (“”)
- Évitez d’utiliser le langage HTML dans vos messages (à l’exception des liens)