Comment utiliser le serveur MCP de Pumble
Grâce au serveur MCP (Model Context Protocol) de Pumble, vous pouvez connecter des agents IA tiers (p. ex. Claude, Gemini, Codex) à Pumble et leur permettre d’accéder au contenu afin qu’ils puissent rechercher des messages, trouver des informations et effectuer des actions en votre nom.
Comment se connecter à un serveur MCP #
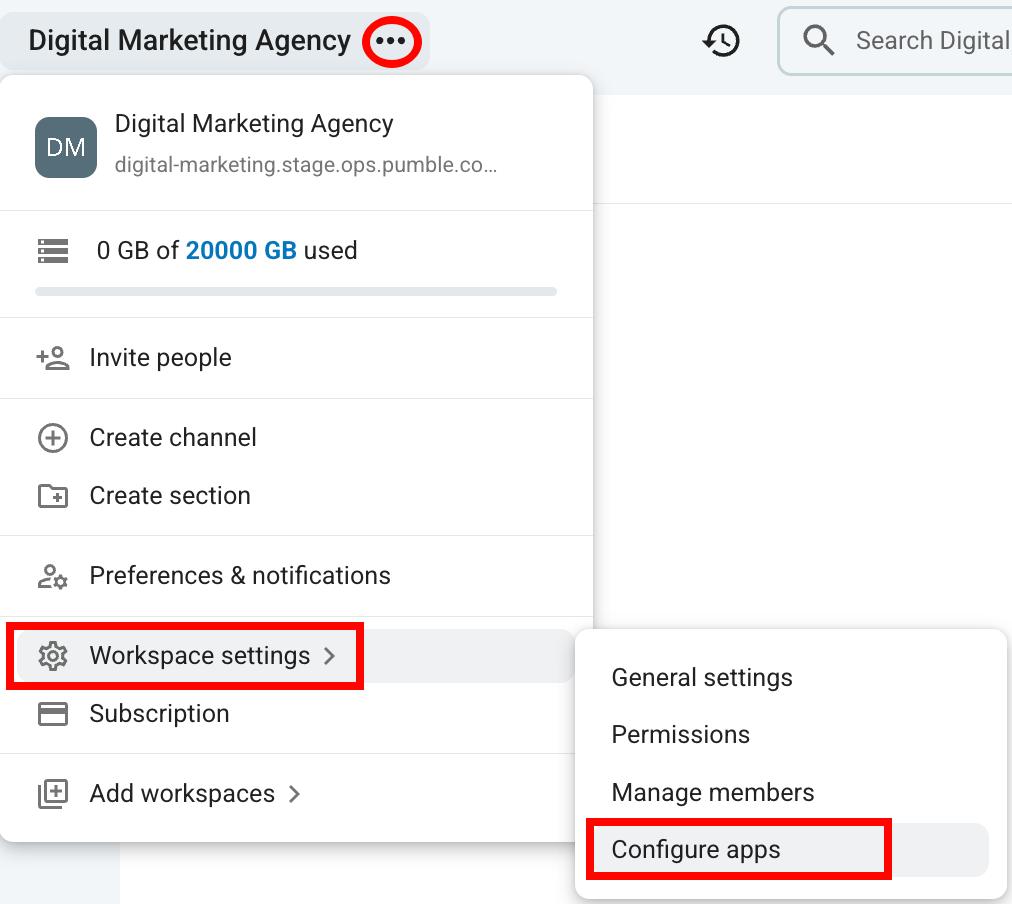
Pour connecter votre assistant IA au serveur Pumble MCP, vous devrez créer un module complémentaire Pumble et y récupérer vos identifiants. Pour ce faire, vous devrez d’abord accéder aux modules complémentaires Pumble.
- Cliquez sur les trois points situés à côté du nom de l’espace de travail
- Passez la souris sur Paramètres de l’espace de travail
- Sélectionnez Configurer les applis
Une fois que vous avez ouvert la page « Configurer les applis », vous pouvez ajouter votre propre extension. Voici comment procéder :
- Cliquez sur + Créer une appli
- Sélectionnez Créer à partir de zéro
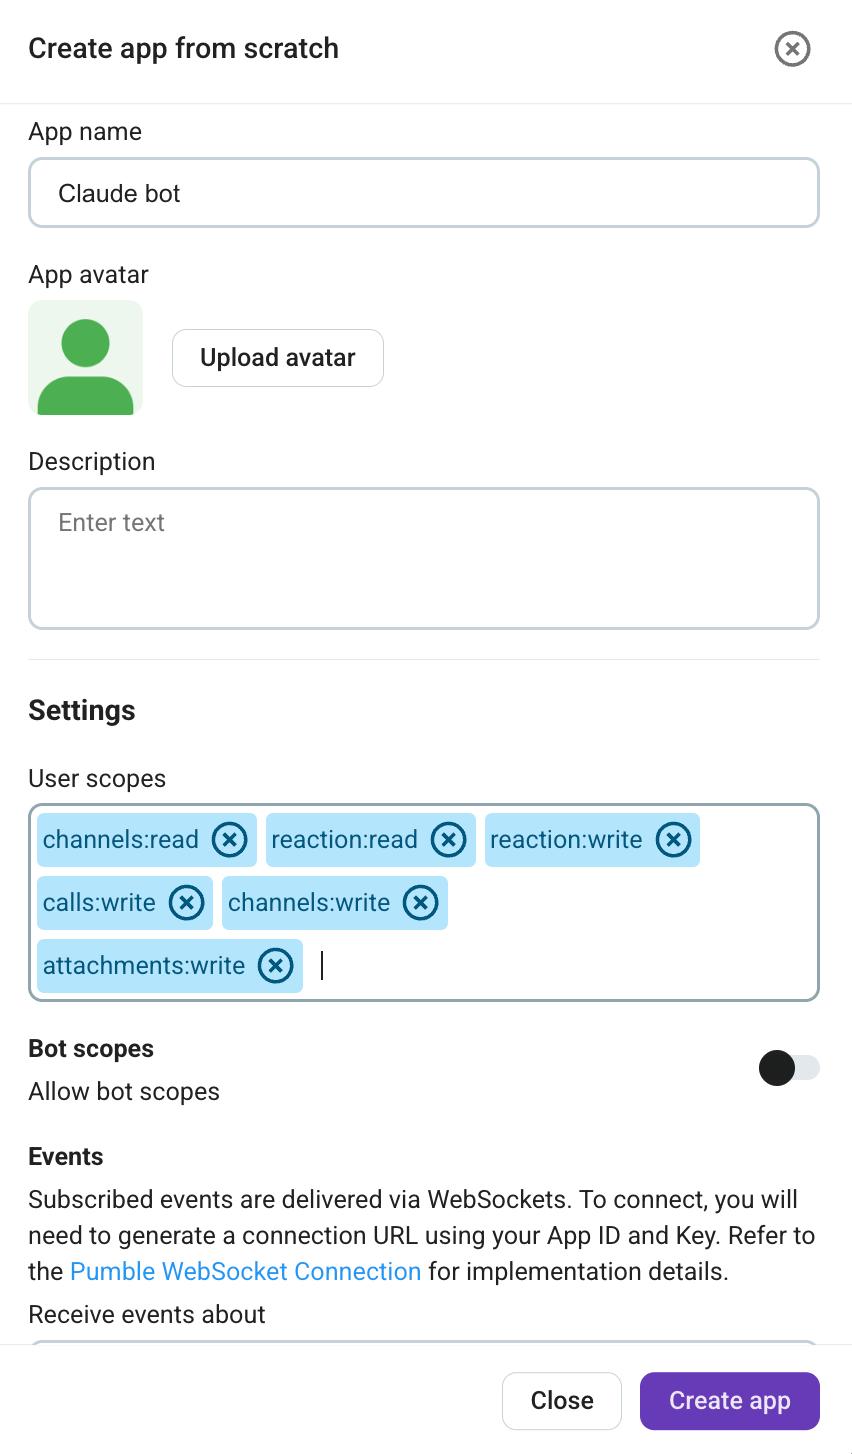
- Saisissez le nom de l’appli
- Saisissez la description
- Sélectionnez les périmètres d’accès utilisateur
- Sélectionnez les périmètres d’accès du bot
- Cliquez sur Installer l’appli
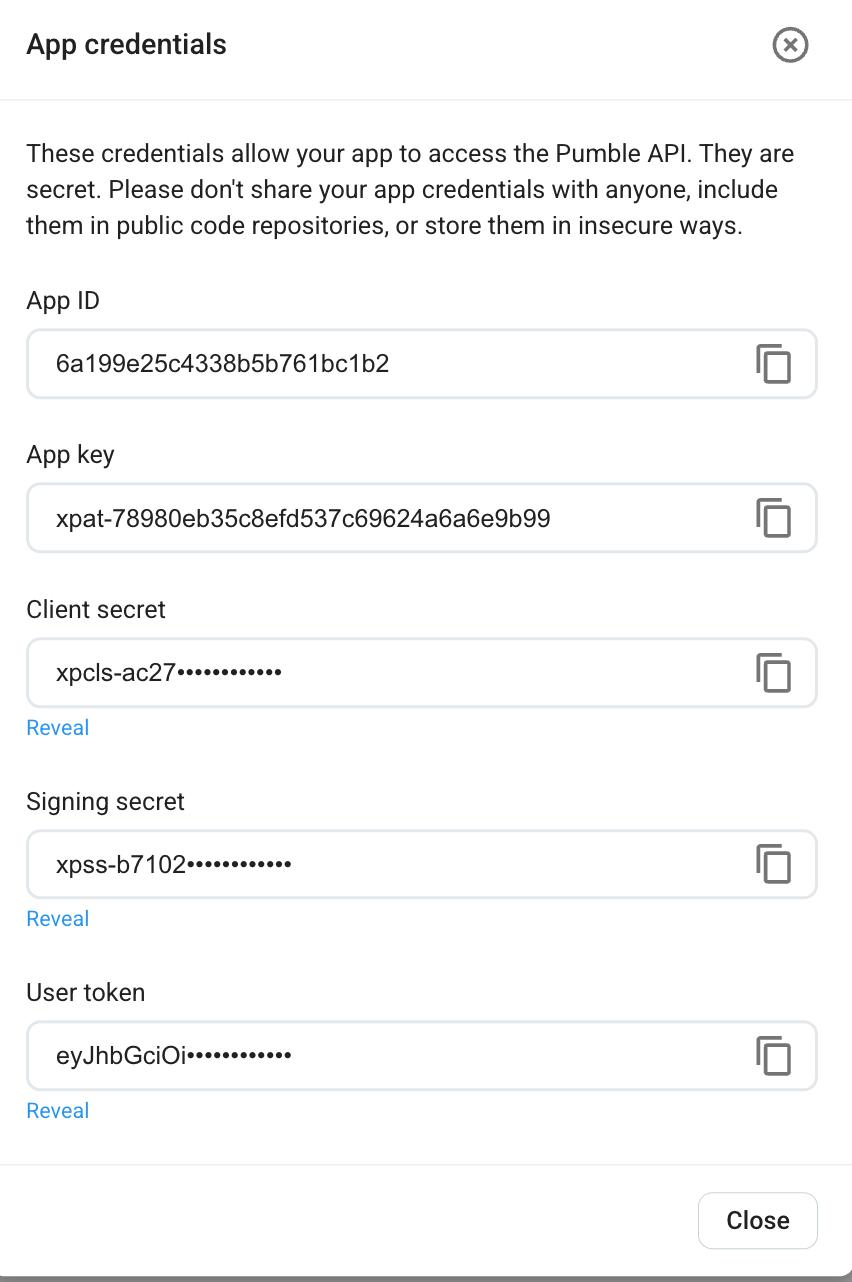
Une fois l’appli installée, veillez à copier la clé de l’appli, le jeton utilisateur et le jeton du bot.
Que pouvez-vous faire une fois connecté au serveur MCP ? #
La liste des outils MCP disponibles est dynamique et dépend entièrement des paramètres que vous avez sélectionnés lors de la création de l’appli.
Voici tous les outils disponibles que le serveur MCP de Pumble vous permet d’utiliser :
- add_reaction_to_message
- add_user_to_channel
- create_call_link
- create_channel
- delete_scheduled_message
- edit_message
- fetch_file
- get_channel_details
- get_channel_messages
- get_channels
- get_latest_messages
- get_scheduled_messages
- get_thread_replies
- get_users
- get_workspace_info
- reply_to_message
- schedule_message
- search_messages
- send_message
De plus, vous pouvez utiliser les commandes suivantes pour communiquer avec le serveur MCP :
- create-channel-with-initial-users
- explain-pumble-mcp
- send-channel-message
- Send-dm-message
Connecter Pumble MCP à Claude CLI #
Si vous utilisez Claude CLI, vous pouvez également le connecter au serveur Pumble MCP. Pour ce faire, collez le code ci-dessous dans votre fichier .mcp.json.
{
  "mcpServers": {
    "pumble-mcp": {
      "type": "http",
      "url": "https://mcp.pumble.com/mcp",
      "headers": {
        "token": "user/bot token"
	"x-app-token": "xpat-token"
      }
    }
  }
}
Vous pouvez également utiliser la commande suivante :
claude mcp add pumble-mcp https://mcp.pumble.com/mcp --transport http --header "token: token" --header "x-app-token: xpat-token"Le jeton x-app-token/xpat correspond à la clé d’appli que vous recevez lorsque vous créez une appli à partir de zéro.
Connecter Pumble MCP à Codex CLI #
Le serveur Pumble MCP peut également se connecter à l’interface CLI de Codex. Pour ce faire, il suffit de coller le code ci-dessous dans votre fichier config.toml.
[mcp_servers.pumble-mcp]
transport = "http"
url = "https://mcp.pumble.com/mcp"
http_headers = { "token" = "user/bot token", "x-app-token" = "xpat-token" }
Connecter Pumble MCP à Gemini CLI #
Une fois que vous avez créé l’extension personnalisée, vous pouvez la connecter à votre CLI Gemini. Pour ce faire, collez le code ci-dessous dans votre fichier settings.json.
{
  "mcpServers": {
    "pumble-mcp": {
      "httpUrl": "https://mcp.pumble.com/mcp",
      "headers": {
        "token": "user/bot token",
        "x-app-token": "xpat-token"
      },
    }
  }
}
Vous pouvez également le faire en utilisant la commande suivante :
gemini mcp add pumble-mcp https://mcp.pumble.com/mcp \
  --transport http \
  --header "token: token
" \
  --header "x-app-token: xpat-token"
Pour connecter Pumble MCP à votre interface en ligne de commande (CLI), vous aurez besoin de la clé d’appli et des jetons utilisateur/bot.