Outils et fonctionnalités des appels
Chez Pumble, une communication efficace est essentielle à la collaboration. Que vous organisiez ou participiez à une réunion virtuelle, la maîtrise des outils et fonctionnalités d’appel peut grandement optimiser votre expérience. Ce guide vous offre des instructions claires et détaillées pour utiliser ces fonctionnalités, rendant ainsi vos appels plus productifs.
Activer le microphone et la caméra #
Le microphone et la caméra sont désactivés par défaut.
Pour activer/désactiver votre microphone pendant un appel, procédez comme suit :
- Repérez l’icône du microphone en bas de votre écran d’appel
Si votre microphone est désactivé, vous verrez une ligne rouge à travers l’icône. - Cliquez sur l’icône du microphone pour rétablir le son
- Cliquez à nouveau sur l’icône du microphone pour couper le son

Cliquez sur la flèche vers le bas à côté de l'icône du microphone pour choisir le périphérique audio.
Veillez à accorder au navigateur les autorisations nécessaires pour accéder à votre microphone.
- Repérez l’icône du microphone en bas de votre écran d’appel
Si votre microphone est désactivé, vous verrez une ligne rouge à travers l’icône. - Appuyez sur l’icône du microphone pour rétablir le son
- Appuyez à nouveau sur l’icône du microphone pour vous mettre en sourdine

Assurez-vous que vous disposez des autorisations nécessaires pour accéder à votre microphone.
Pour activer ou désactiver votre caméra pendant un appel vidéo, procédez comme suit :
- Recherchez l’icône de la caméra en bas de votre écran d’appel
Si votre caméra est désactivée, l’icône est barrée d’une ligne rouge. - Cliquez sur l’icône de la caméra pour l’activer
- Cliquez à nouveau sur l’icône de la caméra pour la désactiver
Cliquez sur la flèche vers le bas à côté de l'icône du microphone pour choisir le périphérique vidéo.
Veillez à autoriser le navigateur à accéder à votre caméra pour les appels vidéo.
- Recherchez l’icône de la caméra en bas de votre écran d’appel
Si votre caméra est désactivée, l’icône est barrée d’une ligne rouge. - Appuyez sur l’icône de la caméra pour l’activer
- Appuyez à nouveau sur l’icône de la caméra pour la désactiver

Veillez à autoriser le système à accéder à votre caméra pour les appels vidéo.
Flouter le fond d’écran #
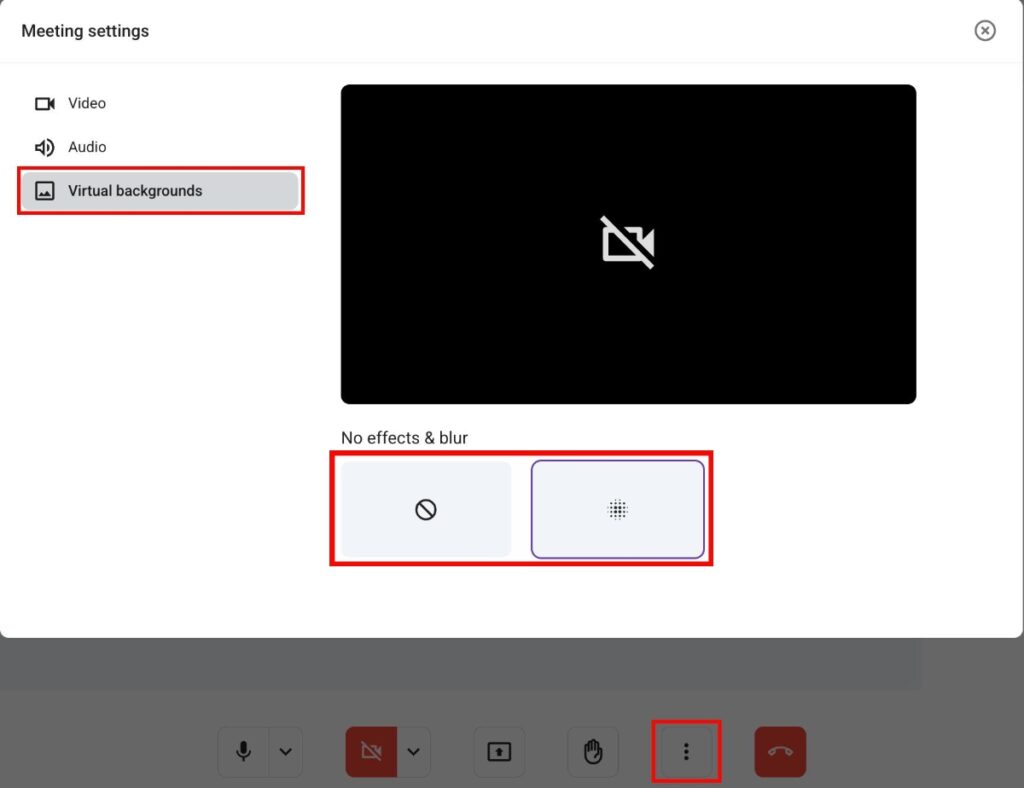
Pour garantir votre confidentialité ou pour rester le point focal lors d’un appel vidéo, vous avez la possibilité de flouter votre fond d’écran. Notez que cette fonction est accessible sur les navigateurs Chrome, Edge et Firefox.
Pour l’activer :
- Cliquez sur les trois points en bas de votre écran
- Sélectionnez Paramètres
- Dans Fond d’écran virtuel, sélectionnez Flouter le fond d’écran
Pour supprimer le flou :
- Cliquez sur les trois points en bas de votre écran d’appel
- Sélectionnez Paramètres
- Dans Fond d’écran virtuel, sélectionnez Aucun
Assurez-vous que vous disposez de la dernière version de votre navigateur et des autorisations appropriées.
Lever la main #
Cette fonctionnalité permet de maintenir l'ordre et de s'assurer que tout le monde a la possibilité de contribuer.
Pour lever ou baisser la main lors d'un appel :
- Cliquez sur l'icône Lever la main au bas de votre écran d'appel
- Cliquez à nouveau sur l'icône Lever la main pour baisser la main
Lever la main déclenche un effet sonore, affiche une icône de main levée à côté du nom du participant et un message d’alerte pour les autres. Une file d’attente des mains levées apparaît dans la barre latérale, accessible aussi via l’alerte.
- Appuyez sur l'icône Lever la main en bas de votre écran d'appel
- Appuyez à nouveau sur l'icône Lever la main pour baisser la main

Lever la main déclenche un son, affiche une icône à côté du nom du participant et un message toast pour les autres. La liste d’attente des membres ayant levé la main s’affiche dans la barre latérale, dans l’ordre chronologique.
Appuyer pour parler #
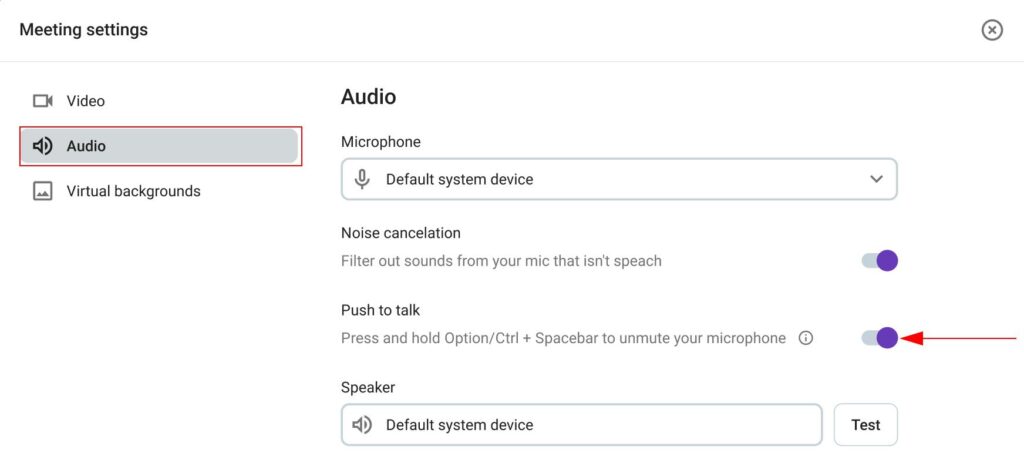
Appuyer pour parler vous permet de communiquer avec vos collègues pendant une réunion sans devoir couper votre microphone. Cette fonctionnalité est conçue pour fluidifier la communication et encourager une participation plus confiante aux appels.
Pour utiliser la fonctionnalité Appuyer pour parler, appuyez sur la touche espace et maintenez-la enfoncée (Windows et Mac).

La fonctionnalité Appuyer pour parler est désactivée par défaut, mais chaque utilisateur peut l'activer lui-même. Pour l'activer, suivez les étapes suivantes :
- Cliquez sur les trois points
- Ouvrez les Paramètres
- Sélectionnez Audio
- Appuyez sur le bouton Appuyer pour parler pour l'activer ou le désactiver
La fonctionnalité Appuyer pour parler est disponible pour les appels de groupe et les appels 1:1.
Vous ne pouvez utiliser la fonctionnalité Appuyer pour parler que lorsque la fenêtre/onglet de réunion de Pumble est en cours d'affichage.
Partager le lien de la réunion #
Pour partager le lien d'une réunion avec vos collègues :
1. Cliquez sur l’icône Ajouter des personnes en bas de l’écran d’appel
2. Cliquez sur Copier le lien
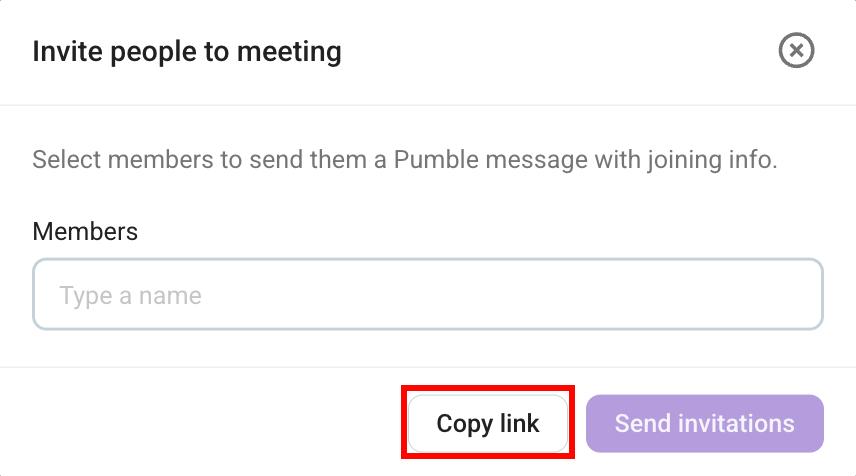
ou
1. Copiez l'URL de l'appel à partir du navigateur
Les liens de réunion sont une fonctionnalité payante. Consultez cet article pour apprendre à créer des liens de réunion.
Partager l’écran #
Le partage d’écran est une fonctionnalité payante qui permet aux utilisateurs des abonnements PRO et supérieurs de présenter des documents, des diapositives ou d’autres contenus aux participants d’un appel.
Pour partager votre écran :
- Cliquez sur l’icône Partager l’écran en bas de l’écran
- Sélectionnez l’écran (onglet du navigateur, fenêtre, écran entier) à partager
- Cliquez sur Partager pour terminer l’action
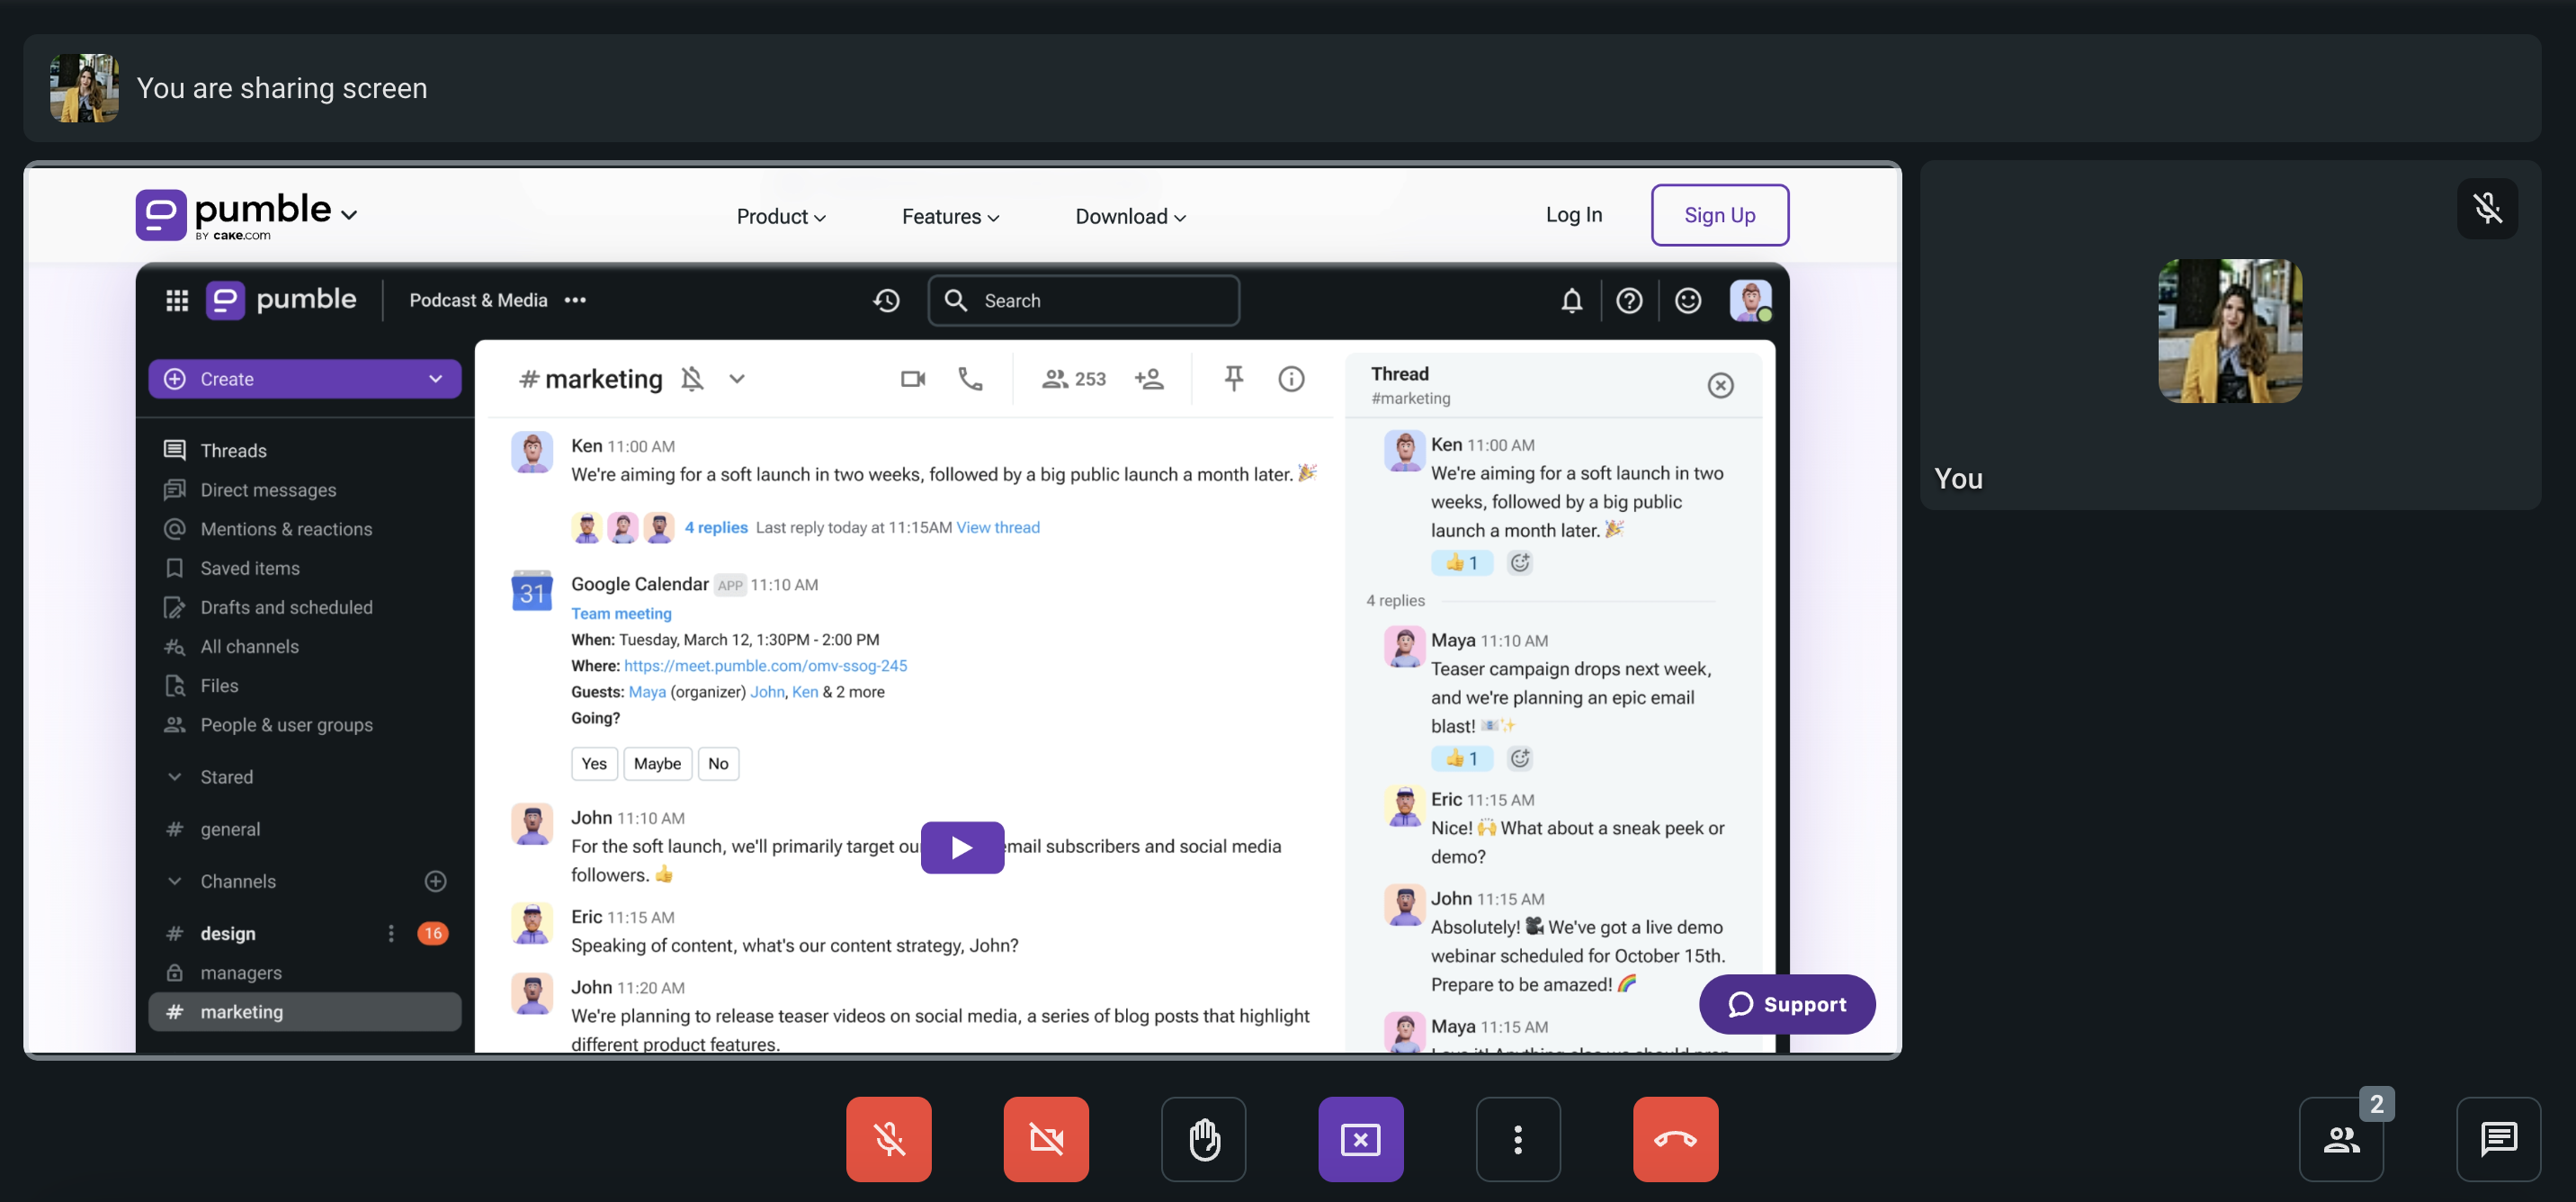
Pour arrêter le partage, cliquez sur le bouton Arrêter de partager en bas de l'écran d'appel.
N'oubliez pas d'accorder les autorisations du navigateur si vous y êtes invité.
Lorsqu’un écran est partagé, vous pouvez zoomer ou dézoomer. Pour ce faire, cliquez sur le bouton de zoom ou utilisez le raccourci clavier cmd + « +/- ».
- Appuyez sur les trois points en bas de votre écran
- Sélectionnez Démarrer le partage d'écran
- Sélectionnez Pumble dans la liste des applis
- Appuyez sur Démarrer le partage d’écran pour terminer l’action
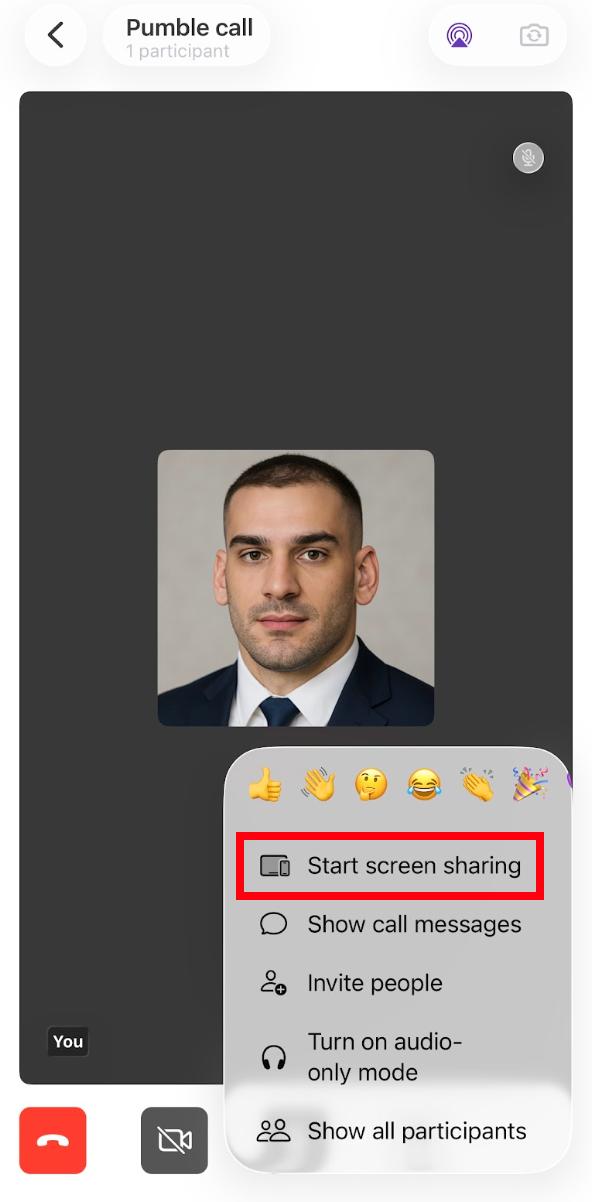
Pour arrêter le partage appuyez sur le bouton Arrêter le partage d’écran.
N'oubliez pas d'accorder les autorisations système si vous y êtes invité.
- Appuyez sur les trois points en bas de votre écran d’appel
- Sélectionnez Partager l’écran
- Cliquez sur Autoriser pour terminer l'action
Pour arrêter le partage, appuyez sur le bouton Arrêter le partage d’écran en bas de l’écran d’appel.
N'oubliez pas d'accorder les autorisations système si vous y êtes invité.
Un seul membre peut partager l'écran à la fois.
Envoyer et lire des messages #
Pendant les appels Pumble, vous pouvez envoyer et lire des messages visibles par tous les participants. Les messages envoyés avant votre arrivée ne sont pas visibles, et tous les messages disparaissent dès que vous quittez l’appel vidéo ou actualisez l’écran.
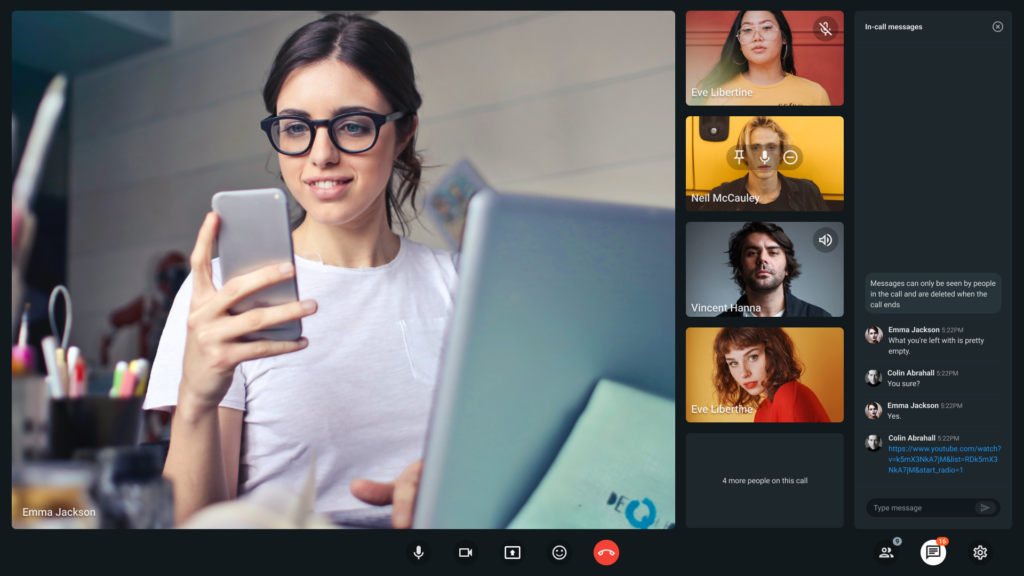
Pour accéder à la section des messages dans les appels Pumble, procédez comme suit :
- Cliquez sur l’icône de message située dans le coin inférieur droit de l’écran
- La liste de tous les messages apparaît dans la barre latérale droite
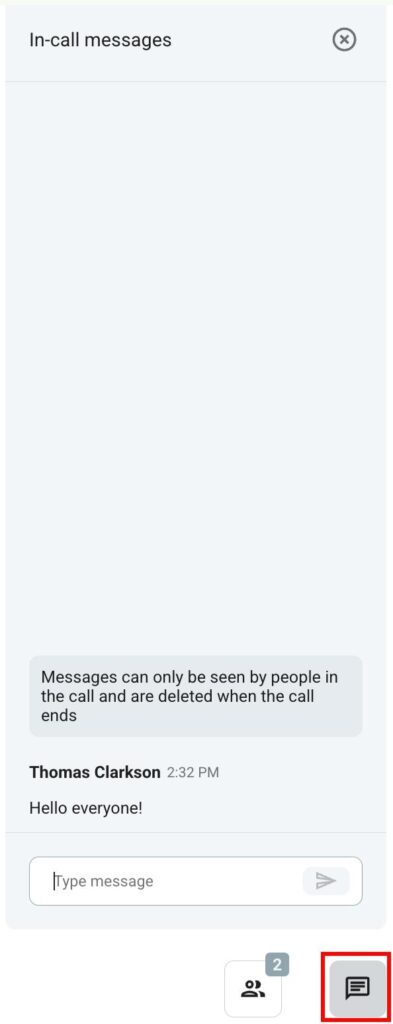
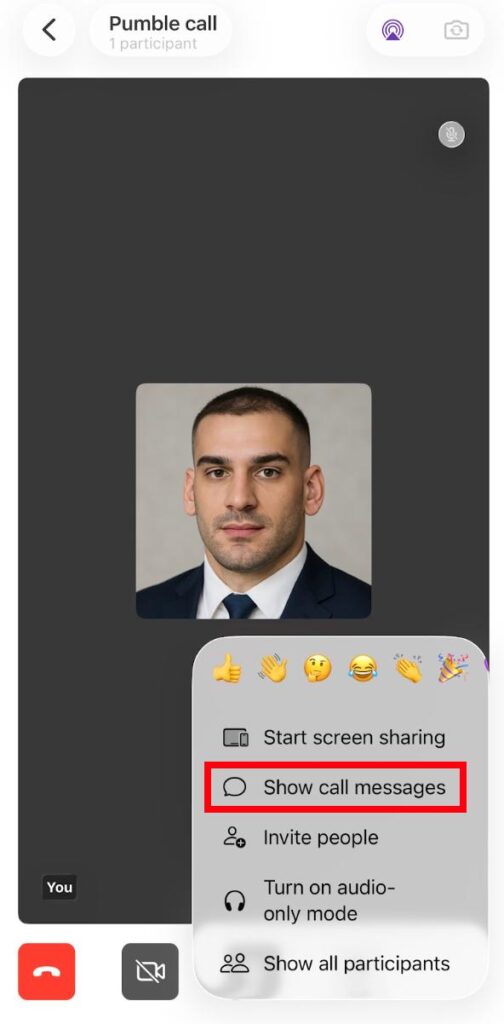
- Appuyez sur les trois points dans le coin inférieur droit
- Sélectionnez Afficher les messages d’appel
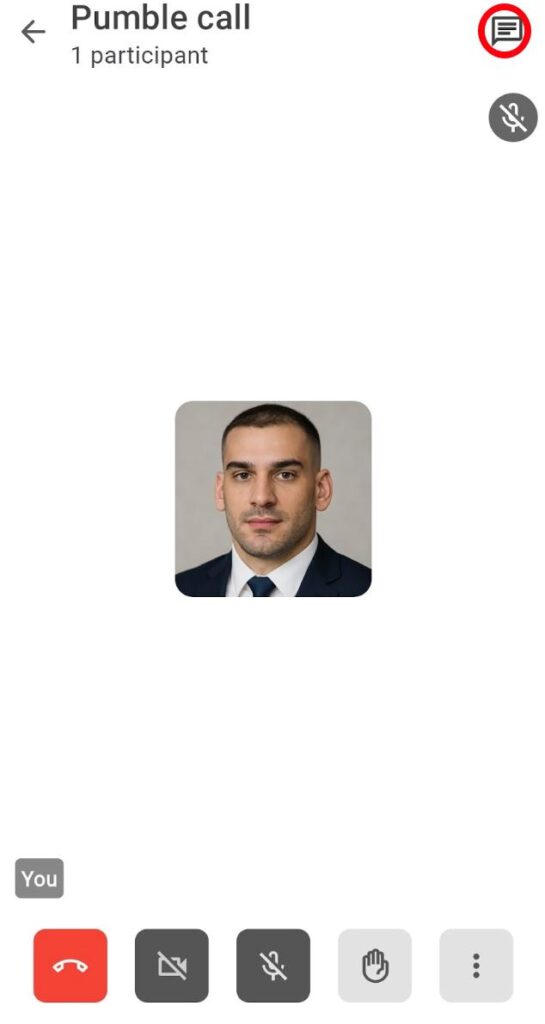
- Appuyez sur l’icône de message en haut de l’écran d’appel
- La liste de tous les messages s'affiche
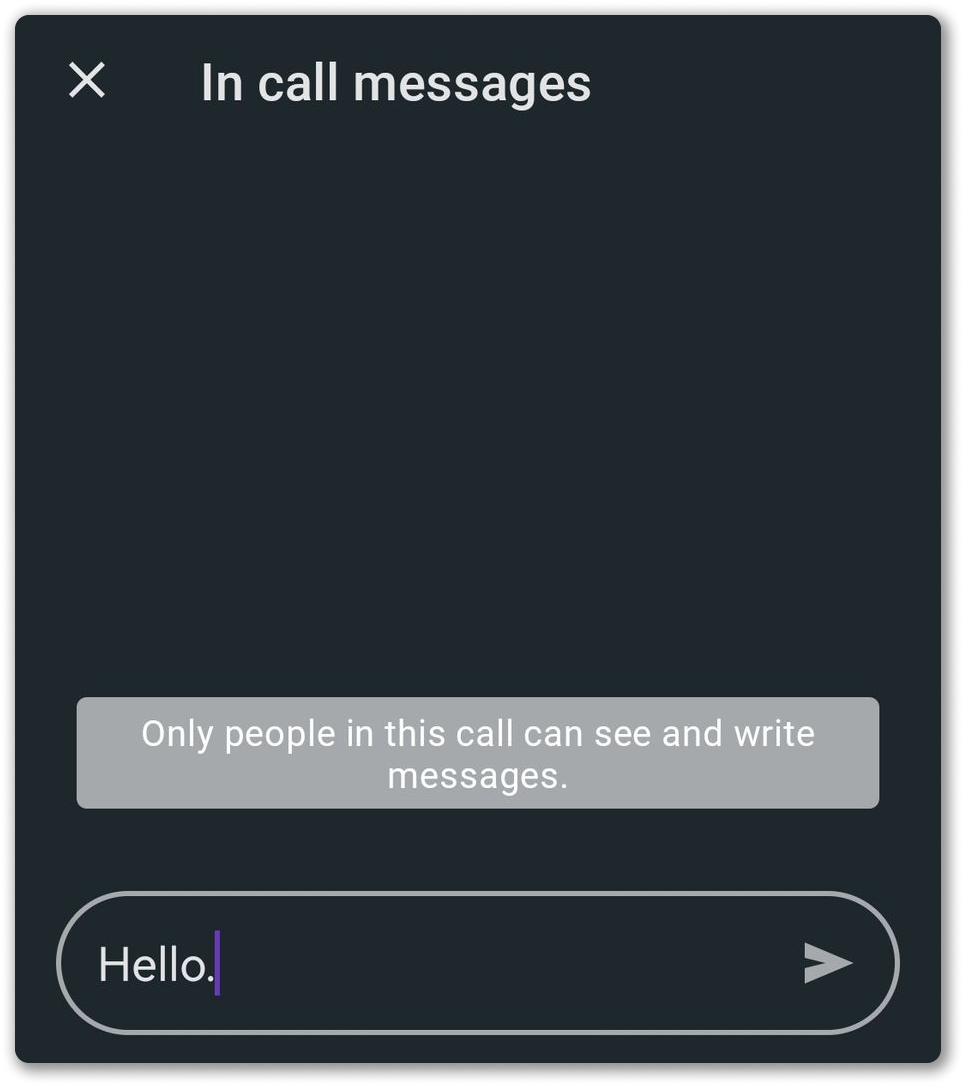
Pour envoyer des messages dans les appels Pumble, procédez comme suit :
- Cliquez sur l’icône de message située dans le coin inférieur droit de l’écran
- Saisissez votre message
- Cliquez sur le bouton Envoyer ou appuyez sur la touche Entrée pour envoyer le message
Un message non envoyé restera à l'état de brouillon jusqu'à la fin de l'appel.
- Appuyez sur les trois points dans le coin inférieur droit
- Sélectionnez Afficher les messages d’appel
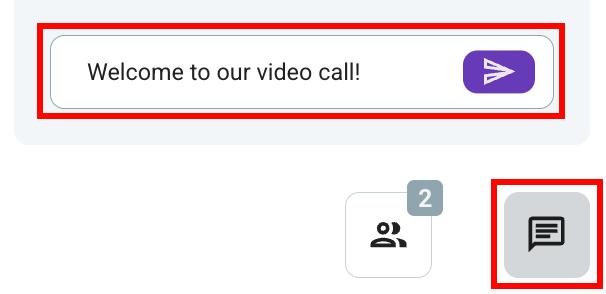
- Saisissez votre message
- Appuyez sur l’icône d’envoi pour envoyer le message
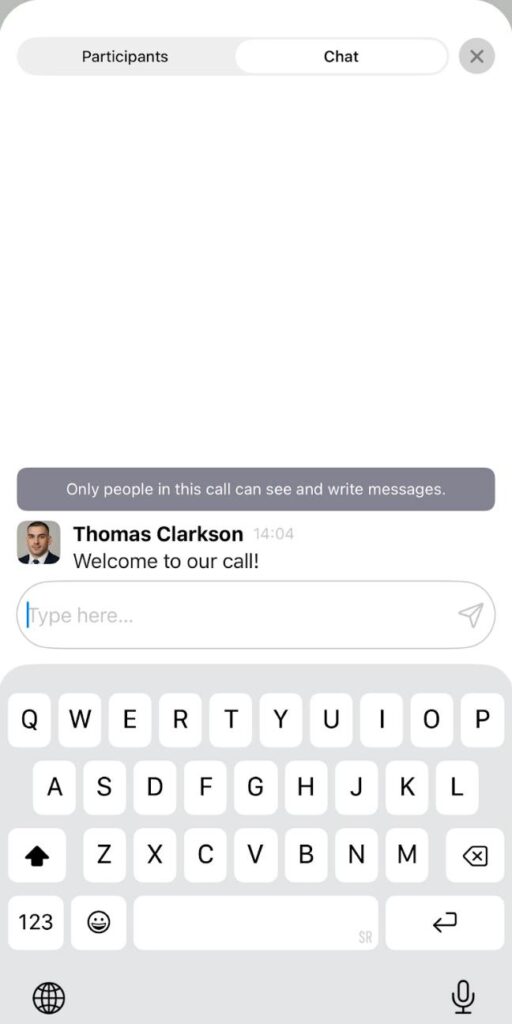
- Appuyez sur l’icône de message en haut de l’écran
- Saisissez votre message
- Appuyez sur le bouton d’envoi pour terminer l’action
Vous pouvez envoyer des messages de 1000 caractères maximum pendant les réunions.
Ajouter une réaction #
Que vous participiez à une réunion d’équipe ou à une conversation individuelle, les réactions vous aident à participer sans interrompre la conversation.
Les réactions aux réunions ne sont disponibles que les appels de groupe et ne sont pas prises en charge pour les appels 1:1.
Les propriétaires et les administrateurs peuvent activer/désactiver les réactions aux réunions.
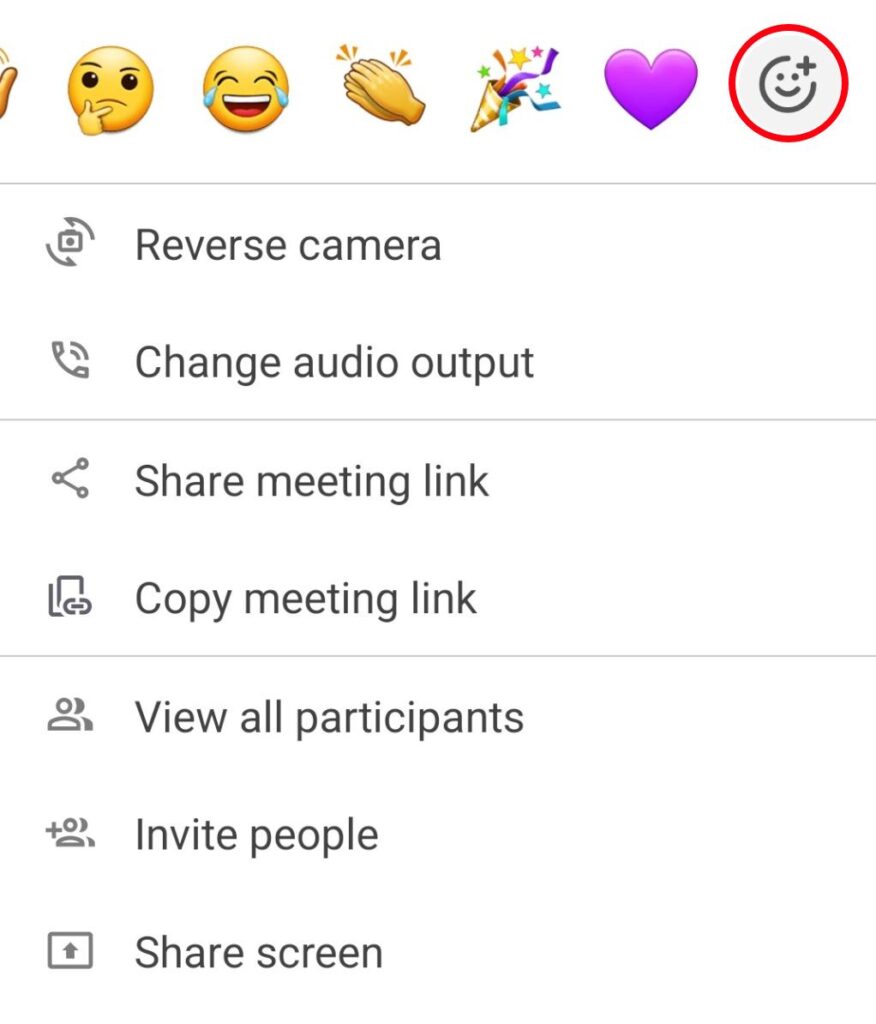
Accédez aux Réactions en cliquant sur le bouton Réactions dans la fenêtre modale au bas de votre écran, ou en appuyant sur le raccourci R. À partir de là, choisissez parmi une gamme d'emojis prédéfinis (👍, 👎, 🤔, 😂, 👏, 🎉, 💜).

Pour ajouter des réactions différentes :
- Sélectionnez le sélecteur d'emoji
- Cliquez sur l'emoji que vous souhaitez utiliser
- Fermez le sélecteur d'emoji en cliquant sur le bouton de réaction ou en appuyant sur ESC
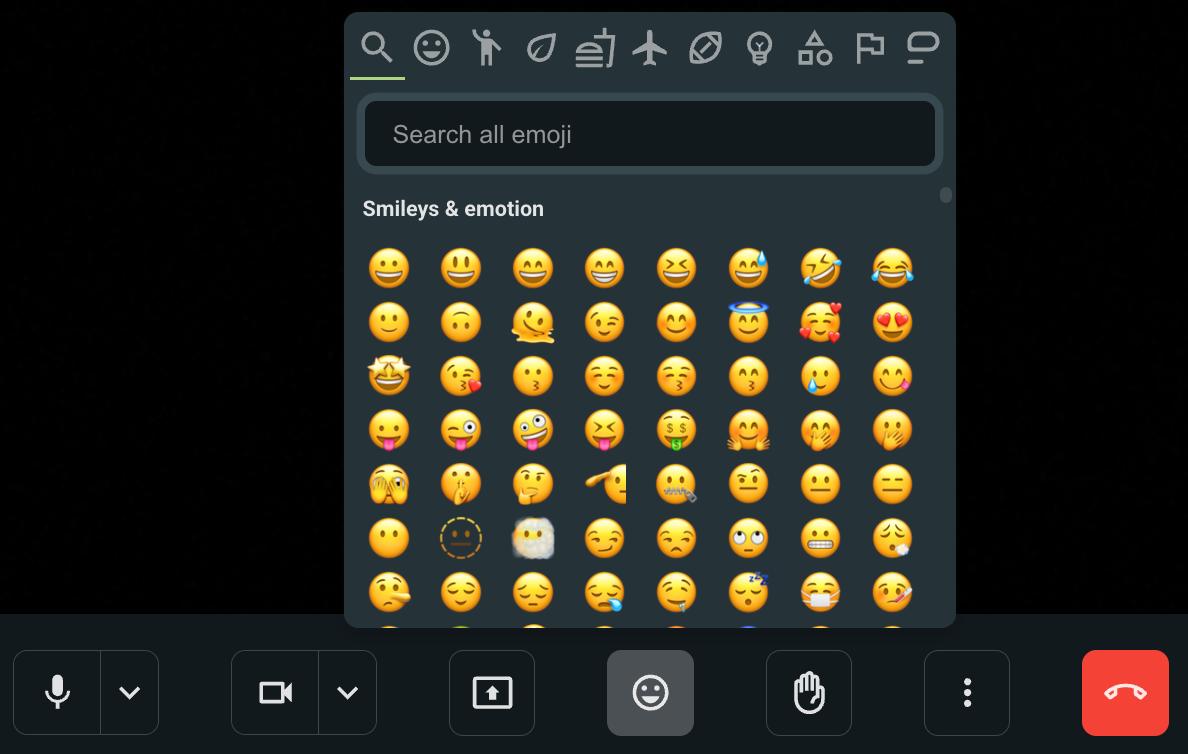
Les réactions apparaissent sous forme d'animations flottantes (par défaut) dans le coin inférieur gauche de l'écran.
Pour désactiver les animations flottantes :
- Accédez aux Paramètres de la réunion
- Sélectionnez Réactions
- Décochez l'option Afficher les animations à l'écran
Si plusieurs utilisateurs envoient des réactions en même temps, les réactions apparaîtront l'une après l'autre.
Les réactions aux réunions sont activées par défaut.
Pour désactiver les réactions en réunion :
- Allez dans les Paramètres de l'espace de travail
- Sélectionnez Autorisations
- Faites défiler vers le bas jusqu'à la section Réunion
- Activez ou désactivez les Réactions dans les réunions
- Appuyez sur les trois points en bas de votre écran d'appel
- Appuyez pour sélectionner l’une des réactions en haut de la fenêtre modale
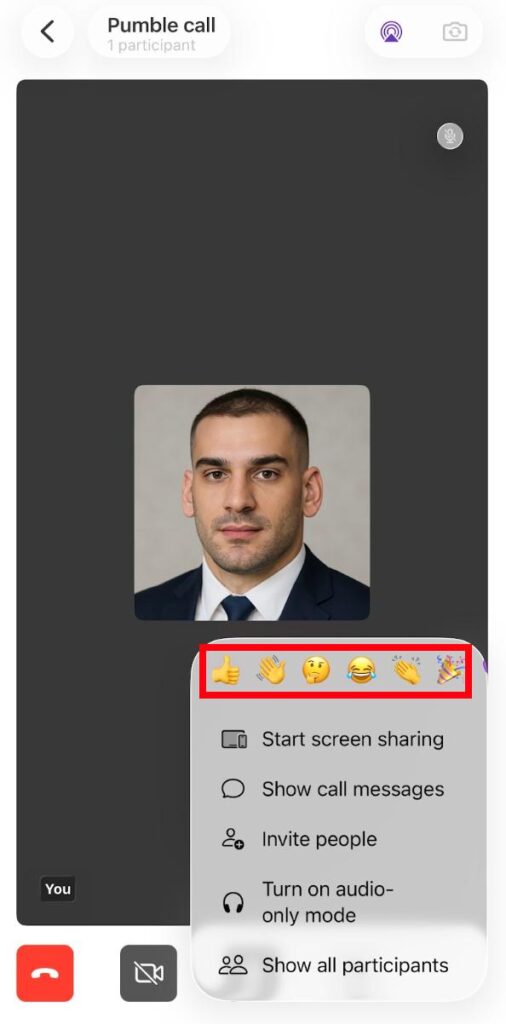
La réaction apparaîtra sous forme de réaction flottante à l’écran.
- Appuyez sur les trois points en bas de votre écran d'appel
- Une fenêtre modale apparaît avec un sélecteur de réactions en haut
- Parcourez les réactions à accès rapide disponibles
- Appuyez pour en sélectionner un
La réaction apparaîtra sous forme de réaction flottante à l’écran.
Pour afficher une liste complète d’emojis, faites défiler jusqu’à la fin de la liste et appuyez sur le bouton pour ouvrir un sélecteur d’emojis complet.
Les réactions flottantes apparaissent dans le coin inférieur gauche de l'écran et durent quelques secondes.
Plusieurs utilisateurs peuvent ajouter des réactions en même temps et les réactions s’affichent les unes sur les autres.
Masquer ma propre image #
Pour masquer votre vue personnelle et vous concentrer uniquement sur les autres participants à l'appel, procédez comme suit :
- Cliquez sur les trois points en bas de l’écran
- Sélectionnez Masquer ma propre image pour terminer l’action
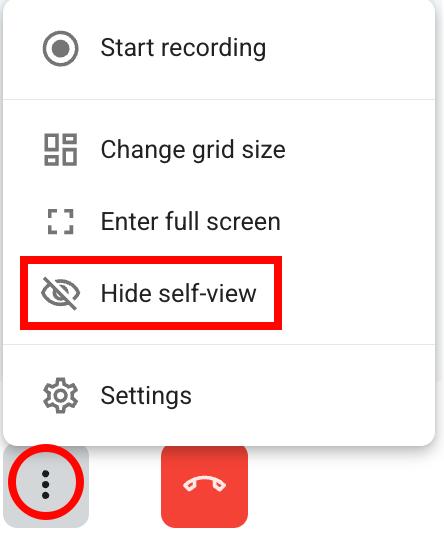
Même si vous masquez votre vue personnelle pendant un appel, il est important de noter que les autres participants verront toujours votre écran vidéo.
Afficher en plein écran #
Pour vous immerger dans une réunion sans distraction, activez l’affichage en plein écran. Pour ce faire :
- Cliquez sur les trois points en bas de l’écran
- Sélectionnez Accéder au plein écran
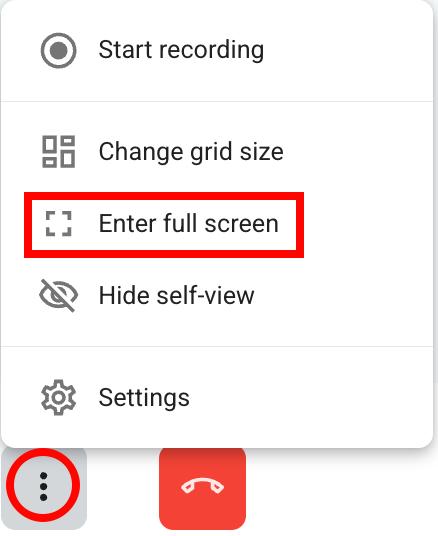
Pour quitter le plein écran, cliquez sur les trois mêmes points et sélectionnez Quitter le plein écran.
Ajouter des membres à l’équipe #
Si vous devez inviter des membres de l’équipe qui ne font pas partie du canal dans lequel l’appel a été lancé, ou ajouter de nouveaux participants à l’appel, procédez comme suit :
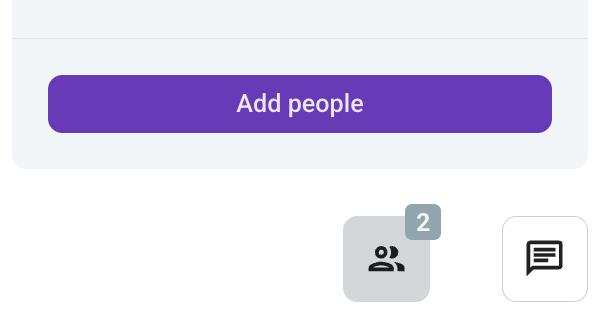
- Cliquez sur l’icône des personnes en bas de l’écran d’appel
- Cliquez sur Ajouter des personnes
- Saisissez leur nom ou sélectionnez les utilisateurs dans le menu déroulant
- Cliquez sur Envoyer les invitations et ils recevront un message Pumble avec une invitation à rejoindre l’appel
ou
- Cliquez sur copier le lien pour copier le lien de l'appel et le partager avec les collègues sur Pumble
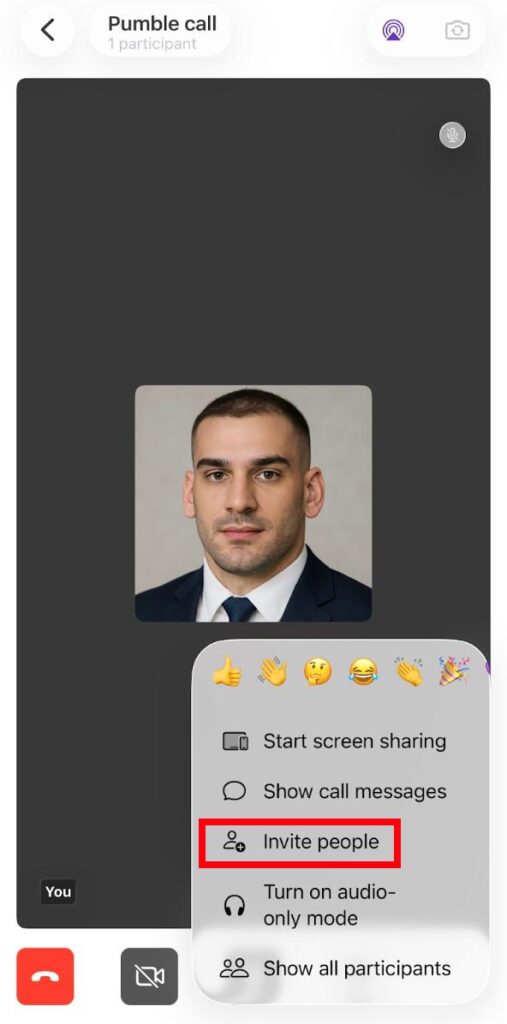
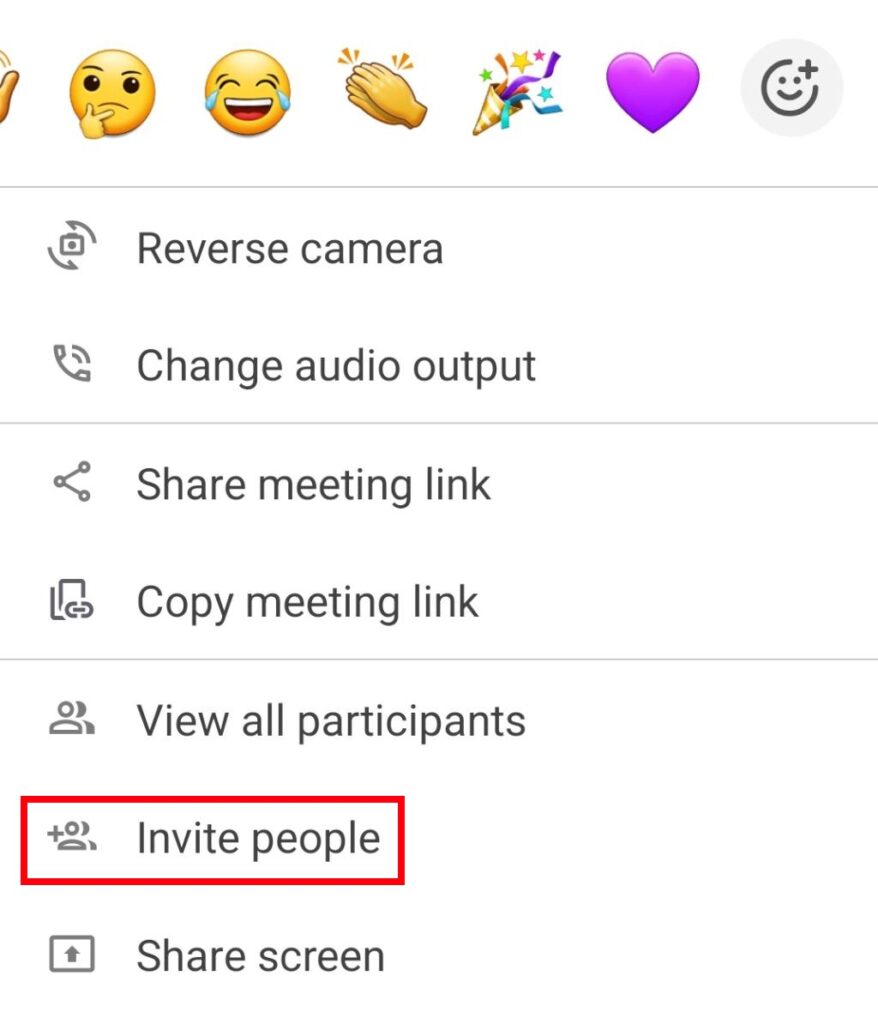
- Appuyez sur les trois points dans le coin inférieur droit
- Sélectionnez Inviter des personnes
- Sélectionnez l’utilisateur et appuyez sur Inviter à rejoindre à côté de leur nom
- Appuyez sur les trois points dans le coin inférieur droit
- Sélectionnez Inviter des personnes
- Sélectionnez l’utilisateur et appuyez sur Inviter à rejoindre à côté de leur nom
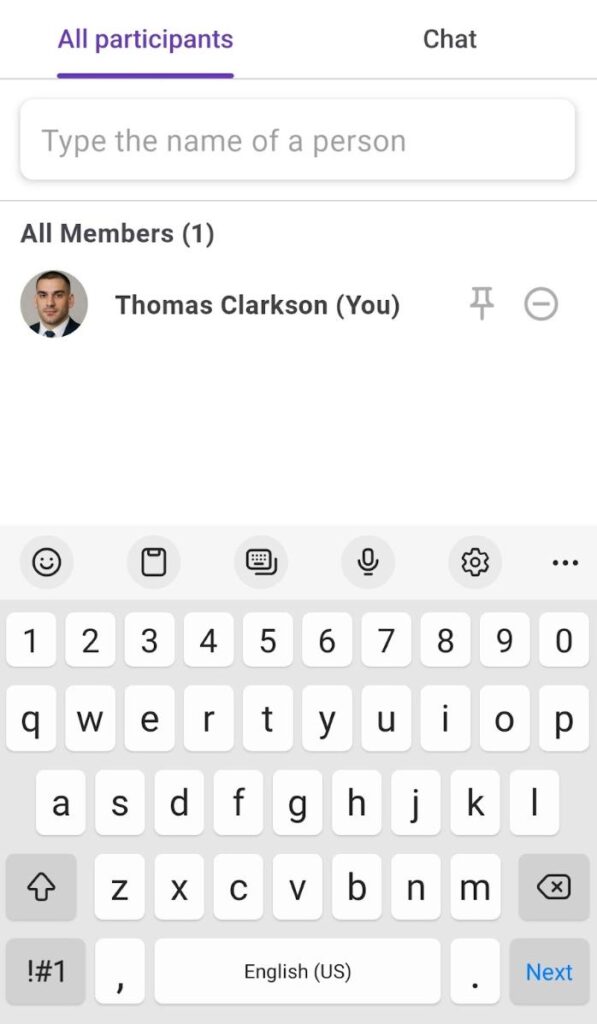
Rechercher des participants à l’appel #
Pour localiser rapidement des participants spécifiques à un appel, utilisez la fonctionnalité de recherche :
- Cliquez sur l’icône Tout le monde dans le coin inférieur droit de l’écran
- Saisissez le nom de la personne que vous recherchez dans la barre de recherche
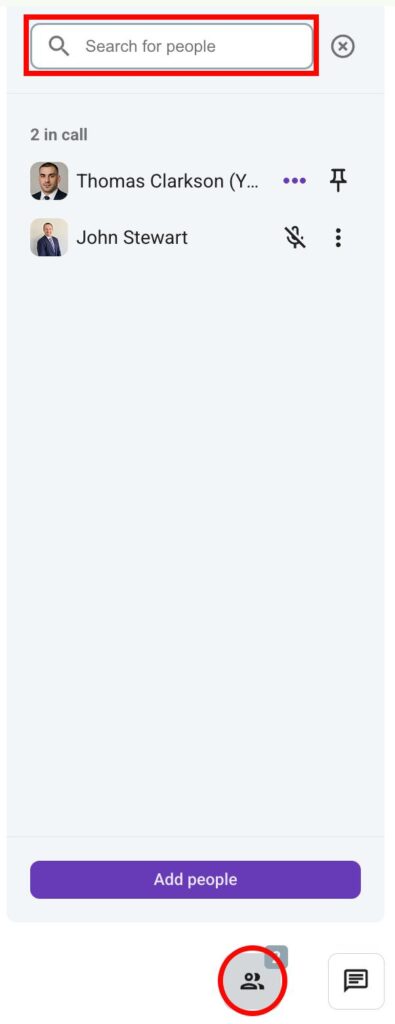
Pumble filtrera les participants en conséquence. Lorsque vous cliquez sur l'icône Tout le monde, une barre latérale contenant la liste de tous les participants s'affiche.
- Appuyez sur les trois points dans le coin inférieur droit
- Sélectionnez Afficher tous les participants
- Saisissez le nom de la personne que vous recherchez dans la barre de recherche
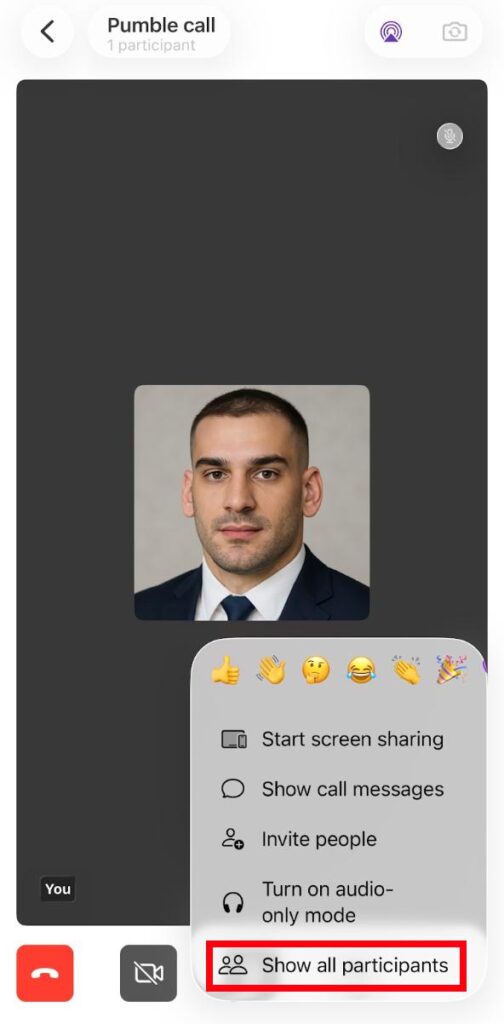
Pumble filtrera les participants en conséquence.
- Appuyez sur les trois points dans le coin inférieur droit
- Sélectionnez Afficher tous les participants
- Saisissez le nom de la personne que vous recherchez dans la barre de recherche
Pumble filtrera les participants en conséquence.
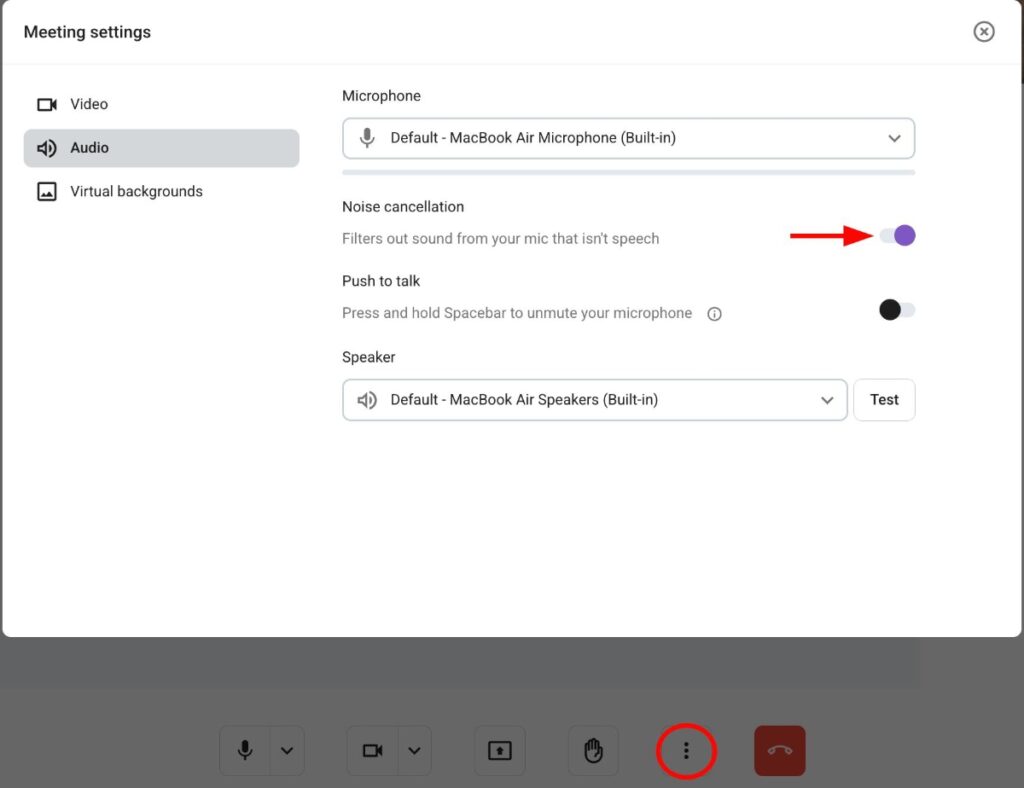
Réduire le bruit #
Les espaces de travail avec un abonnement PRO disposent d’une fonctionnalité de réduction automatique du bruit lors des appels.
Pour gérer la réduction du bruit :
- Cliquez sur les trois points en bas de l’écran
- Sélectionnez Paramètres
- Ouvrez la section Audio
- Activez ou désactivez le bouton radio pour activer ou désactiver l'annulation du bruit
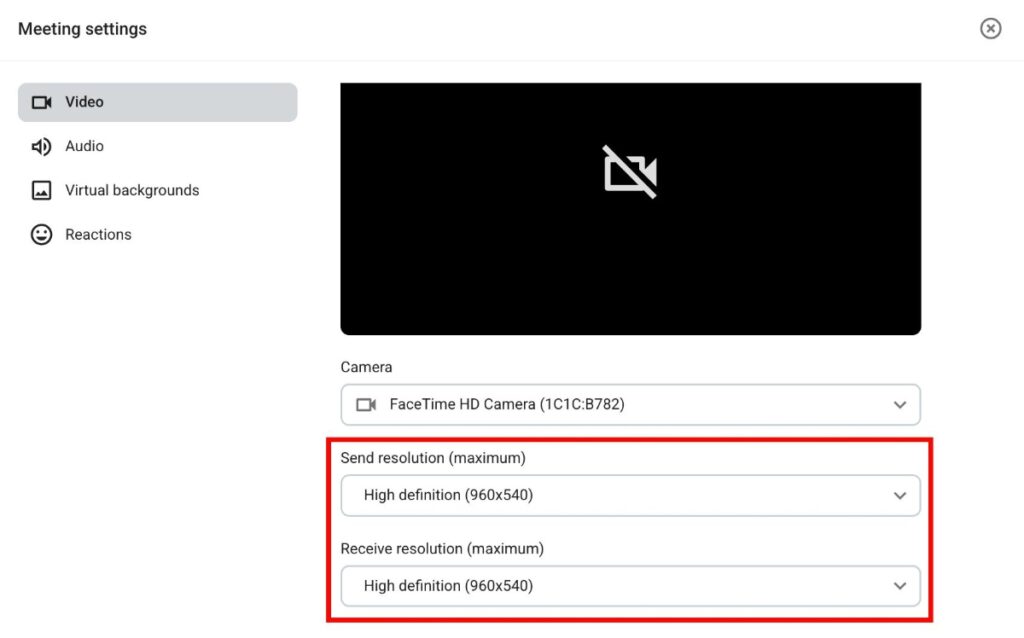
Définir la résolution d’envoi/réception #
Pumble permet d’ajuster les résolutions d’envoi et de réception pour gérer la qualité des appels vidéo. Baissez la résolution pour des appels fluides en cas de faible réseau, ou augmentez-la pour une communication claire avec une connexion robuste. Pour définir la résolution d’envoi/de réception :
- Cliquez sur les trois points en bas de l’écran
- Sélectionnez Paramètres
- Ouvrez la section Vidéo
- Sélectionnez le paramètre de Résolution d'envoi dans la liste déroulante (haute, moyenne, basse définition)
- Sélectionnez la Résolution de réception dans le menu déroulant (haute, moyenne, basse définition ou audio uniquement)
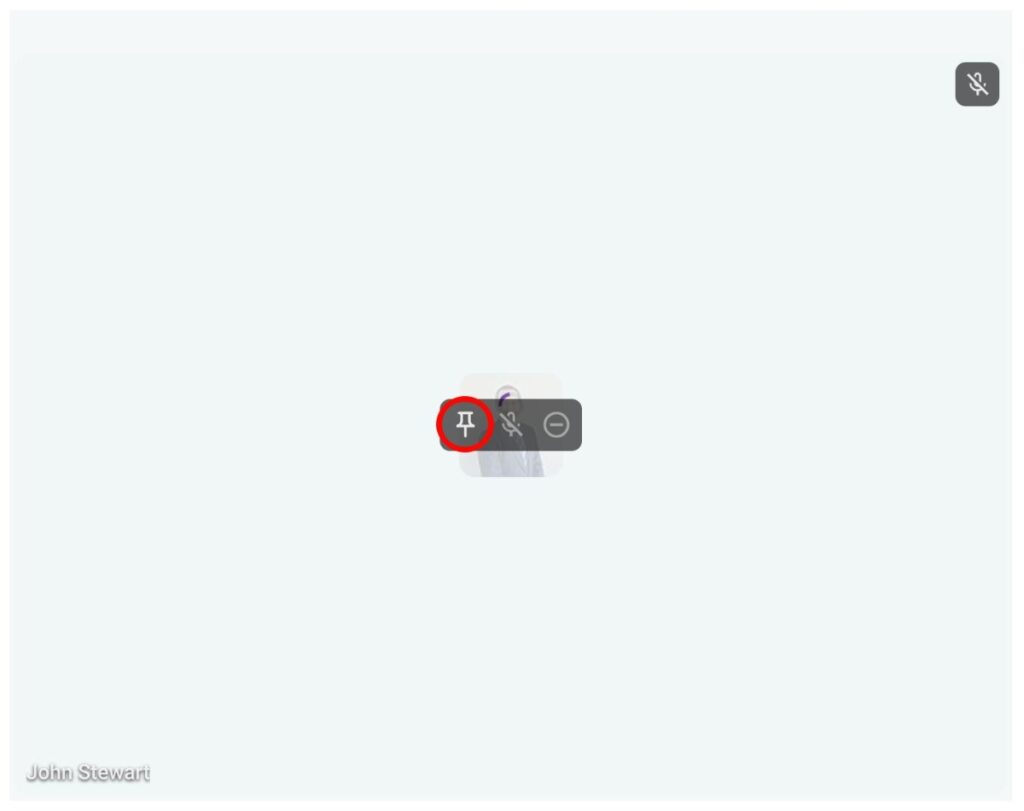
Épingler à l’écran principal #
Vous pouvez épingler un participant spécifique à l'écran principal afin de garder sa vidéo ou son contenu au premier plan. Pour ce faire :
- Passez la souris sur la vidéo ou le contenu du participant
- Cliquez sur l’icône d’épinglage
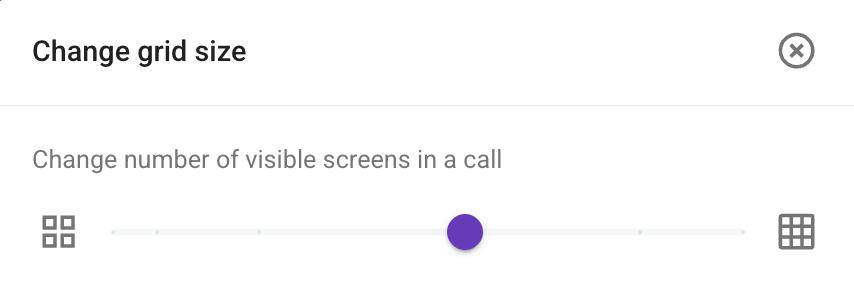
Modifier la disposition de la grille #
Vous pouvez ajuster la taille de la grille d’appel pour mieux vous concentrer dans les appels encombrés. La taille par défaut est de 15 carreaux, mais vous pouvez définir le nombre de carreaux en fonction de vos besoins. Pour ce faire :
- Cliquez sur les trois points en bas de l’écran
- Sélectionnez Modifier la taille de la grille
- Ajustez le curseur pour modifier le nombre de carreaux
- Cliquez sur X pour terminer l’action
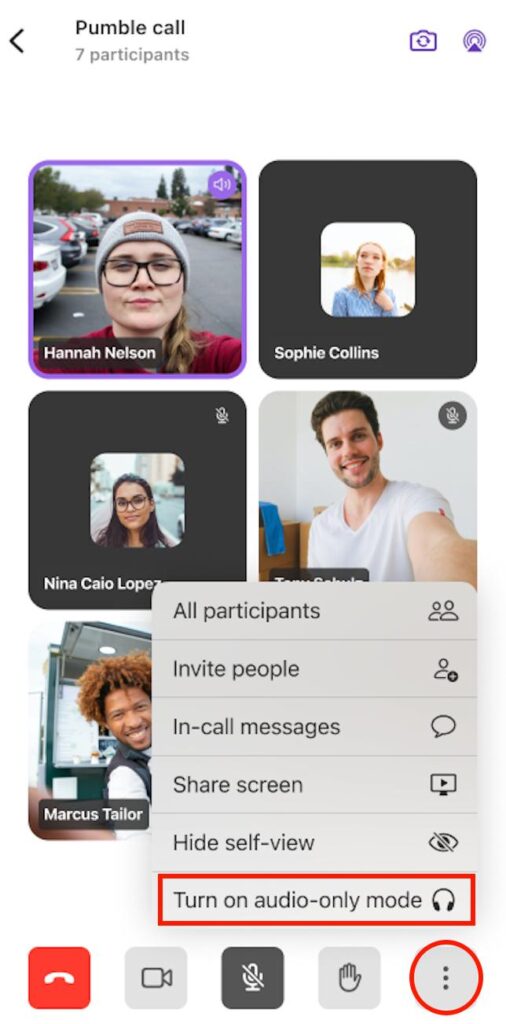
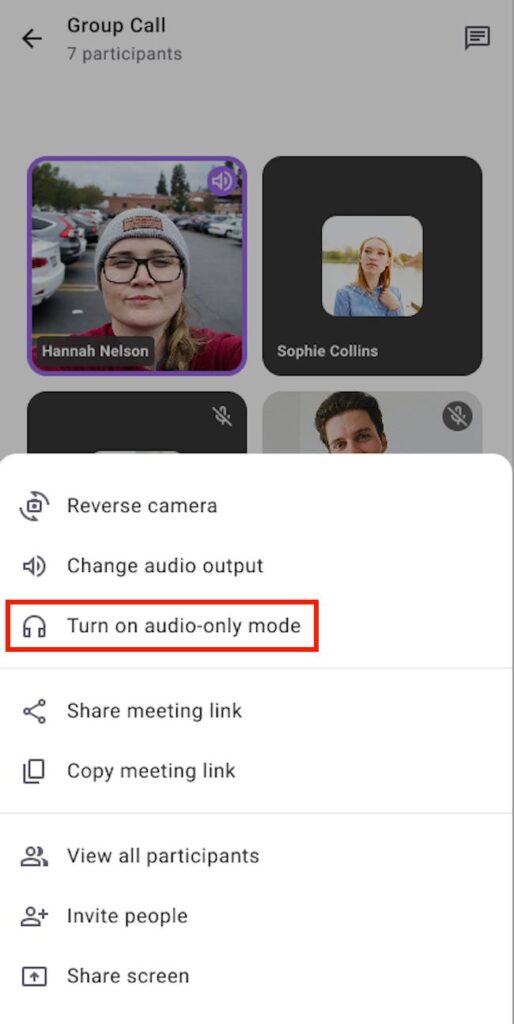
Mode audio seul #
Sur Pumble mobile (Android/iOS), activez le mode audio uniquement pour désactiver la vidéo des autres (votre vidéo reste active). Cela améliore les performances et réduit l’utilisation des données cellulaires.
Voici comment procéder :
- Appuyez sur les trois points dans le coin inférieur droit
- Appuyez sur Activer le mode audio seul
- Appuyez sur les trois points dans le coin inférieur droit
- Appuyez sur Activer le mode audio seul
Quitter l’appel #
Pour quitter l’appel, cliquez sur le bouton Quitter l’appel en bas de l’écran d’appel.

Raccourcis #
- Allumer ou éteindre la caméra : Ctrl/Cmd + E ou appuyez sur V
- Désactiver ou activer le microphone : Ctrl/Cmd + ou appuyez sur M
- Ajouter une réaction : appuyez sur R
- Masquer ou afficher les participants : Ctrl + Alt/Cmd + P
- Créer une nouvelle réunion : Ctrl/Cmd + Maj + M
- Créer une nouvelle réunion (Navigateur) : Ctrl/Cmd + Option/Alt + Maj + M
- Lever/baisser la main : appuyez sur H