 Atualizado: 29 de setembro de 2025
 Uma boa comunicação em equipe facilita o trabalho em equipe, tanto no escritório quanto remotamente. Com a interface clara e os recursos de bate-papo em tempo real do Pumble, as equipes podem se conectar instantaneamente. Ao ter toda a comunicação e colaboração em um só lugar, as equipes podem se manter transparentes e produtivas, independentemente de quando ou onde trabalhem.
O Pumble, da CAKE.com é um aplicativo de mensagens corporativas que facilita muito a comunicação entre equipes presenciais, híbridas e remotas. Usar o Pumble evita que você fique preso em intermináveis conversas por texto ou e-mail. Além disso, o Pumble está disponível diversas plataformas, incluindo macOS, Linux e Windows, garantindo ampla compatibilidade para usuários de diferentes sistemas operacionais.
Neste guia, apresentaremos a comunicação em equipe no Pumble e destacaremos sua importância para o sucesso do trabalho em equipe.
A seguir, apresentaremos uma visão geral dos principais recursos do Pumble que facilitam a comunicação eficaz da equipe:
- Canais
- Threads
- Videoconferência
- Mensagens de voz e vídeo
- Mensagens agendadas
- Pesquisa
- Notificações
- Convidados
Vamos nos concentrar nos principais benefícios do Pumble para comunicação em equipe e oferecer algumas dicas sobre como começar a ter uma comunicação eficaz.

Etapa 1: Crie sua sede digital
Como em qualquer aplicativo, você precisará seguir alguns passos para configurar tudo e começar sua experiência com o Pumble com sucesso:
- Crie uma conta
- Convide os membros da sua equipe
- Configure os canais necessários
Crie uma conta no Pumble
O primeiro passo na sua experiência com o Pumble é criar um espaço de trabalho. Como o Pumble faz parte do pacote CAKE.com, a primeira coisa que você precisa fazer é criar uma conta na CAKE.com. Após criá-lo, você terá acesso a outros aplicativos do CAKE.com: Clockify e Plaky.
Após concluir a configuração da sua conta CAKE.com, você pode começar a criar seu espaço de trabalho no Pumble. Para facilitar o processo, o Pumble oferece aplicativos para Windows, Mac e Linux, além de versões para dispositivos móveis iOS e Android.
Após baixar os aplicativos desejados, insira seu endereço de e-mail como primeiro passo ou simplesmente continue com o Google. Se estiver usando seu endereço de e-mail, verifique sua caixa de entrada, onde receberá um código de verificação (que conecta sua conta de e-mail ao espaço de trabalho) e insira-o no modal.
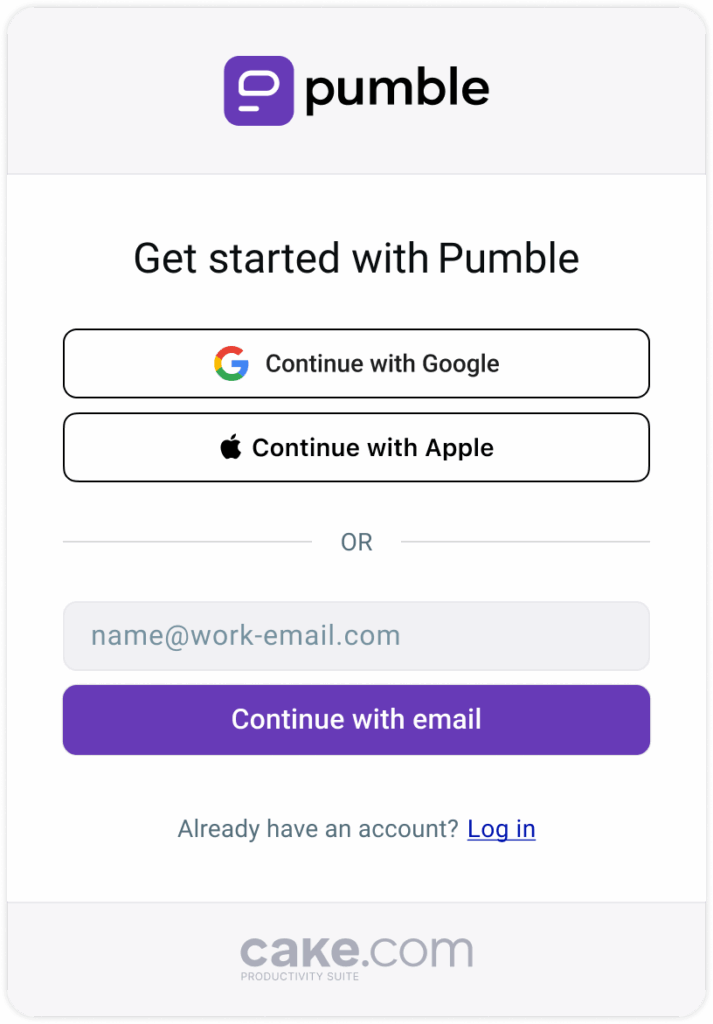
Agora, insira o nome da sua empresa/equipe e clique em Criar Espaço de trabalho.
Pronto! Agora você tem seu espaço de trabalho no Pumble e seus primeiros canais: #geral e #aleatório.
Você pode continuar configurando seus canais, perfil e informações principais.
Convide os membros da sua equipe
Convidar os membros da sua equipe para o seu espaço de trabalho no Pumble é rápido e fácil. No aplicativo para desktop ou web, clique no nome do seu espaço de trabalho no canto superior esquerdo e selecione "Convidar Pessoas". No aplicativo para dispositivos móveis, toque no ícone de menu e selecione "+Convidar Pessoas".
Agora você pode escolher como convidar sua equipe. Há duas maneiras: por e-mail e por meio de um link.
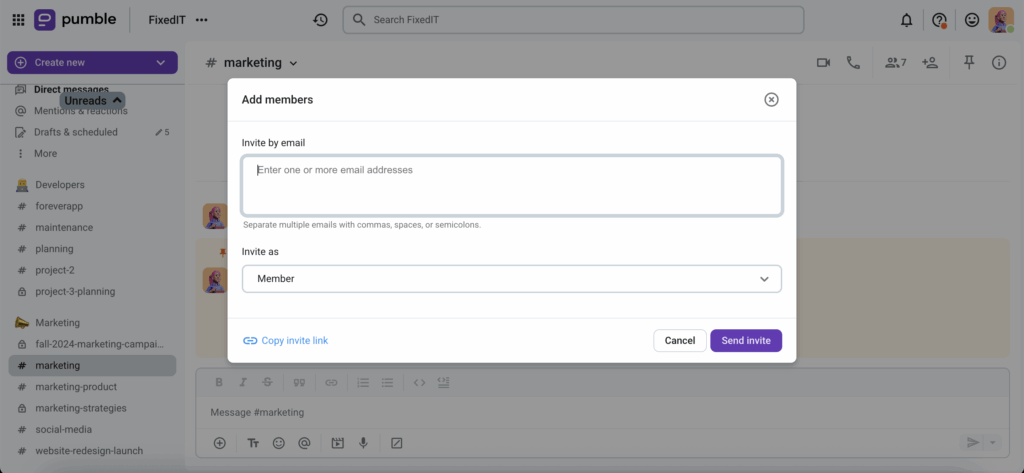
Se escolher e-mail, insira os endereços de e-mail das pessoas que deseja adicionar e clique em "Enviar Convite".
A outra opção é convidar as pessoas por meio de um link. Copie o link e compartilhe-o com sua equipe por chat, e-mail ou qualquer outro canal.
🎓 Dica profissional do Pumble
Use o link de convite quando quiser adicionar rapidamente um grupo maior de pessoas.
Configure os canais necessários
Agora que você criou seu espaço de trabalho e tem seus dois canais padrão, é hora de criar mais canais. Você pode criar canais que atendam às suas necessidades e dividi-los em categorias dedicadas a projetos, equipes ou qualquer outra categoria que considere importante para o seu negócio.
O Pumble possui dois tipos de canais.
Os canais públicos são abertos a todos na organização, enquanto os canais privados são restritos a membros convidados selecionados.
Essa estrutura permite que as equipes equilibrem transparência e confidencialidade, garantindo que as pessoas certas tenham acesso às informações adequadas.
Um dos principais benefícios dos canais é que eles permitem que os membros da equipe encontrem e respondam a informações essenciais de forma rápida e eficiente.
Os canais ajudam a centralizar todas as conversas sobre um projeto ou tarefa específica, facilitando a comunicação com os membros da equipe sobre os últimos desenvolvimentos. Os canais também facilitam o acesso a informações específicas, permitindo que os membros da equipe encontrem rapidamente o que precisam sem precisar navegar por cadeias de e-mail confusas.
Etapa 2: Organize as Conversas com os Canais
Uma das maiores vantagens do Pumble é a capacidade de organizar a comunicação da equipe em canais.
Ao contrário das mensagens diretas, que são mais adequadas para conversas individuais ou em pequenos grupos, os canais do Pumble oferecem um espaço dedicado para discussões temáticas.
O uso de canais no Pumble ajuda as equipes a manter o foco, colaborar e manter informações importantes acessíveis a quem precisar.
Alguns benefícios gerais do uso de canais:
- Comunicação transparente e centralizada, acessível a membros atuais e futuros da equipe
- Histórico de mensagens e arquivos permanente e pesquisável
- A navegação nos canais permite que todos descubram canais públicos para participar
Por que os Canais São Importantes para a Comunicação da Equipe
Quando todas as conversas ocorrem em canais privados ou mensagens diretas, encontrar informações rapidamente se torna difícil.
Os canais resolvem esse problema agrupando mensagens, arquivos e discussões em torno de tópicos, projetos ou equipes específicas.
Essa estrutura ajuda a:
- Reduzir a interferência, separando conversas informais de atualizações relacionadas ao projeto;
- Facilitar a integração de novos membros da equipe, pois eles podem revisar o histórico do canal;
- Incentivar a colaboração entre departamentos sem perder o foco.
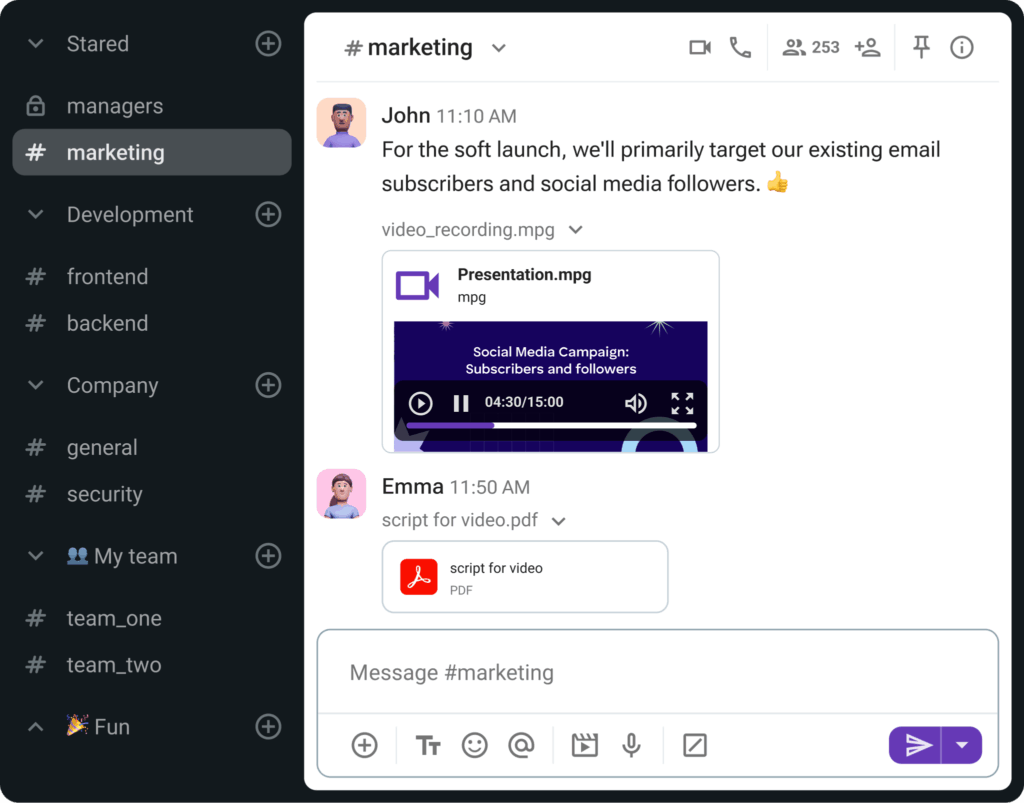
Os canais públicos no Pumble podem ser acessados por meio de "Todos os Canais" na barra lateral. Todos os membros da equipe podem ingressar nos canais públicos e acessar todas as informações publicadas neles.
Dessa forma, os canais públicos promovem a transparência, garantindo um compartilhamento de conhecimento mais eficiente dentro de uma organização. Eles são usados para a comunicação da equipe sobre um componente específico do projeto, como marketing. Por exemplo, todas as discussões sobre o progresso do marketing do projeto ocorrem no canal #marketing.
Por outro lado, os canais privados, são destinados para conversas sensíveis e confidenciais. Somente aqueles que são convidados podem visualizar o canal ou encontrar seu conteúdo na pesquisa. Para ingressar em um canal privado, é necessário ser adicionado por um membro existente do canal. Mensagens ou arquivos postados em um canal privado só podem ser pesquisados por membros desse canal.
🎓 Dica profissional do Pumble
Ao criar um canal, você pode decidir se ele será público ou privado. Somente o proprietário ou administrador pode alterá-lo de público para privado e vice-versa.
Melhores Práticas para Nomear Canais
Usar nomes de canais claros é essencial para tornar seu espaço de trabalho intuitivo. Um bom sistema de nomenclatura garante que qualquer pessoa possa encontrar rapidamente o canal certo e entender sua finalidade.
Aqui estão algumas práticas recomendadas:
- Use prefixos para categorizar canais. Por exemplo: equipe - para canais departamentais (equipe-marketing), diversão - para conversas sociais ou não relacionadas ao trabalho (diversão-música)
- Mantenha os nomes curtos e descritivos para que sejam fáceis de ler (limite de 80 caracteres)
- Evite duplicatas para evitar confusão
- Estabeleça regras para nomear espaços de trabalho para que todos possam seguir o mesmo protocolo
Ter nomes consistentes e intuitivos facilitará muito a navegação pelos canais do Pumble.
Gerenciamento de Canais
Criar canais é apenas o começo. Para aproveitar ao máximo os canais do Pumble, você também precisa gerenciá-los com eficácia. O gerenciamento de canais garante que as conversas permaneçam organizadas, acessíveis e relevantes ao longo do tempo.
No Pumble da CAKE.com, qualquer membro que não seja convidado pode criar canais públicos e privados.
Ao criar um novo canal, você irá dar um nome e, opcionalmente, uma descrição. Embora a descrição possa parecer um detalhe insignificante, ela ajuda os novos membros a entenderem imediatamente o propósito do canal.
Após a criação de um canal, os membros podem começar a enviar mensagens, compartilhar arquivos, participar de chamadas e colaborar em um só lugar.
Com o tempo, o propósito de um canal pode mudar. Por exemplo, o que começou como um espaço temporário para um projeto pode se tornar um canal departamental de longo prazo. Nesses casos, o Pumble permite que você edite o nome e a descrição do canal para refletir melhor a função atual. Somente o criador do canal, ou em alguns casos o proprietário, tem a capacidade de renomear ou ajustar os canais padrão.
Por fim, o gerenciamento de canais também envolve a definição de limites de participação. Em canais onde a clareza é fundamental, como o canal #geral, os administradores podem limitar as permissões de publicação para que apenas determinadas pessoas possam compartilhar atualizações. Isso evita confusão e garante que informações importantes não fiquem escondidas em conversas casuais.
Etapa 3: Focalize as discussões com threads
As threads no Pumble podem ser seus melhores amigos se usados corretamente. Uma simples mensagem em threads pode trazer muita organização aos seus canais.
Além disso, você pode responder dentro da threads, reagir a uma mensagem ou marcar um membro da equipe.
Mas vamos começar pelo principal benefício dos threads no Pumble da CAKE.com.
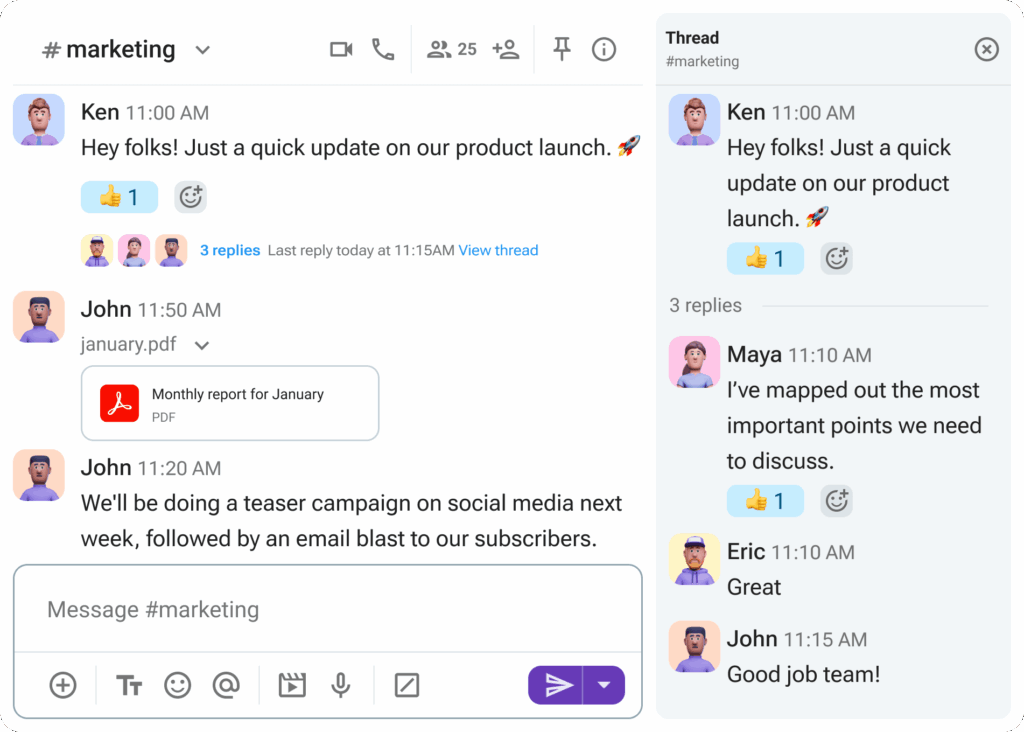
Em vez de postar inúmeras respostas diretamente no canal ou mensagem direta, você pode iniciar uma threads respondendo a uma mensagem específica.
As threads podem ser usados para:
- Manter seu feed de anúncios claro e organizado
- Reduzir a necessidade de mensagens diretas, mantendo o fluxo dentro de uma threads
- Manter membros importantes da equipe envolvidos na discussão usando @menções nas threads
Como usar as threads do Pumble?
Usar as threads do Pumble é bastante simples. Usar threads é o mesmo em computadores e dispositivos móveis.
No seu computador e navegador, passe o mouse sobre a mensagem e selecione a caixa "Responder na threads". Em seguida, basta começar a digitar.
No seu celular, pressione e segure a mensagem que deseja responder e toque no ícone "Responder na threads". Digite sua mensagem e envie-a.
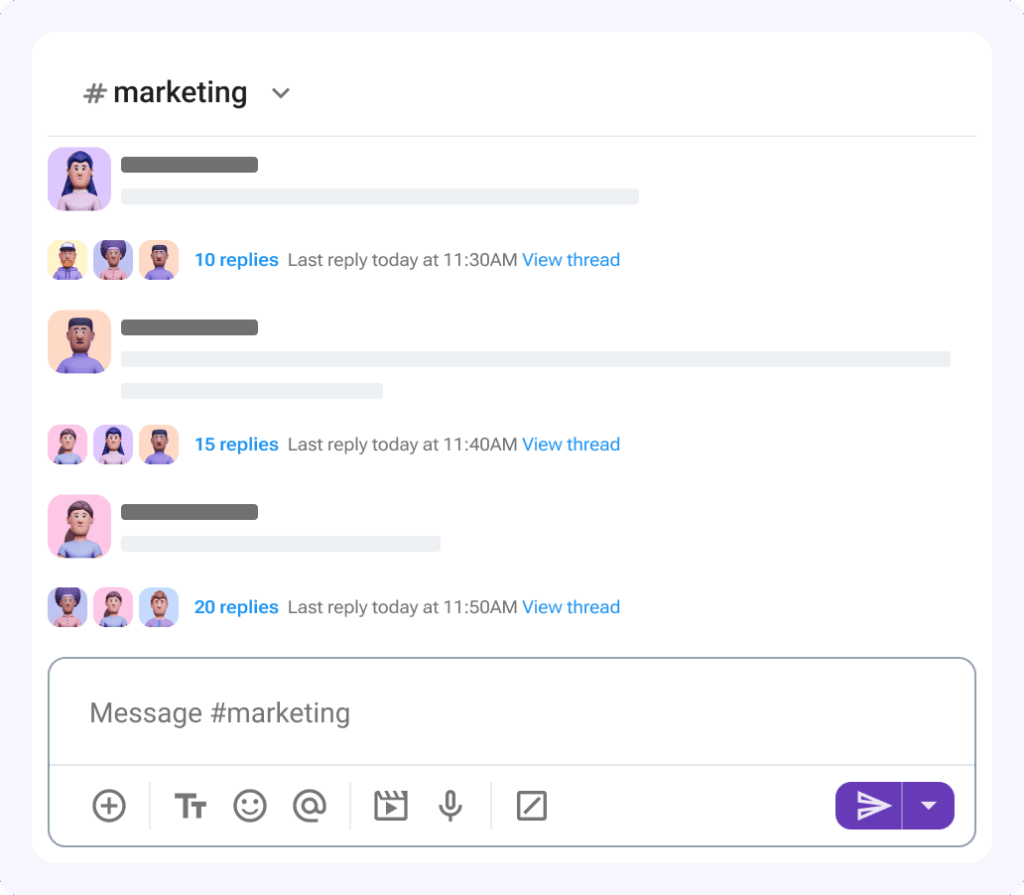
Para visualizar todos os seus threads, vá para a barra lateral e, na parte superior, você verá a opção "Threads". Todas as threads com respostas não lidas aparecerão no topo da lista. Na visualização de threads, você tem algumas opções:
- Responder a qualquer threads
- Clicar no nome do canal no cabeçalho da threads para visualizar a mensagem original
- Clicar no ícone de três pontos para deixar de seguir uma threads
- Selecionar "Desativar notificações de resposta" para concluir a ação
Quando usar threads e quando responder em um canal?
Quando você tem a opção de enviar uma mensagem, iniciar uma threads ou simplesmente responder em um canal, há algumas coisas a serem consideradas. Primeiro, verifique se há uma discussão ativa em um canal. Em seguida, considere quantas pessoas estão no canal e se sua resposta será relevante para todos.
Quando você tem uma equipe e seus canais estão muito ocupados, a única solução lógica é usar threads para evitar a desordem no canal e manter a discussão sobre threads específicos em um só lugar. Sem desordem no canal ou mensagens confusas, a equipe fica feliz.
Threads também podem ajudar a reduzir o uso de mensagens diretas para perguntas e respostas. Em vez disso, as perguntas podem ser postadas em threads públicos do canal, onde os detalhes são transparentes e acessíveis.
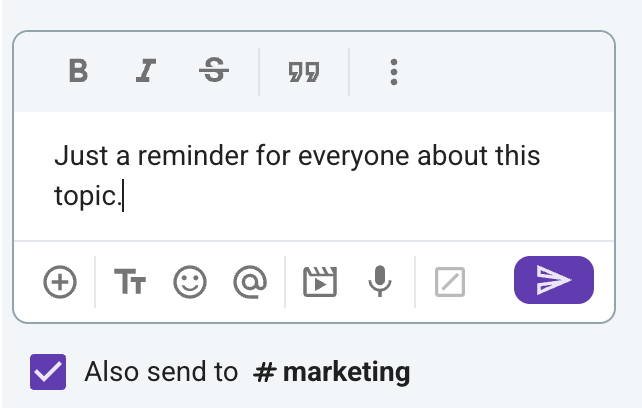
Um uso importante das threads do Pumble dentro de um canal é enviar uma mensagem diretamente para o canal. Isso pode ser muito útil quando decisões importantes estão sendo tomadas em uma thread. Marque a caixa "Enviar também para #canal" e sua mensagem será enviada para um canal e notificará a todos sobre a decisão.
Como seguir uma threads no Pumble?
Ao responder a uma thread, você automaticamente começa a seguir todas as respostas e recebe notificações. Mas e se você quiser seguir uma thread, mas não responder? Claro que pode.
Acesse a thread, toque nos três pontos e escolha "Notificar-me sobre novas respostas". Dessa forma, você receberá notificações sempre que alguém responder a esse thread.
Deixar de seguir uma threads
Deixar de seguir uma thread no Pumble é muito fácil. Passe o mouse sobre a mensagem original e clique nos três pontos. Selecione a primeira opção - "Desativar notificações de resposta".
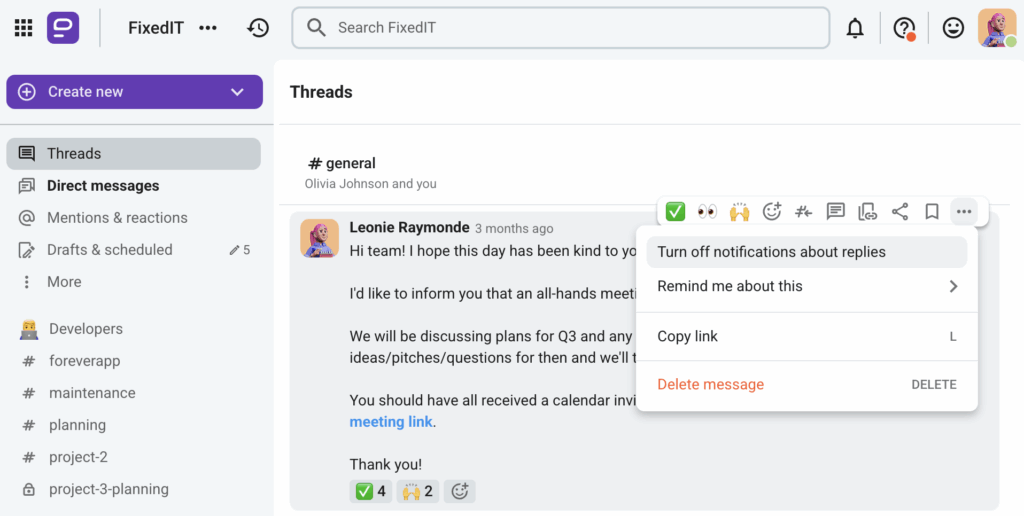
De repente, suas notificações ficarão um pouco mais claras e você poderá se concentrar nas threads mais relevantes.
Marcando threads como não lidas
O que fazer se respostas importantes estiverem sempre sendo postadas nas threads, mas você tem muito trabalho a fazer e só consegue ler depois? Bem, é fácil. Você pode marcar as threads às quais precisa retornar mais tarde como não lidos.
Para marcar uma threads como não lido, use o menu de três pontos e selecione "Marcar como não lido". Se isso acontecer com frequência, há sempre mais uma opção: Lembrar.
Opção "Lembrar-me sobre as respostas da threads"
Selecione o horário em que deseja ser lembrado sobre a resposta da threads.
Para uma mensagem normal, você pode escolher entre:
- 20 minutos
- 1 hora
- 3 horas
- Amanhã (9h)
- Próxima semana (segunda-feira às 9h)
- Personalizado: Escolha qualquer
Para selecionar o horário em que deseja ser lembrado, passe o mouse sobre a resposta do tópico e selecione "Lembrar-me sobre isso".
Ao usar esta opção corretamente, você estará essencialmente criando uma lista de tarefas. Cada vez que o horário selecionado chegar, você receberá uma mensagem do Pumblebot lembrando-o da sua tarefa agendada.
Etapa 4: Domine a Comunicação em Tempo Real e Assíncrona
O que é Comunicação Assíncrona?
Simplificando, a comunicação assíncrona é aquela que não ocorre em tempo real. Isso significa que os membros da equipe podem compartilhar tudo em uma ferramenta de comunicação, mas não precisam ou esperam uma resposta imediata.
Exemplos de comunicação assíncrona incluem:
- Mensagens de texto
- Mensagens instantâneas
- Vídeos gravados
Por outro lado, a comunicação em tempo real ocorre em tempo real.
Para uma comunicação eficaz no trabalho, as empresas precisam praticar tanto a comunicação assíncrona quanto a em tempo real. Um estudo recente revelou que 70% dos entrevistados consideram as reuniões de tomada de decisão em tempo real valiosas.
Videoconferência
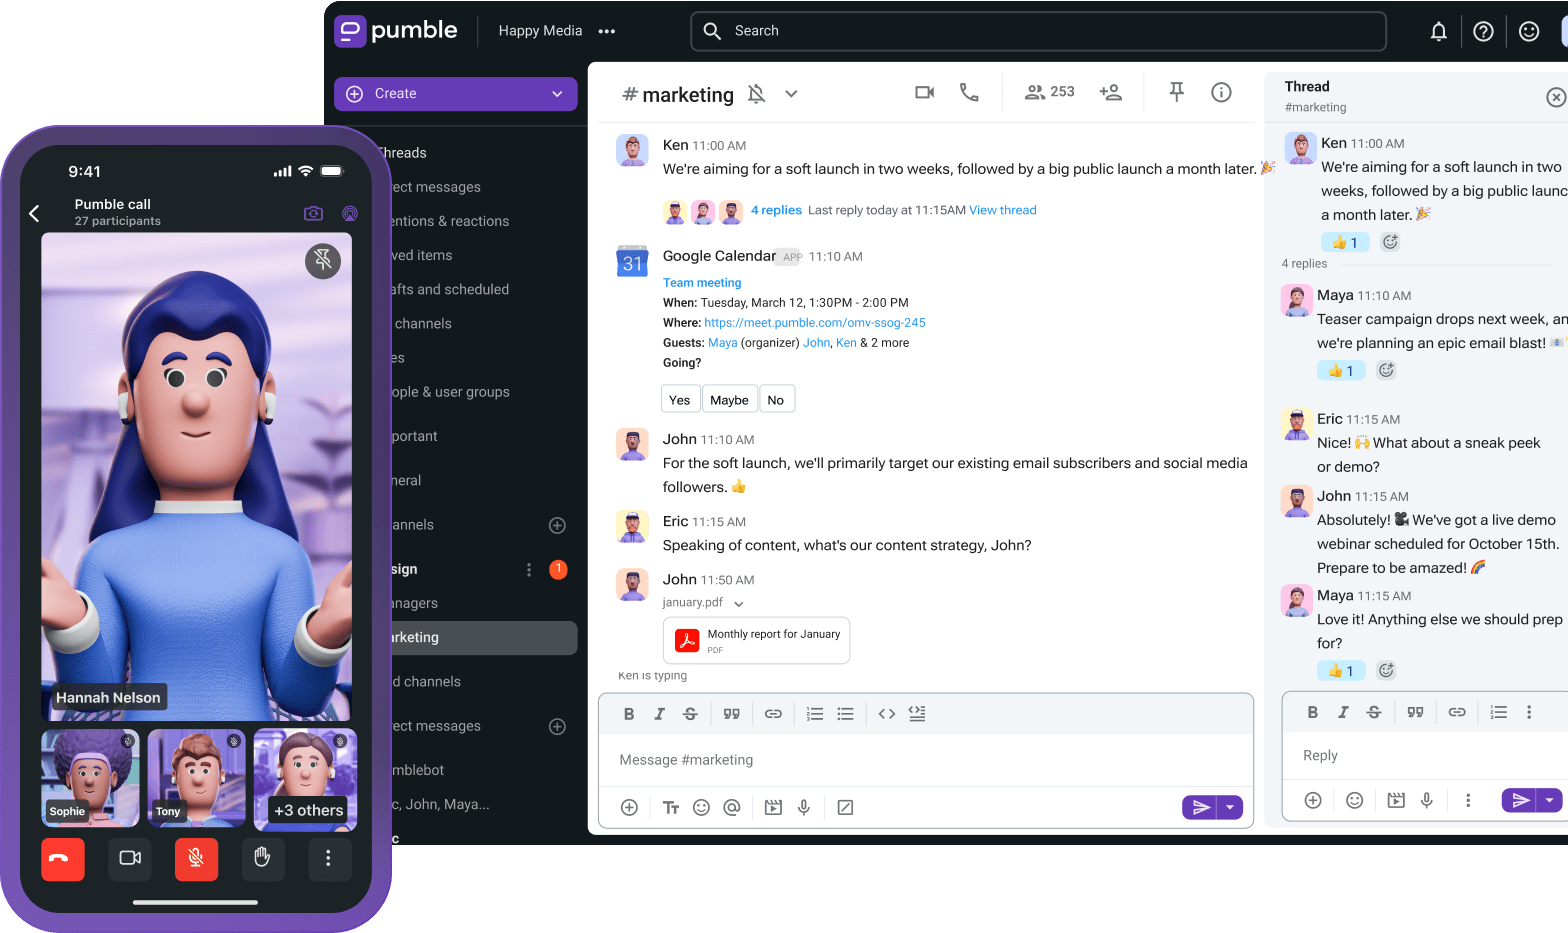
No Pumble, você pode realizar dois tipos de reuniões: videoconferência e reuniões por voz. Com a videoconferência do Pumble, você pode fazer chamadas e se conectar com qualquer membro da sua equipe. Você pode se conectar por vídeo, individualmente ou em grupo. Para uma reunião individual, você pode enviar um link para um colega de equipe ou simplesmente discar clicando no ícone da câmera no chat.
Para reuniões em grupo, éé muito melhor usar um link de reunião. Enviar um link ajuda você a convidar apenas as pessoas relevantes. Na maioria dos casos, você não precisará de todos os membros do canal em uma chamada.
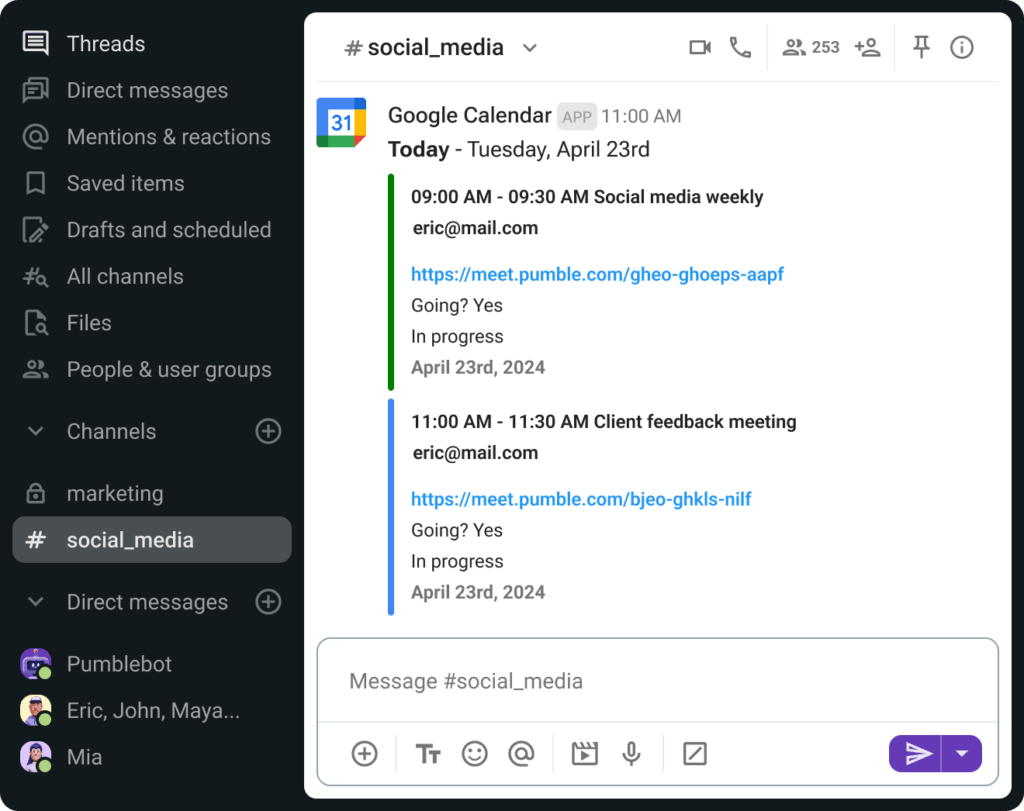
Outra maneira de participar de uma reunião é pelo Google Agenda. Quando alguém agenda uma reunião no Pumble, a integração com o Google Agenda pode notificá-lo de que sua reunião começa em um minuto. Dessa forma, você nunca perderá uma reunião. Basta clicar no link e você estará na reunião.
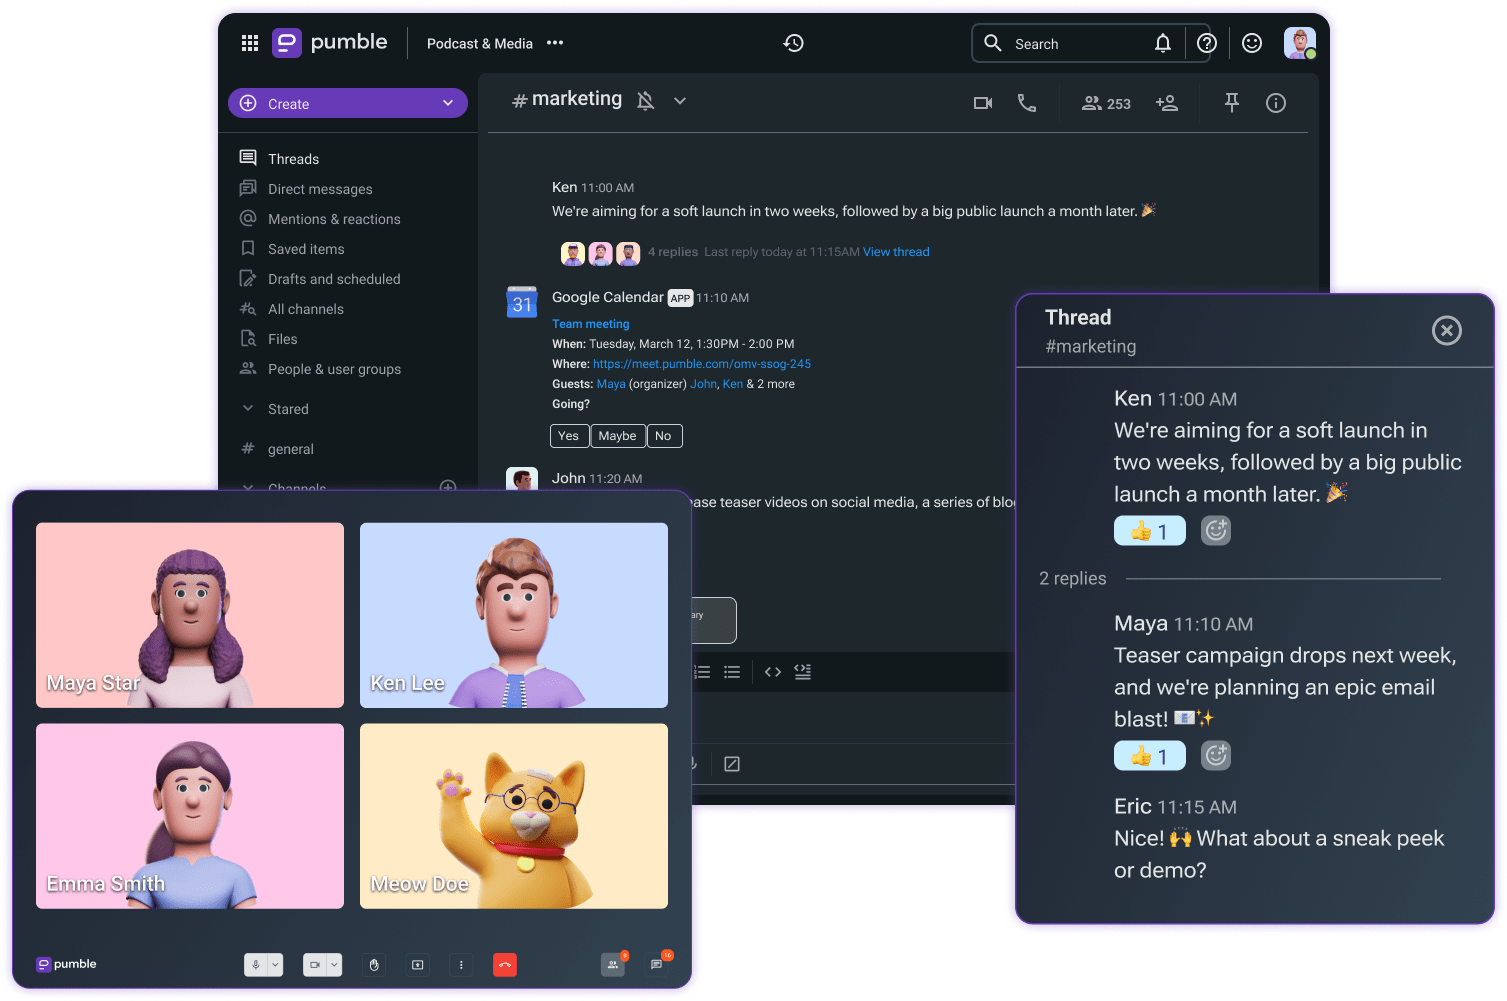
Com o Pumble, você pode se conectar facilmente com os membros da sua equipe, clientes ou parceiros por meio de videoconferências de alta qualidade, não importa onde esteja.
É perfeito para equipes remotas, porque permite que todos permaneçam em sincronia e promove uma sensação de presença real — como se estivessem na mesma sala.
As chamadas de videoconferência podem ser iniciadas a partir de qualquer canal ou conversa direta no Pumble.
Você pode iniciar uma chamada de vídeo ou participar de uma.
Chamadas de voz
Em chamadas de voz, você participará com a câmera desligada e apenas o microfone ligado. Em vez de ver as pessoas, você ouvirá apenas as vozes e verá suas fotos de perfil no Pumble.

Para ligar para qualquer pessoa no seu espaço de trabalho do Pumble, basta abrir a conversa com essa pessoa e clicar no ícone de telefone para iniciar uma chamada de voz. Assim como nas videochamadas, é muito melhor enviar um link de reunião em uma chamada de voz se você quiser hospedar uma chamada em grupo para que todos os participantes possam participar.
Realize reuniões de equipe pelo Pumble
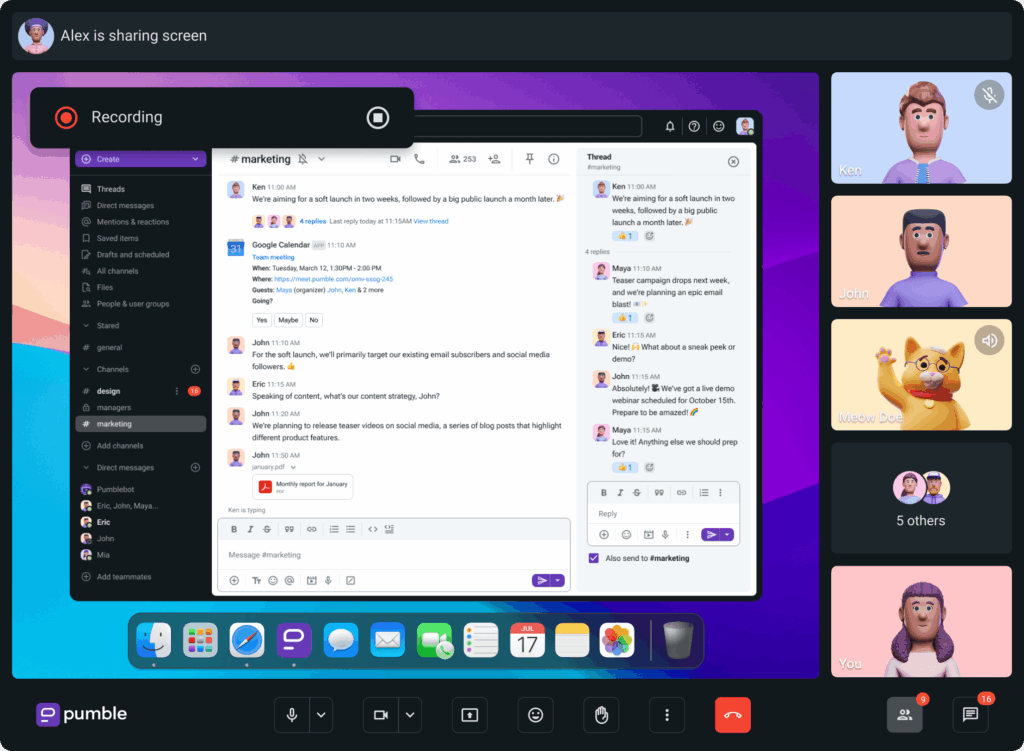
Compartilhamento de tela
O Pumble permite que todos os participantes da reunião compartilhem a tela inteira, apenas uma janela ou abas específicas.
Na maioria dos casos, os participantes compartilham uma tela quando desejam:
- Apresentar: compartilhar slides, documentos ou qualquer outro recurso visual para complementar sua apresentação;
- Hospedar demonstrações: mostrar como usar um software específico;
- Colaborar em tempo real: trabalhar em conjunto em um documento ou projeto; ou
- Solucionar problemas: ajudar alguém a resolver um problema técnico visualizando a tela.
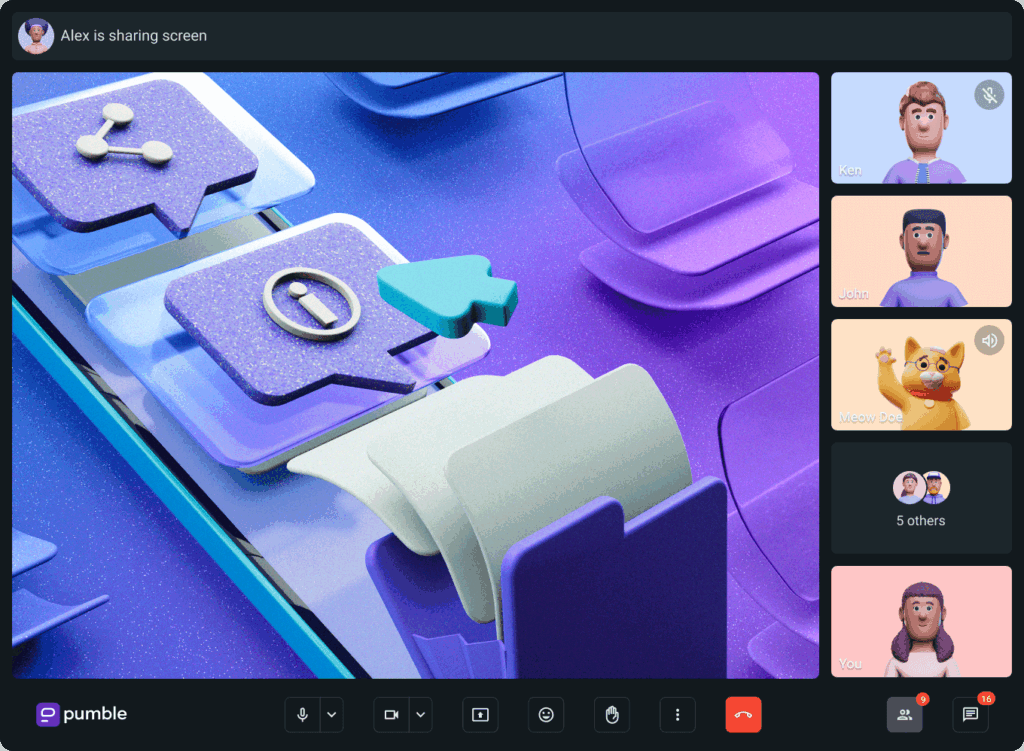
Com o compartilhamento de tela no Pumble, você pode melhorar a maneira como você e seus colegas de equipe trabalham remotamente. Com a capacidade de compartilhar a tela e colaborar de qualquer lugar, sua equipe pode ser mais produtiva e eficiente na conclusão de tarefas.
Como usar mensagens agendadas?
Ao trabalhar remotamente, você provavelmente trabalhará com colegas do mundo todo. Vocês provavelmente não têm a mesma agenda ou hábitos. Ou talvez alguns de seus colegas mais próximos optem por trabalhar fora do horário normal de trabalho, mas não queiram incomodá-lo durante seu tempo livre.
Em todos esses casos, mensagens agendadas são a solução ideal. As mensagens serão enviadas no horário que você escolher, sem interromper o tempo livre de ninguém.
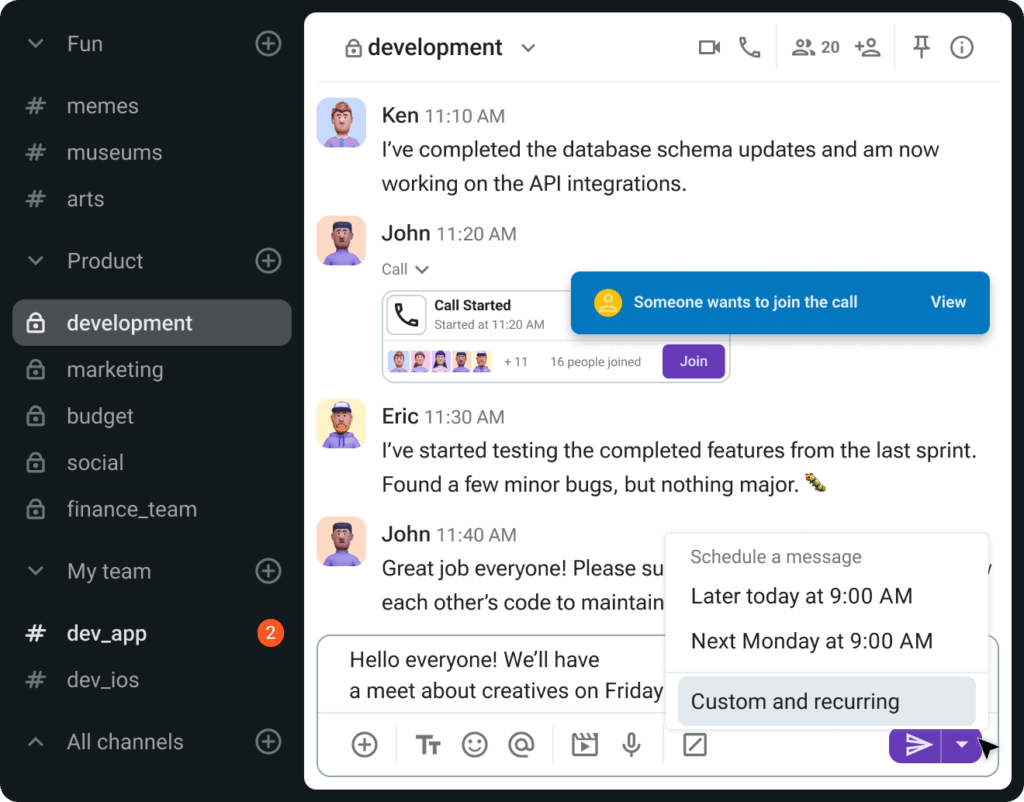
Agendar mensagens no Pumble é simples:
- Digite a mensagem que deseja compartilhar por mensagem direta ou em um canal
- Clique na seta ao lado do botão de envio
- Selecione o horário de envio
Você também pode definir uma data e hora, horários de envio personalizados (por exemplo, se você estiver enviando uma mensagem para um colega que está de férias e você sabe quando ele voltará).

Outra opção é configurar uma mensagem recorrente. Mensagens recorrentes permitem agendar mensagens que serão enviadas automaticamente em intervalos regulares para usuários específicos.
Com esse recurso, você não precisa enviar mensagens repetidas para os membros da equipe, pois pode configurar mensagens recorrentes uma vez e o Pumble cuidará do resto.
Depois de definir a hora e a data, o próximo passo é escolher a frequência das mensagens:
- Diariamente
- Semanalmente
- Quinzenalmente
- Mensalmente
- Trimestralmente
- Anualmente
- Todos os dias úteis
Depois de escolher quando deseja que a mensagem seja enviada, você pode escolher quando ela termina. Há também algumas opções:
- Após determinadas ocorrências
- Uma data específica
Depois de configurar tudo, vá em "Agendar uma Mensagem" e pronto.
Após agendar a mensagem, uma barra de informações aparecerá na mensagem direta/canal, indicando que ela será enviada.
Clique na opção "Ver todas as mensagens agendadas" para ver a lista e o conteúdo de todas as mensagens agendadas e rascunhos.
Se desejar fazer alterações, basta passar o mouse sobre a mensagem agendada e clicar no ícone de lápis à direita, que representa a edição. Isso permite modificar o conteúdo da mensagem antes de enviá-la.
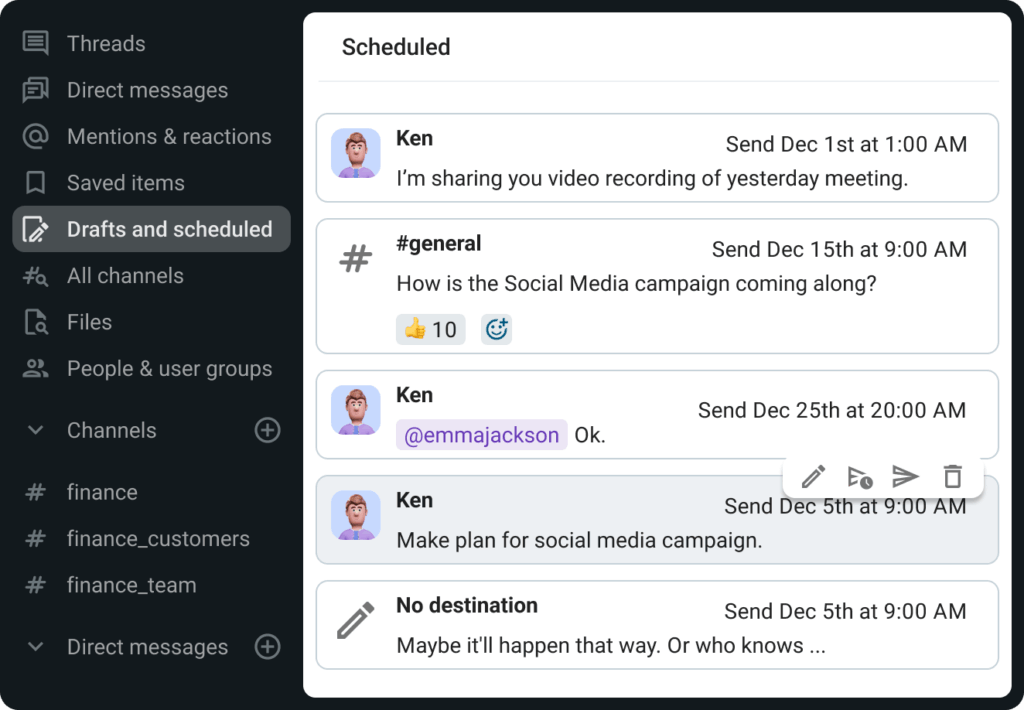
Você também pode alterar a data e a hora das suas mensagens agendadas, se necessário. Passe o mouse sobre a mensagem agendada e clique no ícone ao lado do ícone de edição.
A lista de todas as mensagens agendadas também está disponível na seção Rascunhos e Agendadas da barra lateral.
Usando mensagens de voz
Imagine que você está com pressa e precisa enviar uma mensagem rápida para seus colegas de trabalho. Mas, em vez de digitá-la, você pode enviar uma mensagem de voz para um canal onde todos possam acessá-la.
Quando a mensagem é muito longa ou complexa, as mensagens de voz podem ser uma forma mais eficiente de comunicação. Além disso, falar é mais rápido do que digitar, especialmente quando você está longe de casa.
Usando mensagens de voz, você pode ajustar seu tom de voz e tornar uma mensagem mais pessoal e memorável. Todos sabemos a importância de personalizar uma mensagem para que ela seja entendida da maneira que você pretende. Para algumas pessoas, as mensagens de voz são a forma mais comum de comunicação diária.
A maioria das ferramentas de comunicação e colaboração em equipe, como o Pumble da CAKE.com, facilita a gravação e a reprodução de mensagens de voz.
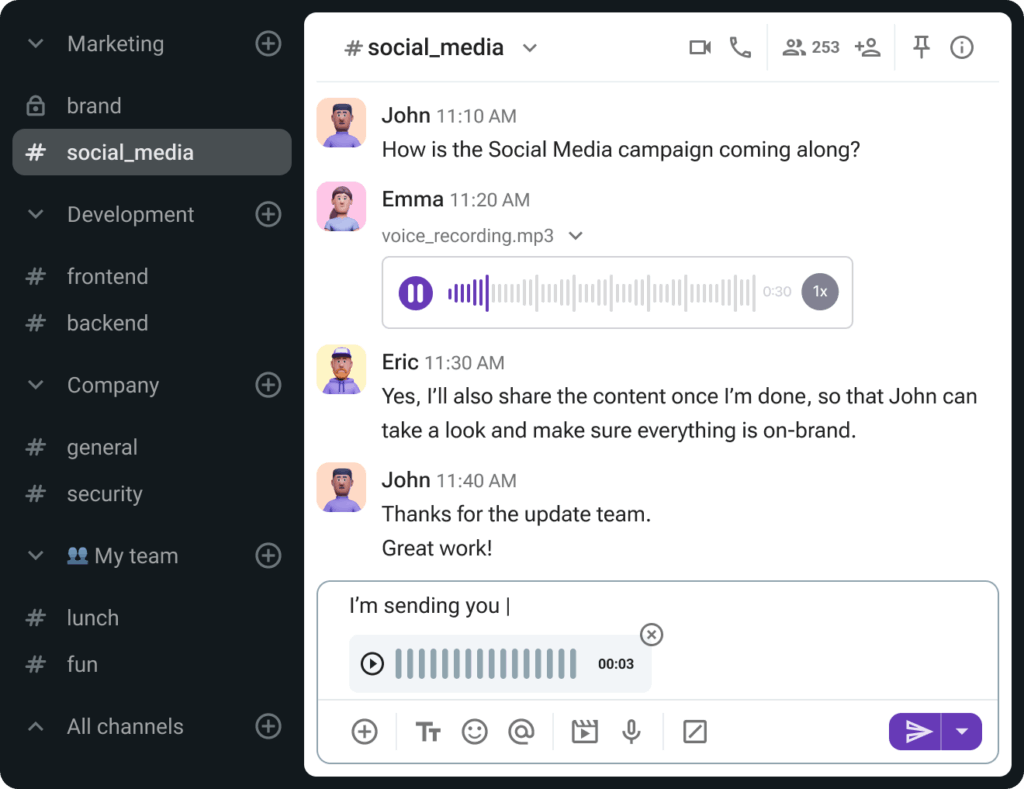
Veja como fazer isso no Pumble:
- Abra o canal ou DM para onde deseja enviar a mensagem de voz
- Pressione no ícone do microfone
- Comece a gravar sua mensagem
- Ao terminar de gravar, toque na marca de seleção
- Adicione uma mensagem de texto à sua mensagem de voz, se desejar
- Envie a mensagem
Usando Mensagens de Vídeo
Mais do que mensagens de voz, as mensagens de vídeo permitem que você explique ideias complexas, apresente propostas e esclareça objetivos de maneiras que outros formatos de mensagens não conseguem. Seja para apresentar um novo produto ou atualizar seus colegas sobre os resultados mais recentes da campanha, o vídeo garante que sua mensagem se destaque.
Além disso, mensagens escritas muitas vezes carecem de clareza, exigindo muito acompanhamento. Mensagens de vídeo, por outro lado, oferecem uma comunicação clara e concisa, economizando tempo para todos os envolvidos.
Ao enviar uma mensagem de vídeo personalizada para seus colegas, eles não precisam procurar nas mensagens. Eles veem seu rosto, ouvem sua voz e entendem o contexto em segundos.
E, apesar de tudo isso, os fusos horários não importam. Você envia uma mensagem de vídeo e eles assistem quando quiserem. É eficaz, eficiente e produtivo, tudo ao mesmo tempo.
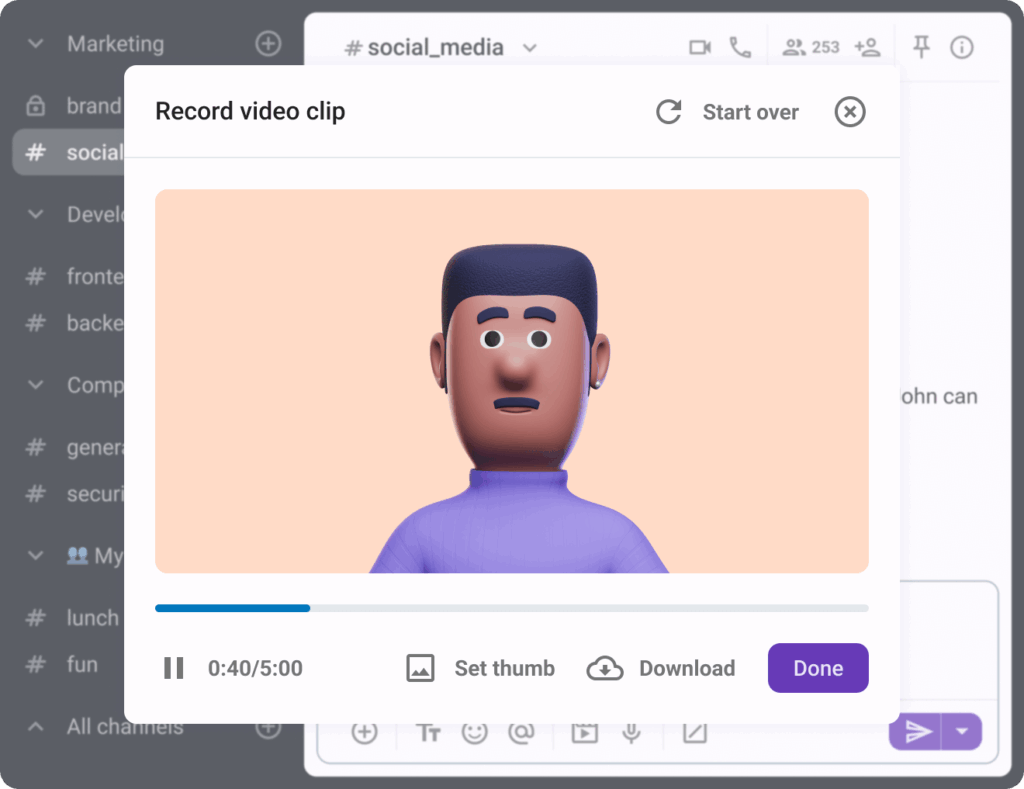
Aqui estão as etapas que você precisa seguir para gravar e reproduzir mensagens de vídeo no Pumble:
- Abra o aplicativo Pumble no seu dispositivo e navegue até o canal ou mensagem direta para onde deseja enviar a mensagem de vídeo
- Clique no ícone "Câmera" ao lado da caixa de mensagem de voz
- Clique no botão vermelho "Gravar" para começar a gravar sua mensagem de vídeo
- Grave sua mensagem pressionando o botão e falando no microfone do seu dispositivo. Você pode gravar por até 5 minutos
- Após terminar a gravação, selecione o botão "Parar". Você terá a opção de visualizar sua mensagem de vídeo antes de enviá-la
- Clique no botão "Concluído" para compartilhar sua mensagem de vídeo no canal selecionado ou por mensagem direta
- Você pode inserir texto na caixa de texto para enviá-la junto com o vídeo
Grave e envie mensagens de vídeo e voz com o Pumble
Etapa 5: Crie a base de conhecimento pesquisável da sua equipe
No Pumble, você tem acesso ilimitado às suas mensagens e arquivos por padrão, sem limites.
Isso significa que você pode pesquisar em Todas as suas conversas a qualquer momento. Ao contrário de muitas ferramentas de comunicação em equipe que têm limites variáveis para conversas anteriores, a menos que você faça um upgrade, o Pumble oferece histórico de mensagens ilimitado no plano GRATUITO.
Isso pode transformar o Pumble em uma base de conhecimento permanente e pesquisável para sua empresa.
E pesquisar no Pumble significa:
- Chega de mensagens ou arquivos perdidos
- Chega de perguntar "Onde conversamos sobre isso?"
- Acesso instantâneo a decisões, links e documentos compartilhados
Histórico de Mensagens Ilimitado = Busca Ilimitada
A maioria das plataformas de colaboração restringe o histórico de mensagens nos planos gratuitos, o que significa que você só pode pesquisar as mensagens mais recentes. Se detalhes do projeto ou documentos foram compartilhados meses atrás, eles serão perdidos, a menos que você faça um upgrade.
Com o Pumble da CAKE.com, não há essa barreira. O plano gratuito inclui histórico de mensagens ilimitado, para que sua equipe possa pesquisar em toda a linha do tempo das conversas da sua empresa. Do primeiro ao quinto ano, nada se perde.
Isso torna a busca do Pumble não apenas um recurso, mas um pilar da estratégia de gestão do conhecimento da sua empresa.
Quando combinada com um histórico de mensagens ilimitado, a busca do Pumble agrega valor a longo prazo para toda a empresa:
- Uma base de conhecimento dinâmica: Cada decisão, brainstorming ou arquivo compartilhado está sempre disponível.
- Integração mais rápida: Ao pesquisar conversas antigas, os novos funcionários podem se atualizar sobre decisões, projetos e cultura da empresa anteriores.
- Menor necessidade de compartilhar informações: Em vez de pedir aos colegas que compartilhem informações, os membros da equipe podem encontrar as respostas que precisam.
- Transparência da equipe: Equipes que trabalham em projetos diferentes podem continuar acessando o conhecimento relevante.
- Conformidade a longo prazo: Para setores onde a documentação e a conformidade são importantes, ter um arquivo pesquisável de cada conversa é essencial.
Como funciona a busca do Pumble?
A busca do Pumble foi projetada para ser rápida, intuitiva e precisa, para que você possa encontrar o que precisa em segundos.
Veja como funciona.
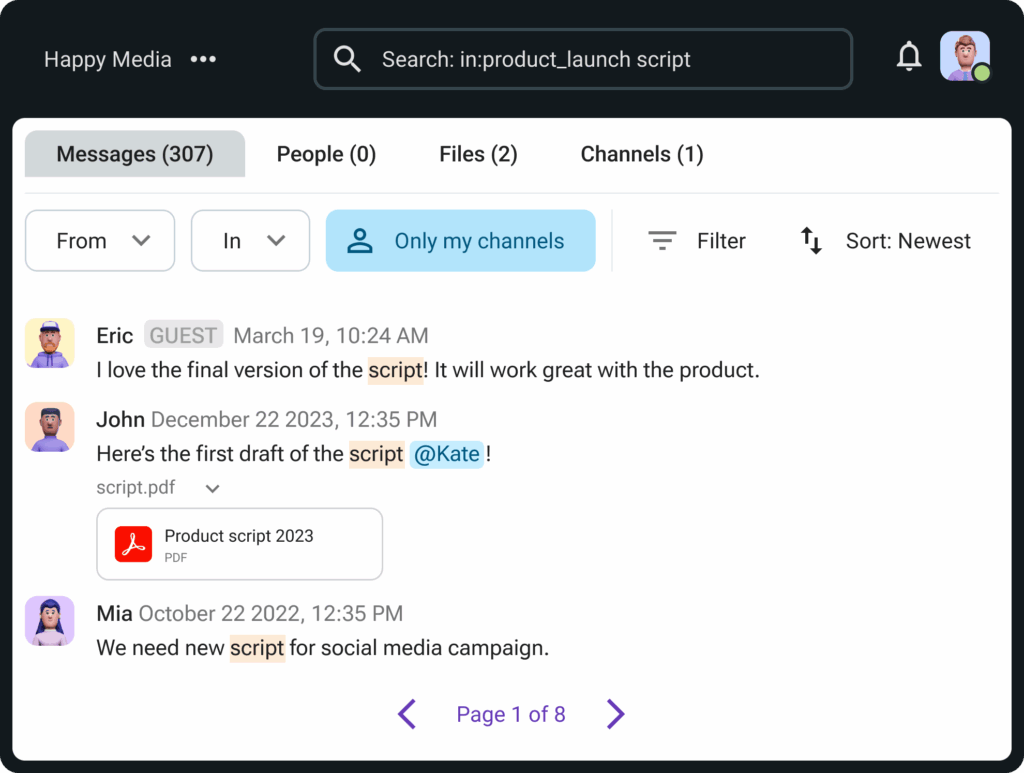
Busca por palavra-chave
Digite uma palavra ou frase específica para encontrar instantaneamente todas as mensagens ou arquivos onde ela aparece. É perfeita para rastrear nomes de projetos, detalhes de clientes ou tarefas específicas.
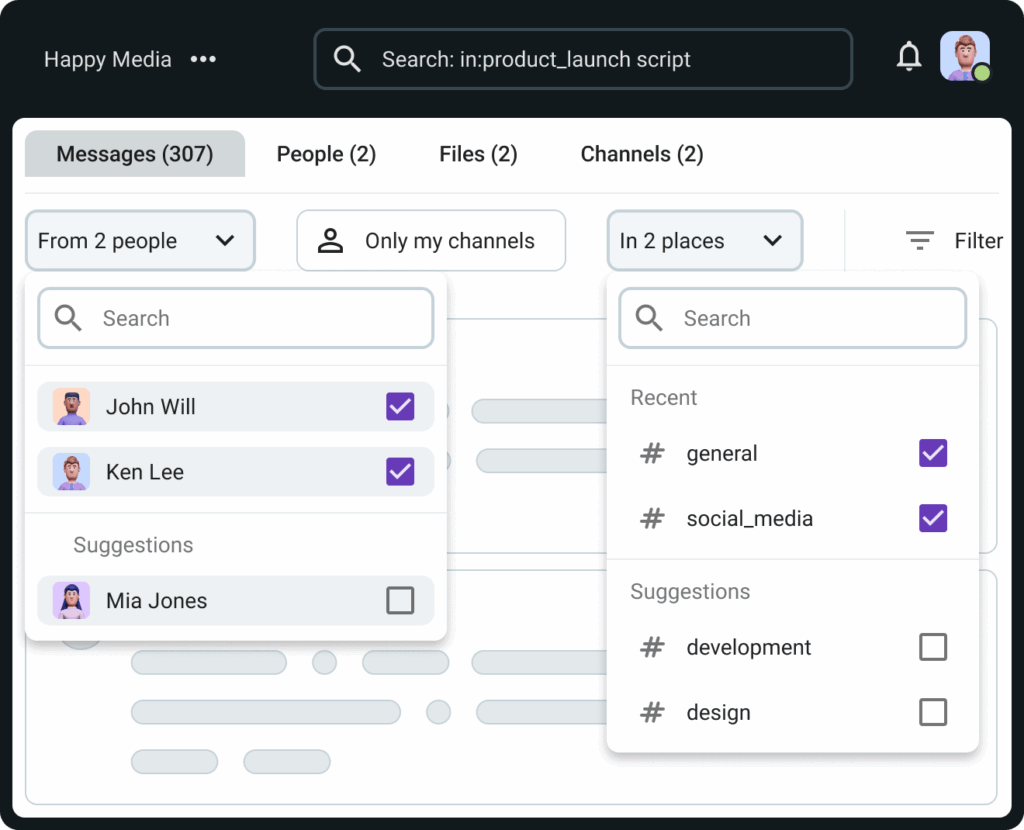
Pesquisar em todos os canais e mensagens diretas
Não importa onde uma conversa tenha ocorrido (em um canal público, privado ou mensagem direta), o Pumble a encontrará. Basta digitar o nome do canal, se você souber, ou o nome de um colega, se estiver procurando por uma mensagem direta, e pronto.
Pesquisar Arquivos e Links
A pesquisa do Pumble também funciona com nomes de arquivos e links, para que você possa localizar rapidamente aquela apresentação ou documento compartilhado há meses.
Melhores práticas para aproveitar ao máximo a busca no Pumble, daCAKE.com
Para maximizar os benefícios da pesquisa do Pumble, considere o seguinte:
- Use nomes de canais claros e consistentes (por exemplo, #projetos-marketing, #clientes-macros, etc.) para tornar os resultados da pesquisa mais significativos
- Promova nomes de arquivo descritivos ao compartilhar documentos (por exemplo, relatorio-orçamentario-q2.pdf, versao-final-2.pdf, etc.)
- Aproveite a fixação e o encadeamento de mensagens para tomar decisões importantes e, em seguida, use a pesquisa para acessá-las posteriormente
Com o tempo, o Pumble pode se tornar muito mais do que apenas um aplicativo de mensagens. Ele pode se tornar a memória da sua empresa e uma base de conhecimento dinâmica.
Etapa 6: Gerencie seu Foco e Reduza o Ruído
No ambiente de trabalho digital de hoje, a comunicação nunca para. Mensagens, atualizações e menções podem aumentar rapidamente, dificultando a distinção entre o urgente e o superficial. É por isso que as notificações do Pumble são projetadas para mantê-lo informado e focado.
Com recursos inteligentes como menções, modo não perturbe, silenciamento de canal e a opção de pausar notificações, as configurações de notificação do Pumble oferecem controle total: você decide quando, onde e como deseja receber notificações.
Por que as notificações do Pumble são importantes
Sem as configurações de notificação corretas, as ferramentas de colaboração podem prejudicar a produtividade. Sons constantes de notificação distraem do trabalho profundo, atualizações importantes se perdem na multidão de mensagens.
É por isso que as notificações do Pumble foram projetadas para equilibrar duas necessidades principais:
- Manter-se informado sobre o que realmente importa
- Proteger o tempo de foco minimizando distrações desnecessárias
Com mensagens ilimitadas já incluídas no plano GRATUITO do Pumble, as notificações se integram à pesquisa para garantir que você nunca perca informações importantes, seja visualizando-as em tempo real ou pesquisando-as posteriormente.
Para aproveitar ao máximo as notificações do Pumble, experimente o seguinte:
- Personalize as notificações por canal: mantenha os canais urgentes ativos e silencie os demais
- Use o modo Não Perturbe durante os horários de pico de foco
- Use menções apenas quando necessário
- Pause as notificações durante reuniões e apresentações
Como funcionam as notificações do Pumble
As notificações flexíveis do Pumble se adaptam à sua função, tamanho da equipe e estilo de trabalho.
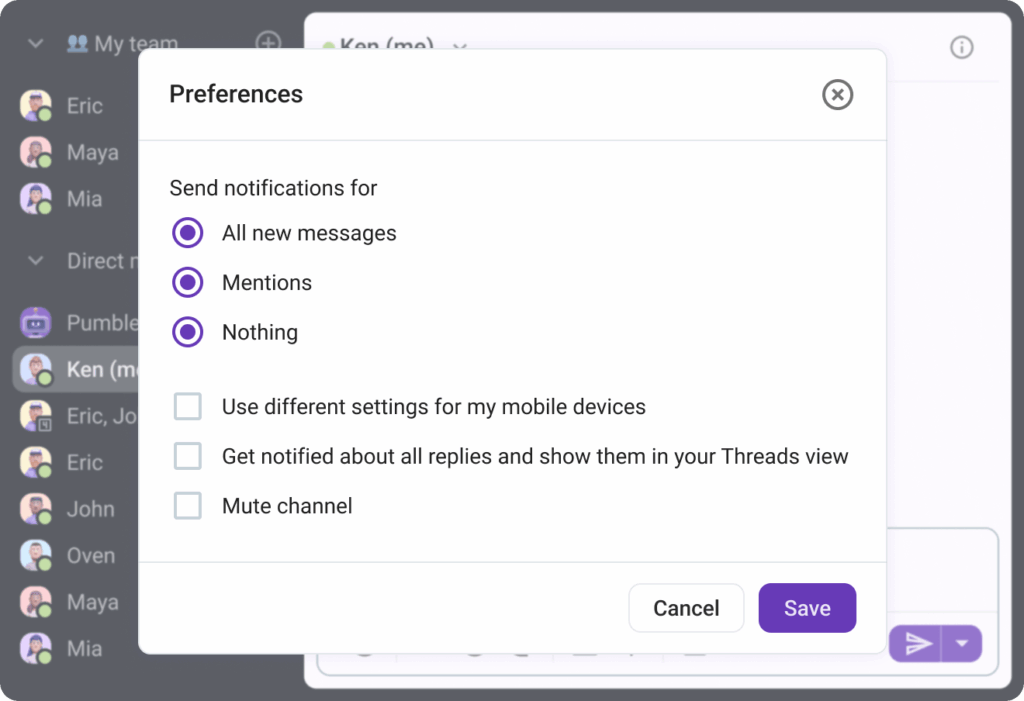
Notificações Padrão
Por padrão, o Pumble notifica você quando há novas mensagens em canais ou mensagens diretas. Isso garante que você esteja sempre por dentro das conversas ativas.
Menções no Pumble
Um dos aspectos mais poderosos das notificações do Pumble é a forma como as menções são gerenciadas. Em um ambiente de trabalho movimentado com múltiplos canais, milhares de mensagens podem chegar diariamente. Mas nem todas as mensagens exigem sua atenção. É aí que as menções fazem a diferença.
Quando um colega digita @seunome, você recebe uma notificação instantânea. Mesmo que o canal esteja silenciado ou suas notificações gerais sejam limitadas, o Pumble garante que as menções substituam essas configurações para que você não perca nada importante.
Os tipos de menções no Pumble são:
- Menções em todo o canal: Quando você deseja anunciar algo importante para todos, use @canal ou @aqui.
- Menção direta: Notifica uma pessoa específica (por exemplo, @Emma) e é perfeita quando alguém precisa da sua opinião, avaliação ou decisão.
- Menções em grupo: Quando as equipes usam grupos de usuários (por exemplo, @equipe-de-design) e querem se manter atualizadas sem enviar spam para ninguém.
Dependendo do tipo de menção, as melhores práticas incluem:
- Usar menções diretas quando uma resposta clara for necessária
- Evitar menções excessivas nos canais para evitar sobrecarga de notificações
- Estabelecer diretrizes para a equipe sobre quando e como mencionar pessoas
- Incentivar os colegas a usar menções para atribuir responsabilidades, não apenas para atualizações aleatórias
As menções transformam as notificações no Pumble em um sistema de priorização: em vez de reagir a tudo, você recebe um alerta apenas quando realmente importa.
Modo Não Perturbe
Embora manter-se informado seja importante, notificações constantes podem reduzir o foco e aumentar o estresse. É por isso que o Pumble inclui o Modo Não Perturbe, que permite silenciar notificações em horários específicos.
Com o Modo Não Perturbe, você não receberá pop-ups, sons ou notificações de aplicativos de terceiros, mas as mensagens chegarão ao seu espaço de trabalho, esperando por você quando estiver pronto. Isso ajuda você a manter o controle do seu dia de trabalho, proteger seu tempo pessoal e manter limites mais saudáveis.
Recomendamos usar o modo Não Perturbe:
- Durante sessões de trabalho intensas: você pode bloquear notificações por algumas horas quando precisar de concentração total.
- Em reuniões e apresentações: evite distrações durante chamadas importantes.
- Após o expediente: certifique-se de não receber chamadas tarde da noite ou nos fins de semana.
- Durante férias e folgas: permita que seus colegas enviem atualizações sem interromper seu tempo livre.
Os benefícios do modo Não Perturbe são:
- Reduz o estresse e ajuda a prevenir o esgotamento.
- Promove o equilíbrio entre vida pessoal e profissional em equipes remotas e híbridas.
- Previne distrações, mantendo as conversas armazenadas e pesquisáveis.
- Permite que os colegas respeitem os limites e mantenham a comunicação fluindo.
🎓 Dica profissional do Pumble
Mesmo com o modo Não Perturbe ativado, você pode revisar todas as menções perdidas ao se reconectar. Como as menções destacam o que é mais relevante para você, você não perde tempo se atualizando com conversas irrelevantes.
Silenciar Canais
Nem todos os canais são igualmente importantes. Por exemplo, um bate-papo casual sobre #animais-de-estimação não exige a mesma urgência que um canal sobre #data-de-término-do-projeto. Com a configuração de silenciar canal, você pode silenciar notificações de canais específicos e ainda consultá-las quando quiser.
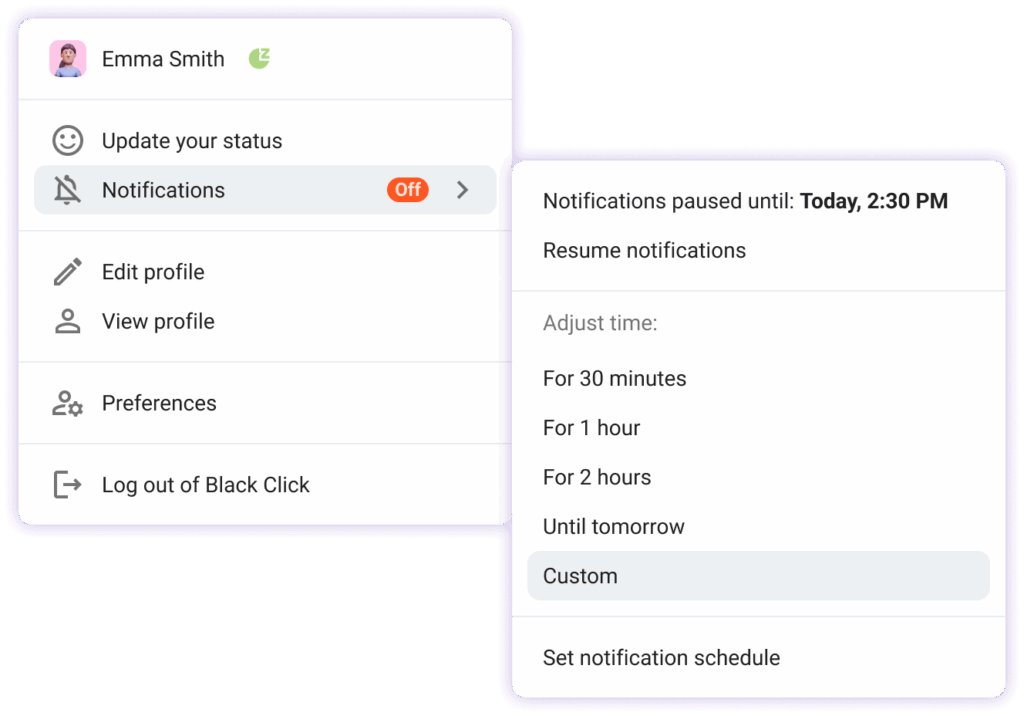
Pausar Notificações
Se você precisa se concentrar sem interrupções, o Pumble permite pausar temporariamente as notificações. Seja escrevendo, programando ou fazendo uma apresentação, elas não o incomodarão até que você decida retomar os alertas.
Benefícios das notificações no Pumble da CAKE.com
Quando usadas intencionalmente, as notificações do Pumble ajudam as equipes a encontrar o equilíbrio perfeito entre capacidade de resposta e produtividade.
Elas são importantes porque:
- Elas priorizam o que é mais importante: Menções e notificações personalizadas garantem que você veja as mensagens de seu interesse, sem ser bombardeado com cada pequena atualização.
- Elas protegem seu tempo de foco: Com a opção de pausar notificações e o modo Não Perturbe, você pode bloquear distrações ao trabalhar em tarefas complexas.
- Elas reduzem o estresse e o esgotamento: Ao controlar suas notificações, você pode reduzir a ansiedade causada por notificações constantes.
- Elas proporcionam uma comunicação mais inteligente: Quando as equipes sabem que as menções acionam notificações, elas se tornam mais conscientes sobre como mencionam seus colegas.
- Elas são flexíveis para diferentes estilos de trabalho: As notificações do Pumble se adaptam ao seu fluxo de trabalho, independentemente da sua posição na empresa.
Etapa 7: Colabore além da sua equipe principal
Equipes modernas raramente trabalham isoladas. De freelancers e consultores a clientes e fornecedores, a colaboração externa é essencial para a conclusão do projeto.
Mas convidar colaboradores externos para o espaço de comunicação da sua equipe pode parecer arriscado. Ou você dá acesso demais a eles ou os restringe tanto que a colaboração se torna frustrante.
É aí que os Convidados do Pumble fazem a diferença. Este recurso permite que você convide colaboradores externos para colaborar de forma segura e flexível, sem interromper o fluxo de trabalho interno da sua equipe.
Esteja você trabalhando com um designer, um contratado ou um cliente antigo, o acesso de convidado ajuda a gerenciar a transparência e a velocidade.
Como sabemos, o aumento do trabalho remoto e das equipes distribuídas tornou tênues os limites entre interno e externo.
Uma agência de marketing pode colaborar estreitamente com a equipe interna de um cliente. Uma empresa de software pode contratar desenvolvedores ou consultores freelancers. Uma organização sem fins lucrativos pode colaborar com doadores ou patrocinadores.
Sem a configuração adequada, essas colaborações podem ocorrer por meio de e-mails, arquivos e aplicativos de mensagens improvisados. Isso cria silos, atrasa projetos e aumenta o risco de falhas de comunicação.
Ao convidar pessoas no Pumble, você centraliza toda a colaboração, tanto externa quanto interna, em um só lugar. Todos se comunicam no mesmo espaço de trabalho, mas com acesso baseado em funções que mantém a segurança e a organização.
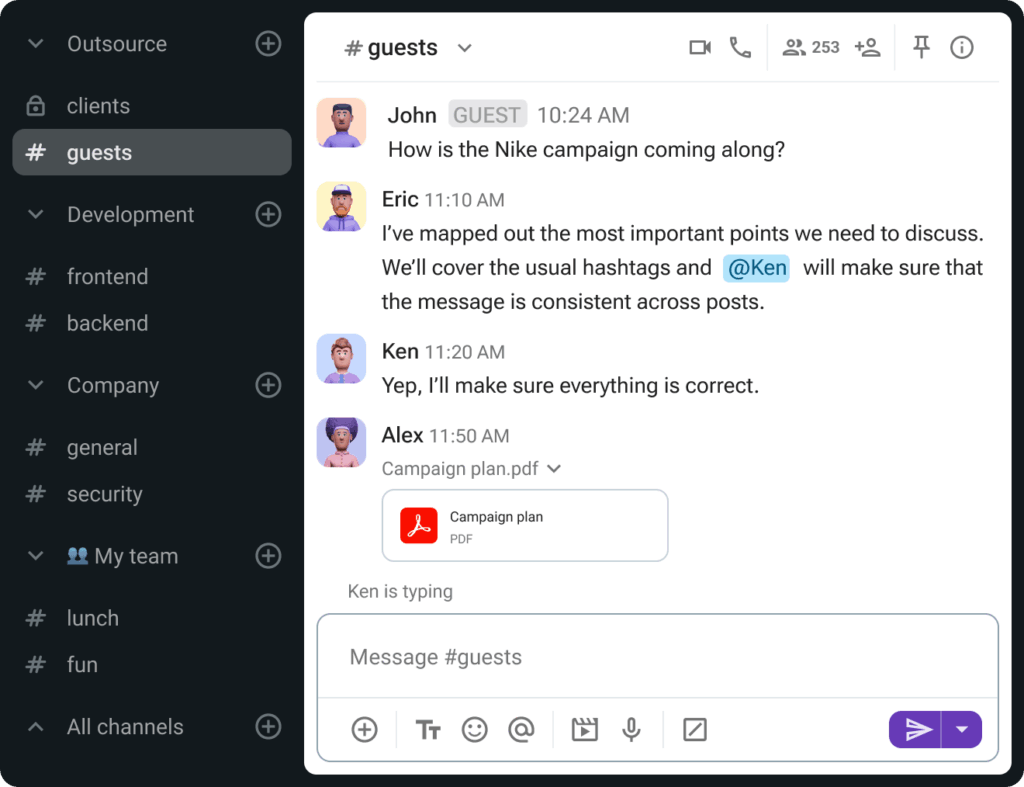
Como os convidados trabalham no Pumble
Convidados no Pumble são funções de usuário especiais, projetadas especificamente para pessoas de fora da sua empresa principal. Ao contrário dos membros plenos, os convidados têm acesso limitado, garantindo que vejam apenas o que é relevante para o seu trabalho.
O Pumble oferece dois tipos de acesso de convidado:
- Convidados de canal único: Esses convidados podem acessar um único canal, onde toda a comunicação relevante é mantida em um só lugar. Isso é perfeito para colaborações de curto prazo com freelancers ou parceiros que precisam acompanhar apenas um projeto específico.
- Convidados Multicanal: Esses convidados podem ser adicionados a vários canais simultaneamente, permitindo que acompanhem conversas em diferentes projetos ou equipes sem se tornarem membros plenos do espaço de trabalho. Essa função é perfeita para colaboradores de longa data ou para aqueles envolvidos em vários projetos.
🎓 Dica profissional do Pumble
Convidados só podem iniciar uma mensagem direta com um membro que esteja no mesmo canal. No entanto, membros podem iniciar uma mensagem direta com qualquer convidado, mesmo que não estejam no mesmo canal.
Trabalhe de forma mais inteligente com links de reunião compartilháveis
Com os links de reunião compartilháveis do Pumble, você pode configurar uma videochamada instantaneamente e enviar o link diretamente para um parceiro externo — sem a necessidade de downloads ou configurações complicadas.
Convidados, clientes ou freelancers podem simplesmente clicar no link e ingressar na reunião diretamente do navegador ou do aplicativo do Pumble.
Isso facilita:
- Trocar ideias com clientes sem trocar de plataforma
- Revisar entregas com freelancers pessoalmente e fornecer feedback instantâneo
- Manter atualizações de progresso com parceiros externos em um ambiente seguro
- Substituir ferramentas de reunião de terceiros e manter toda a colaboração em um só lugar
Como o link é compartilhável, mesmo aqueles que não são membros permanentes do seu espaço de trabalho podem ingressar na chamada. Isso resulta em uma colaboração mais fluida e menos barreiras entre você e seus parceiros externos.
Benefícios para hóspedes no Pumble
Adicionar parceiros externos como convidados ao seu espaço de trabalho do Pumble cria uma maneira simplificada e segura de colaborar.
Comunicação centralizada com parceiros
Em vez de alternar entre e-mail, aplicativos de mensagens e ferramentas de terceiros, tudo reside no Pumble. Os convidados veem todas as atualizações relevantes em um só lugar: mensagens, arquivos compartilhados, links e recursos fixados.
Transparência aprimorada
A transparência é fundamental ao trabalhar com clientes e prestadores de serviços. No Pumble, os convidados podem ver o progresso em tempo real, acessar atualizações do projeto e acompanhar conversas sem precisar esperar que alguém os atualize.
Segurança e Privacidade
Ao contrário de conceder acesso total a membros externos, as funções de convidado protegem o espaço de trabalho interno. Os convidados veem apenas o que foram convidados, seja um único canal de projeto ou vários projetos em andamento.
Feedback mais rápido
Quando os parceiros são adicionados diretamente aos canais do projeto, eles podem fornecer feedback instantaneamente. Não há atrasos causados por e-mails espalhados. Um designer pode compartilhar um rascunho, um cliente pode responder imediatamente e a equipe pode se adaptar instantaneamente.
Profissionalismo e confiança
Convidar clientes, fornecedores e prestadores de serviços para o seu espaço de trabalho no Pumble demonstra profissionalismo. Indica que você tem confiança para colaborar abertamente e que valoriza a comunicação estruturada e transparente. Com o tempo, isso gera confiança e relacionamentos mais fortes e duradouros com parceiros externos.
Construindo Equipes Mais Fortes por Meio de uma Comunicação Melhor
A comunicação eficaz em equipe não se resume apenas à troca de mensagens. Trata-se de criar um ambiente onde cada membro da equipe se sinta conectado, informado e capacitado para fazer o seu melhor trabalho.
Da organização de conversas em canais à participação em videochamadas, gerenciamento de notificações e colaboração com convidados, as ferramentas modernas transformaram a maneira como equipes e empresas compartilham informações e impulsionam projetos.
A verdadeira chave da comunicação em equipe reside na criação de hábitos de comunicação que equilibrem clareza, transparência e foco. O Pumble, da CAKE.com, reúne todos esses elementos em um só lugar. Ao centralizar a comunicação, mantendo-a simples e segura, o Pumble ajuda equipes de todos os tamanhos a criar a base para o sucesso a longo prazo.
Se você deseja que sua equipe trabalhe de forma mais aberta, eficaz e segura, a jornada começa com uma comunicação melhor, e o Pumble está aqui para apoiá-lo.
Comece a usar o Pumble hoje mesmo
Como avaliamos esta publicação: Nossos escritores e editores monitoram as postagens e as atualizam quando novas informações ficam disponíveis, para mantê-las atualizadas e relevantes.