How to use the Pumble MCP server
With the Pumble Model Context Protocol (MCP) server, you can connect third-party AI agents (e.g., Claude, Gemini, Codex) to Pumble and let them access content so they can search messages, find information, and take actions on your behalf.
How to connect to an MCP server #
To connect your AI assistant to the Pumble MCP server, you will have to create a Pumble addon and take credentials from there. To do this, you will first need to access Pumble addons.
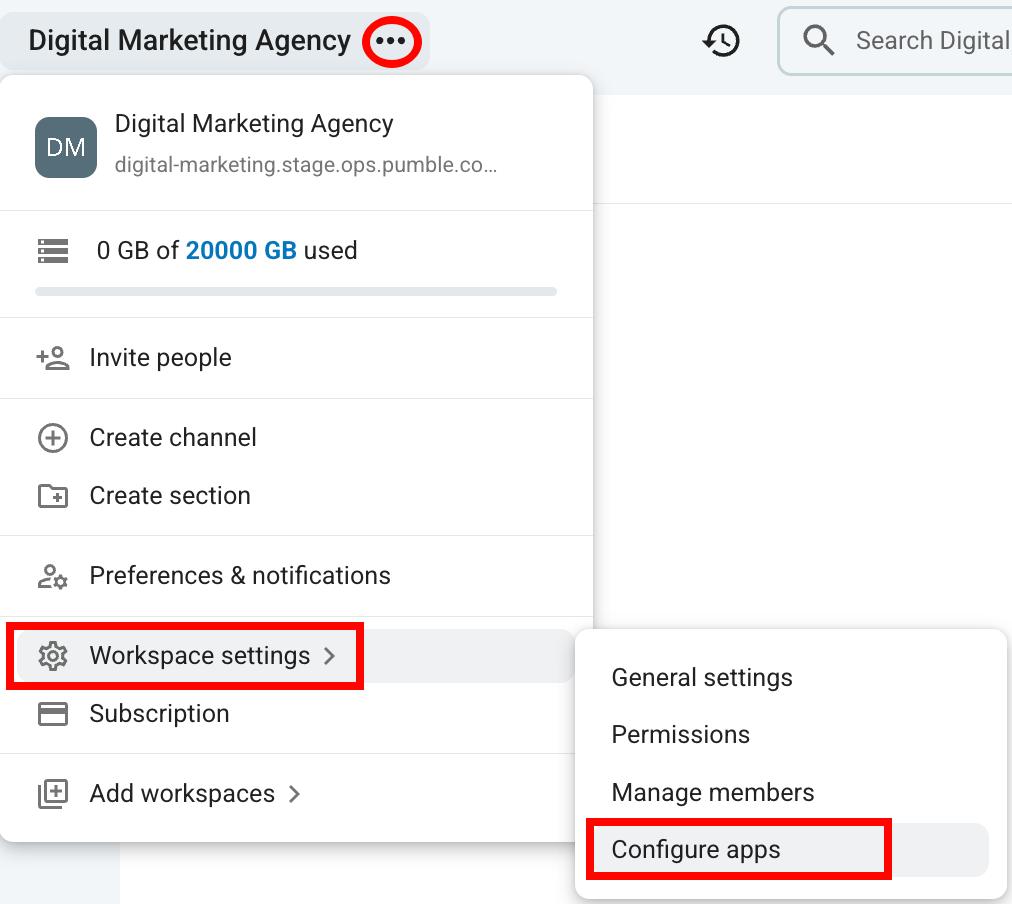
- Click on the three dots next to the Workspace name
- Hover over Workspace settings
- Select Configure apps
Once you have opened the Configure apps page, you can add your own addon. Here’s how:
- Click on + Create app
- Select Create from scratch
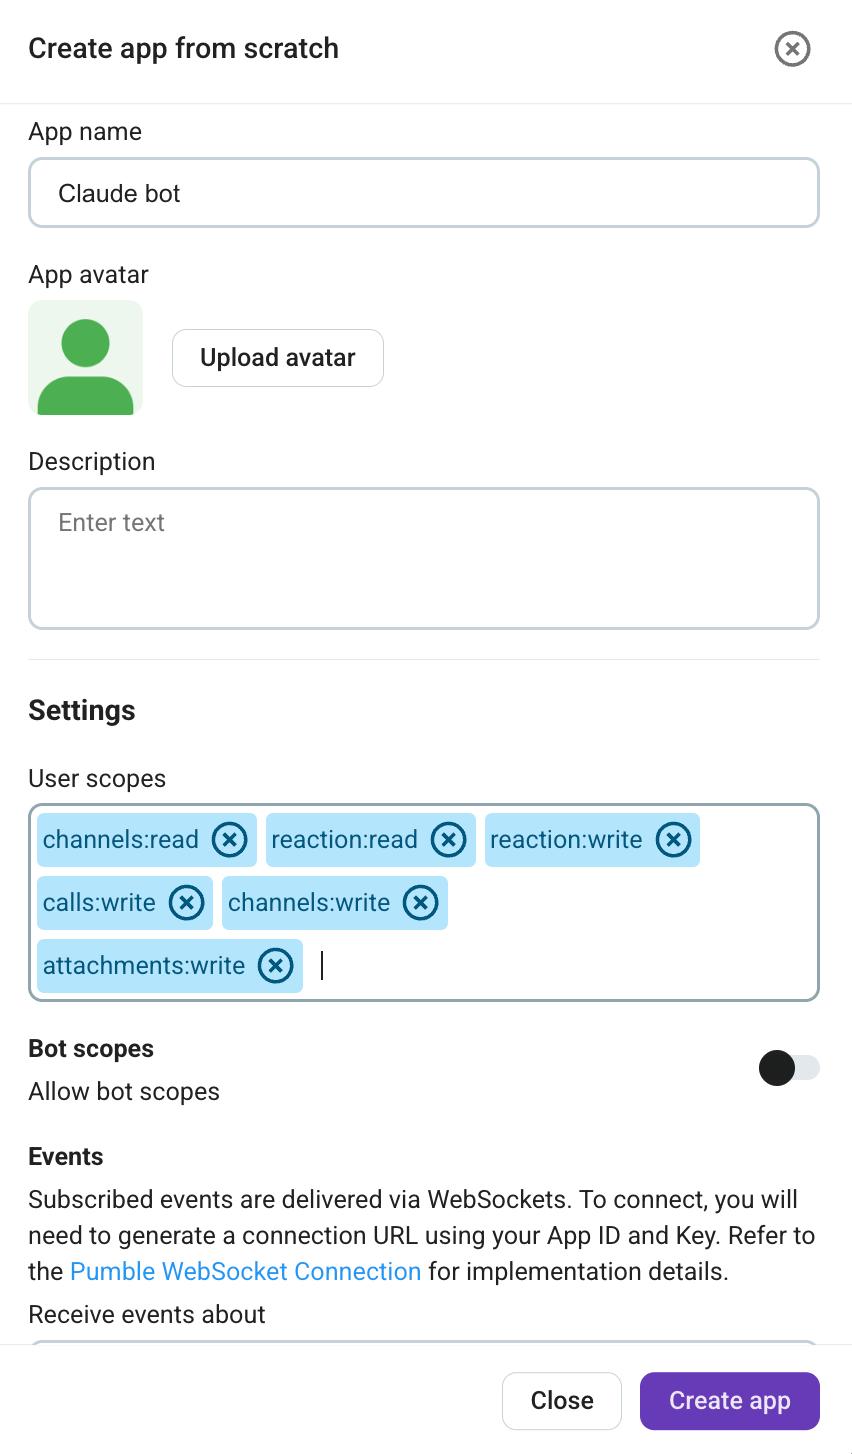
- Enter app name
- Enter description
- Select User scopes
- Select Bot scopes
- Click on Install app
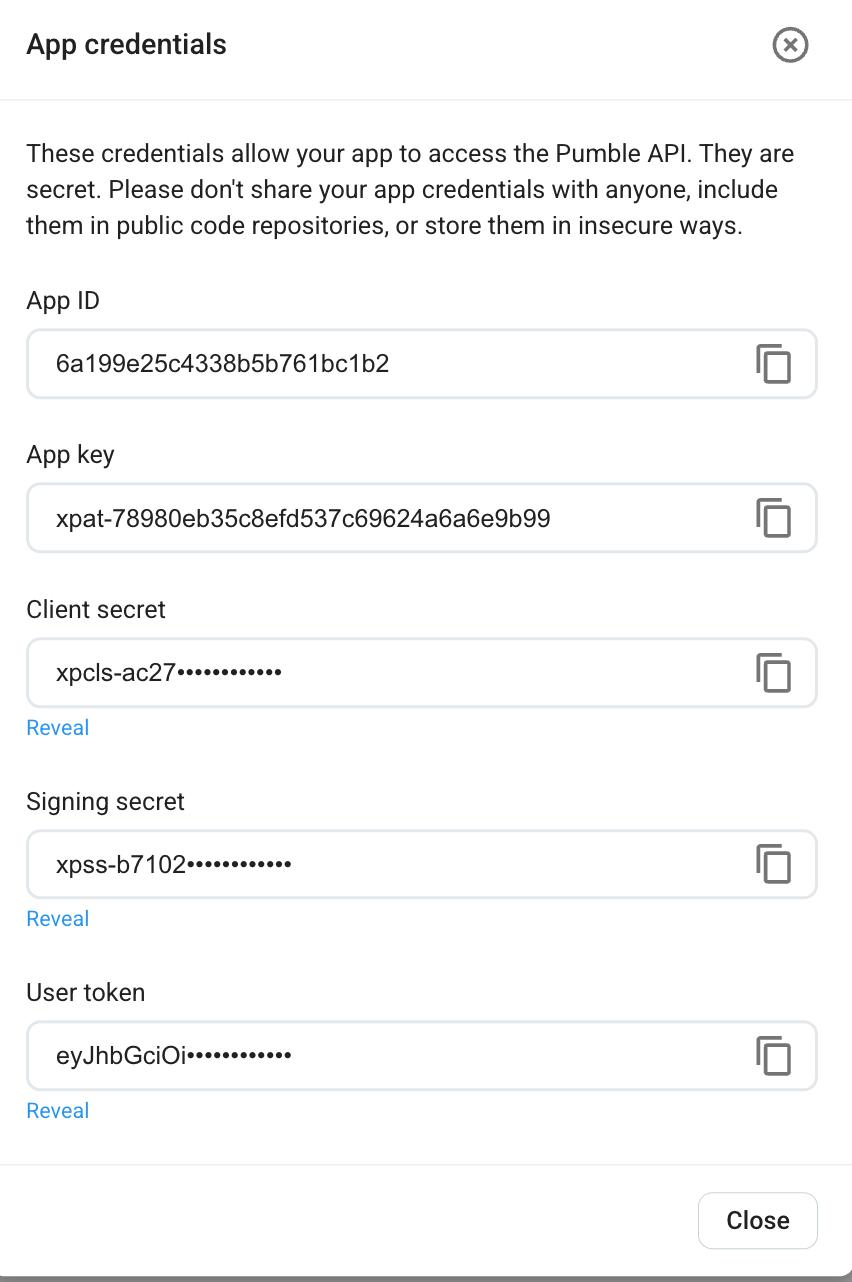
When the app is installed, make sure to copy the App key, user token, and bot token.
What can you do after connecting to the MCP server? #
The list of available MCP tools is dynamic and depends entirely on the specific scopes you selected when creating an app.
These are all the available tools that the Pumble MCP server lets you use:
| Tool | Required scopes |
|---|---|
| add_reaction_to_message | reaction:write |
| add_user_to_channel | channels:write |
| create_call_link | calls:write |
| create_channel | channels:write |
| delete_scheduled_message | messages:delete |
| edit_message | messages:edit |
| fetch_file | messages:read |
| get_channel_details | channels:read |
| get_channel_messages | messages:read |
| get_channels | channels:list |
| get_latest_messages | messages:read, channels:list |
| get_scheduled_messages | messages:read |
| get_thread_replies | messages:read |
| get_users | users:list |
| get_workspace_info | workspace:read |
| reply_to_message | messages:write, files:write |
| schedule_message | messages:write, files:write |
| search_messages | messages:read, channels:list |
| send_message | messages:write, files:write |
Moreover, you can use the following prompts to communicate with the MCP server:
| Prompt | Required scopes |
|---|---|
| create-channel-with-initial-users | channels:write |
| explain-pumble-mcp | No scopes required |
| send-channel-message | channels:read, messages:write |
| send-dm-message | channels:read, messages:write |
Connect Pumble MCP to Claude CLI #
If you are using Claude CLI, you can also connect it to the Pumble MCP server. To do this, paste the code below into your .mcp.json file.
{
  "mcpServers": {
    "pumble-mcp": {
      "type": "http",
      "url": "https://mcp.pumble.com/mcp",
      "headers": {
        "token": "user/bot token"
	"x-app-token": "xpat-token"
      }
    }
  }
}
Or, you can use the following command:
claude mcp add pumble-mcp https://mcp.pumble.com/mcp --transport http --header "token: token" --header "x-app-token: xpat-token"The x-app-token/xpat token is the App key you receive when you create an app from scratch.
Connect Pumble MCP to Codex CLI #
The Pumble MCP server can also connect to the Codex CLI. To do this, simply paste the code below into your config.toml file.
[mcp_servers.pumble-mcp]
transport = "http"
url = "https://mcp.pumble.com/mcp"
http_headers = { "token" = "user/bot token", "x-app-token" = "xpat-token" }
Connect Pumble MCP to Gemini CLI #
When you have created the custom addon, you can connect it to your Gemini CLI. To do so, paste the code below into your settings.json file.
{
  "mcpServers": {
    "pumble-mcp": {
      "httpUrl": "https://mcp.pumble.com/mcp",
      "headers": {
        "token": "user/bot token",
        "x-app-token": "xpat-token"
      },
    }
  }
}
You can also do this by using the command:
gemini mcp add pumble-mcp https://mcp.pumble.com/mcp \
  --transport http \
  --header "token: token
" \
  --header "x-app-token: xpat-token"
To connect Pumble MCP to your CLI, you will need the App key and user/bot tokens.
Use the Claude connector to connect to MCP #
Claude connector is a secure integration bridge that links Anthropic’s Claude to external software, cloud services, and databases. Built on the open Model Context Protocol (MCP) standard, it lets Claude fetch live context and execute actions inside third-party apps (e.g., Pumble) without manual copy-pasting.
Here’s how to add the Claude connector to your Pumble Workspace:
- Click on the three dots next to your Workspace name
- Hover over Workspace settings
- Click on Configure apps

- Click Install next to Claude connector
- Connect Claude to your Pumble Workspace
- Choose which permissions you want to allow

Once the Claude connector is connected to Pumble and permissions are set, you can use Claude to do certain actions in Pumble. Here are some tools you can use:
- Receive channel details
- Write/delete/edit messages
- Add reactions to messages
- Add users to a channel
- Schedule messages
- Receive Workspace info