 Updated: February 13, 2025
 Are you looking for an efficient and cost-effective communication tool? Then you might want to consider migrating from Slack to Pumble. With a simple migration process, Slack users can easily transfer their data, maintain their workflow, and enjoy the benefits of a powerful team communication tool.
If you’re considering this move, you probably have questions about the difference between these two platforms and the potential challenges you might face during the transition process.
In this article, we’ll discuss everything you need to know to successfully migrate your team from Slack to Pumble, and we will walk you through the migration process step by step.
- If you’re looking for an efficient and cost effective communication tool, you might want to consider migrating from Slack to Pumble.
- Pumble offers unlimited message history, a more affordable pricing structure, a built-in conferencing feature, and 24/7, 100% human customer support.
- Moving from Slack to Pumble is a simple process that includes:
- Setting up your Pumble workspace and starting the exporting process,
- Exporting your Slack archive and importing data from Slack into Pumble, and
- Organizing your channels and permissions in Pumble.
Why migrate from Slack to Pumble by CAKE.com?
Many teams choose to migrate from Slack to Pumble to gain unlimited message history and a more affordable pricing structure. Furthermore, unlike Slack, Pumble offers a built-in video conferencing feature and 24/7 customer support, ensuring a smooth transition for your team.
The free version of Slack is limited to just 3 most recent months of messages, but Pumble doesn’t have that limit. Even better, you can move all of your Slack messages — including those older than 3 months — over to Pumble.
Moreover, businesses that rely on productive collaboration and effective team communication often find Slack’s pricing restrictive, especially when scaling their operations. Pumble provides a more budget-friendly alternative offering essential features for free at the same time. On Slack, you have to pay per user. This can quickly get pretty expensive, especially if you want to preserve the chat history for a growing number of community users.
When you’re using Slack, access to messages older than 3 months, in addition to many other key features, are only available if you pay $8.25 per user per month, which adds up quickly even if you just want a chatroom for your colleagues. Pumble’s free version offers almost all of the features Slack puts behind a paywall. Most notably, Pumble eliminates the need to constantly delete messages to stay within Slack’s limits, ensuring access to any past conversations and important files.
Finally, Pumble supports excellent video and voice communication. Want to organize a quick team meeting? Just go to a channel and click on the video or headphone icon, and that’s it.
How to move from Slack to Pumble?
Your team will need to make a plan to avoid workspace attrition during the migration. Put together a strategy to announce the transition with frequent reminders about the timeline for the switch and clear instructions about how members can join Pumble. To ensure a smooth migration process, follow these steps:
Use Pumble, the best Slack alternative
#1 Set up your Pumble workspace
First, make sure to create a Pumble workspace and start importing your Slack data. Creating a workspace on Pumble is a piece of cake. Go to the registration page, insert your email address and workspace name — and that’s it.
Before doing this, you should give your team a heads-up and collect feedback. Let your members know that you are looking for an alternative to Slack. Walk them through the challenges you were facing with Slack, the benefits of Pumble, and the timeline for moving. Set aside at least a few weeks for this process.
Once your team is informed about the migration, you can create your Pumble workspace and initiate the move.
#2 Export your Slack archive
Slack users can export data such as messages, channels history, and links. However, depending on your Slack plan, you may have access to different levels of export options.
If you’re on a Slack’s Free or Standard plan, you’ll have limitations on what you can export. Other paid plans allow access to a more detailed export, including messages from public and private channels. Still, you may need to ask Slack support about exporting your direct messages.
To export your Slack archive, you need to be an Admin for the Slack workspace you want to export.
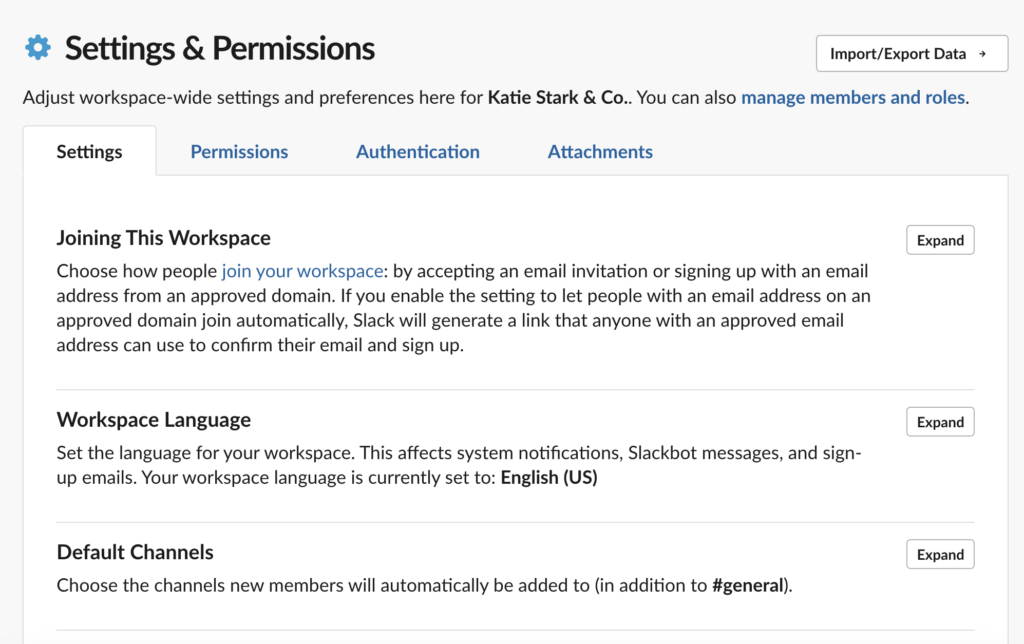
In Slack, click the name of your Slack workspace in the top-left corner, hover over Settings & Administration, then click Workspace Settings. This will open the Settings & Permissions page in your browser, where you will see an Import/Export Data button on the right.
Easily import your data to Pumble
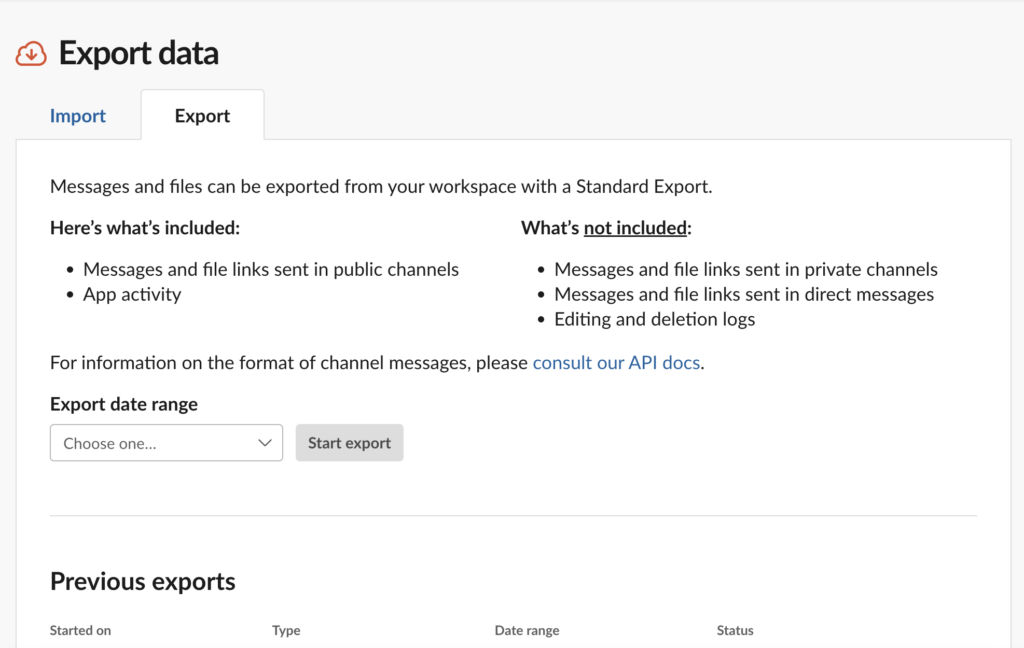
Click that button, then go to the Export tab. Select the date range you want to export, and click Start Export. The export process could take anywhere from a few minutes to a couple of hours, depending on how big your Slack archive is.
You will get a Slackbot DM and an email when this process is complete. When it’s ready, the archive will be a ZIP file in your Downloads folder.
The important part is that you don’t edit the file before importing it to Pumble, as it will disrupt the import process.
#3 Import data from Slack into Pumble
Once you’ve exported your data from Slack, you can import it into Pumble. The data includes channels history, user information, and message history, giving you continuity in communication.
Pumble’s import tools are designed to make the transition as simple as possible, allowing you to keep all important information without losing context. And, if you need assistance, Pumble’s 24/7 support team can guide you through the process.
How to import data into Pumble?
Click on your workspace name in the top left corner, and then go to Workspace settings. Click the General settings and on your left sidebar, you’ll see the Import and Export tab — click on it, and select the option to import data from Slack.
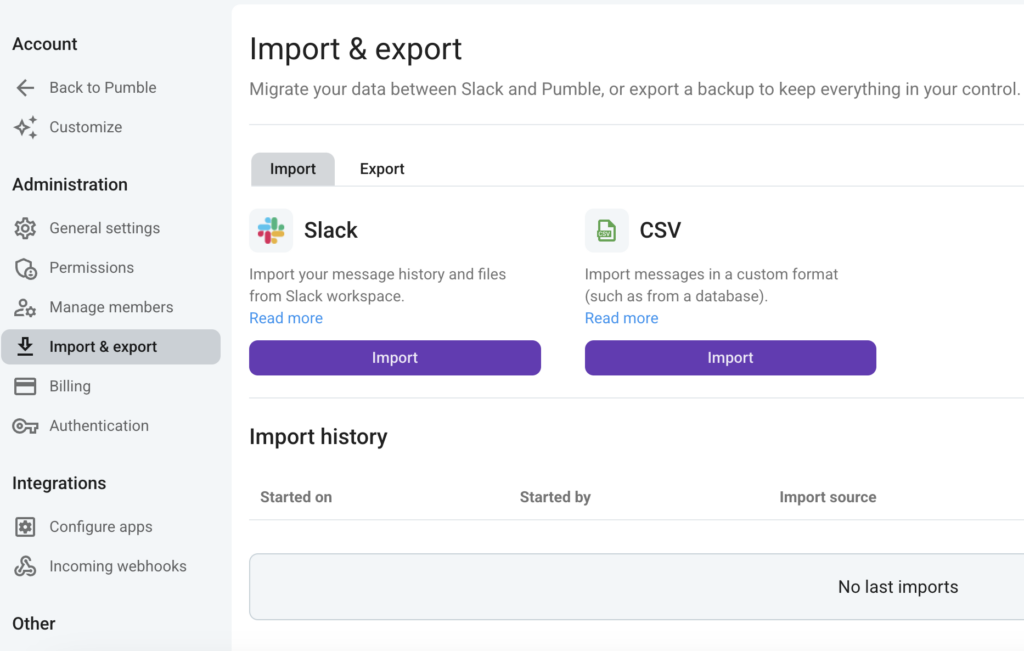
Choose the ZIP file option and select the file you’ve downloaded previously from Slack.
Confirm the file and click on Start import. Depending on the amount of data in your file, importing it might take some time.
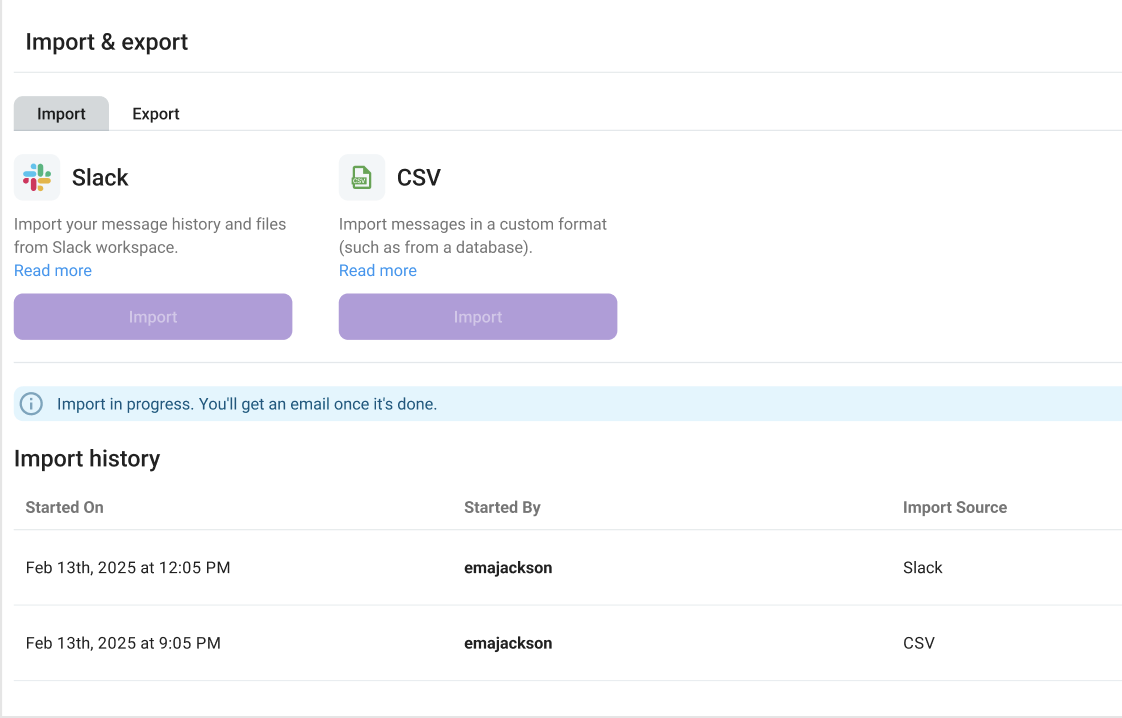
You’ll receive an email when your workspace is fully ready. The files shared on Slack will not be imported to Pumble, but the links shared in messages on Slack will be preserved and imported. If a member already exists, their Slack messages will be merged into their existing Pumble account. If a member does not already exist, they will receive a new account invitation that they need to activate.
#4 Organize channels and permissions in Pumble by CAKE.com
When you enter your Pumble workspace, you’ll see that every public channel has been imported together with all your members.
You can customize your workspace by switching channels from public to private, ensuring that sensitive information is shared only with the relevant teams or team members. This step is crucial for maintaining security and keeping the communication structure as it used to be in Slack.
You can search through your message history in channels to easily find everything you need, and send direct messages to your team members.
Aside from that, you can go to your workspace Settings and Permissions and check if everything is as it should be, or if you need to make some changes in your workspace permissions. Take this opportunity to clean up unused channels, rename discussions for clarity, and organize your workspace so your team can be more productive.
#5 Train your team for a smooth transition
To maximize efficiency, provide guidance to your team for using Pumble’s features, including direct messaging, video conferencing, and integrations. Consider setting up a training session with Pumble’s success team if you’re on some of the paid plans to help your team adapt to the new environment. Encouraging team members to explore Pumble’s features and asking questions will ensure a more comfortable and confident transition.
Set everything you want, and start your Pumble journey!
Conclusion
There are plenty of benefits of moving from Slack to Pumble. Most notably, Pumble offers:
- Unlimited messages history,
- Cost effectiveness, and
- 24/7 customer support.
Migration from Slack to Pumble doesn’t have to be complicated. With a structured migration process, Slack users can move their data and continue collaborating without interruptions.
Ready to make the switch? Start the migration of your data from Slack to Pumble today! Your commitment to following our guide on exporting from Slack and importing to Pumble has brought you one step closer to a more efficient team collaboration experience.
For more details, check out our help page or contact our support team for assistance.
Get started with Pumble by CAKE.com
How we reviewed this post: Our writers & editors monitor the posts and update them when new information becomes available, to keep them fresh and relevant.