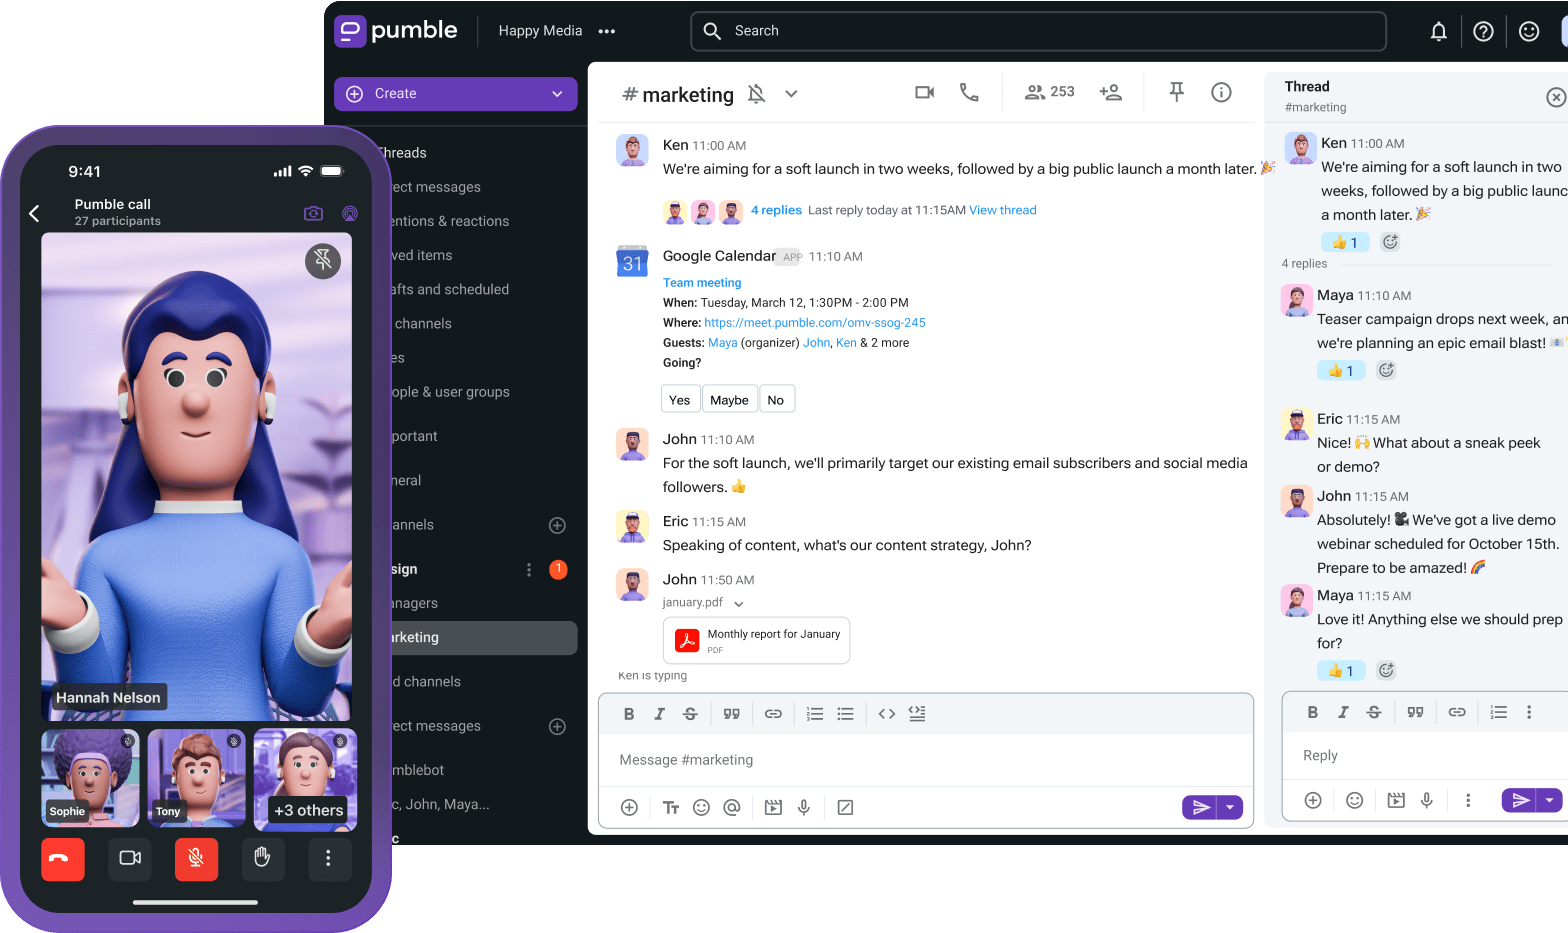
Looking for an efficient and cost-effective communication tool?
Are Slack’s limitations making your conversations disappear?
If so, you should consider migrating from Slack to Pumble.
With a simple migration process, former Slack users can easily:
- Transfer their data to Pumble.
- Maintain their workflow.
- Enjoy the benefits of a powerful team communication tool.
In this article, we’ll discuss everything you need to know to successfully migrate your team from Slack to Pumble, and we’ll walk you through the process step by step.
- If you’re looking for an efficient and cost-effective team communication tool, consider moving from Slack to Pumble.
- Pumble organizes and preserves your entire team communication for free.
- Migrating from Slack to Pumble involves setting up your Pumble workspace, exporting your Slack archive, and importing your data into Pumble.
Why migrate from Slack to Pumble?
Many teams choose to migrate from Slack to Pumble to host all their conversations and get an overall more affordable Slack alternative.
Here are all the core benefits that put Pumble on the list of the best team chat apps and make organizations move their team collaboration from Slack to Pumble:
- Unlimited message history. Unlike Slack’s free version, which limits access to messages to the last 90 days only, Pumble lets you keep and search your entire message history forever. Furthermore, you can move your complete Slack archive — including messages older than 3 months — directly into Pumble.
- A budget-friendly pricing model. Slack’s pricing is notoriously expensive (starting at $7.25 per user per month, billed annually). In contrast, Pumble pricing is more affordable (starting at $2.49 per user per month, billed annually), and it offers essential features for free.
- Built-in video conferencing feature. While Slack’s Huddle feature supports informal chats with screen sharing, Pumble provides a comprehensive video conferencing experience that includes native meeting recording.
- 24/7 customer support even on the free plan. Free Slack users don’t have access to customer support. Help on the Slack free plan is limited to community resources. Pumble, on the other hand, gives all users free access to human customer support at any time.
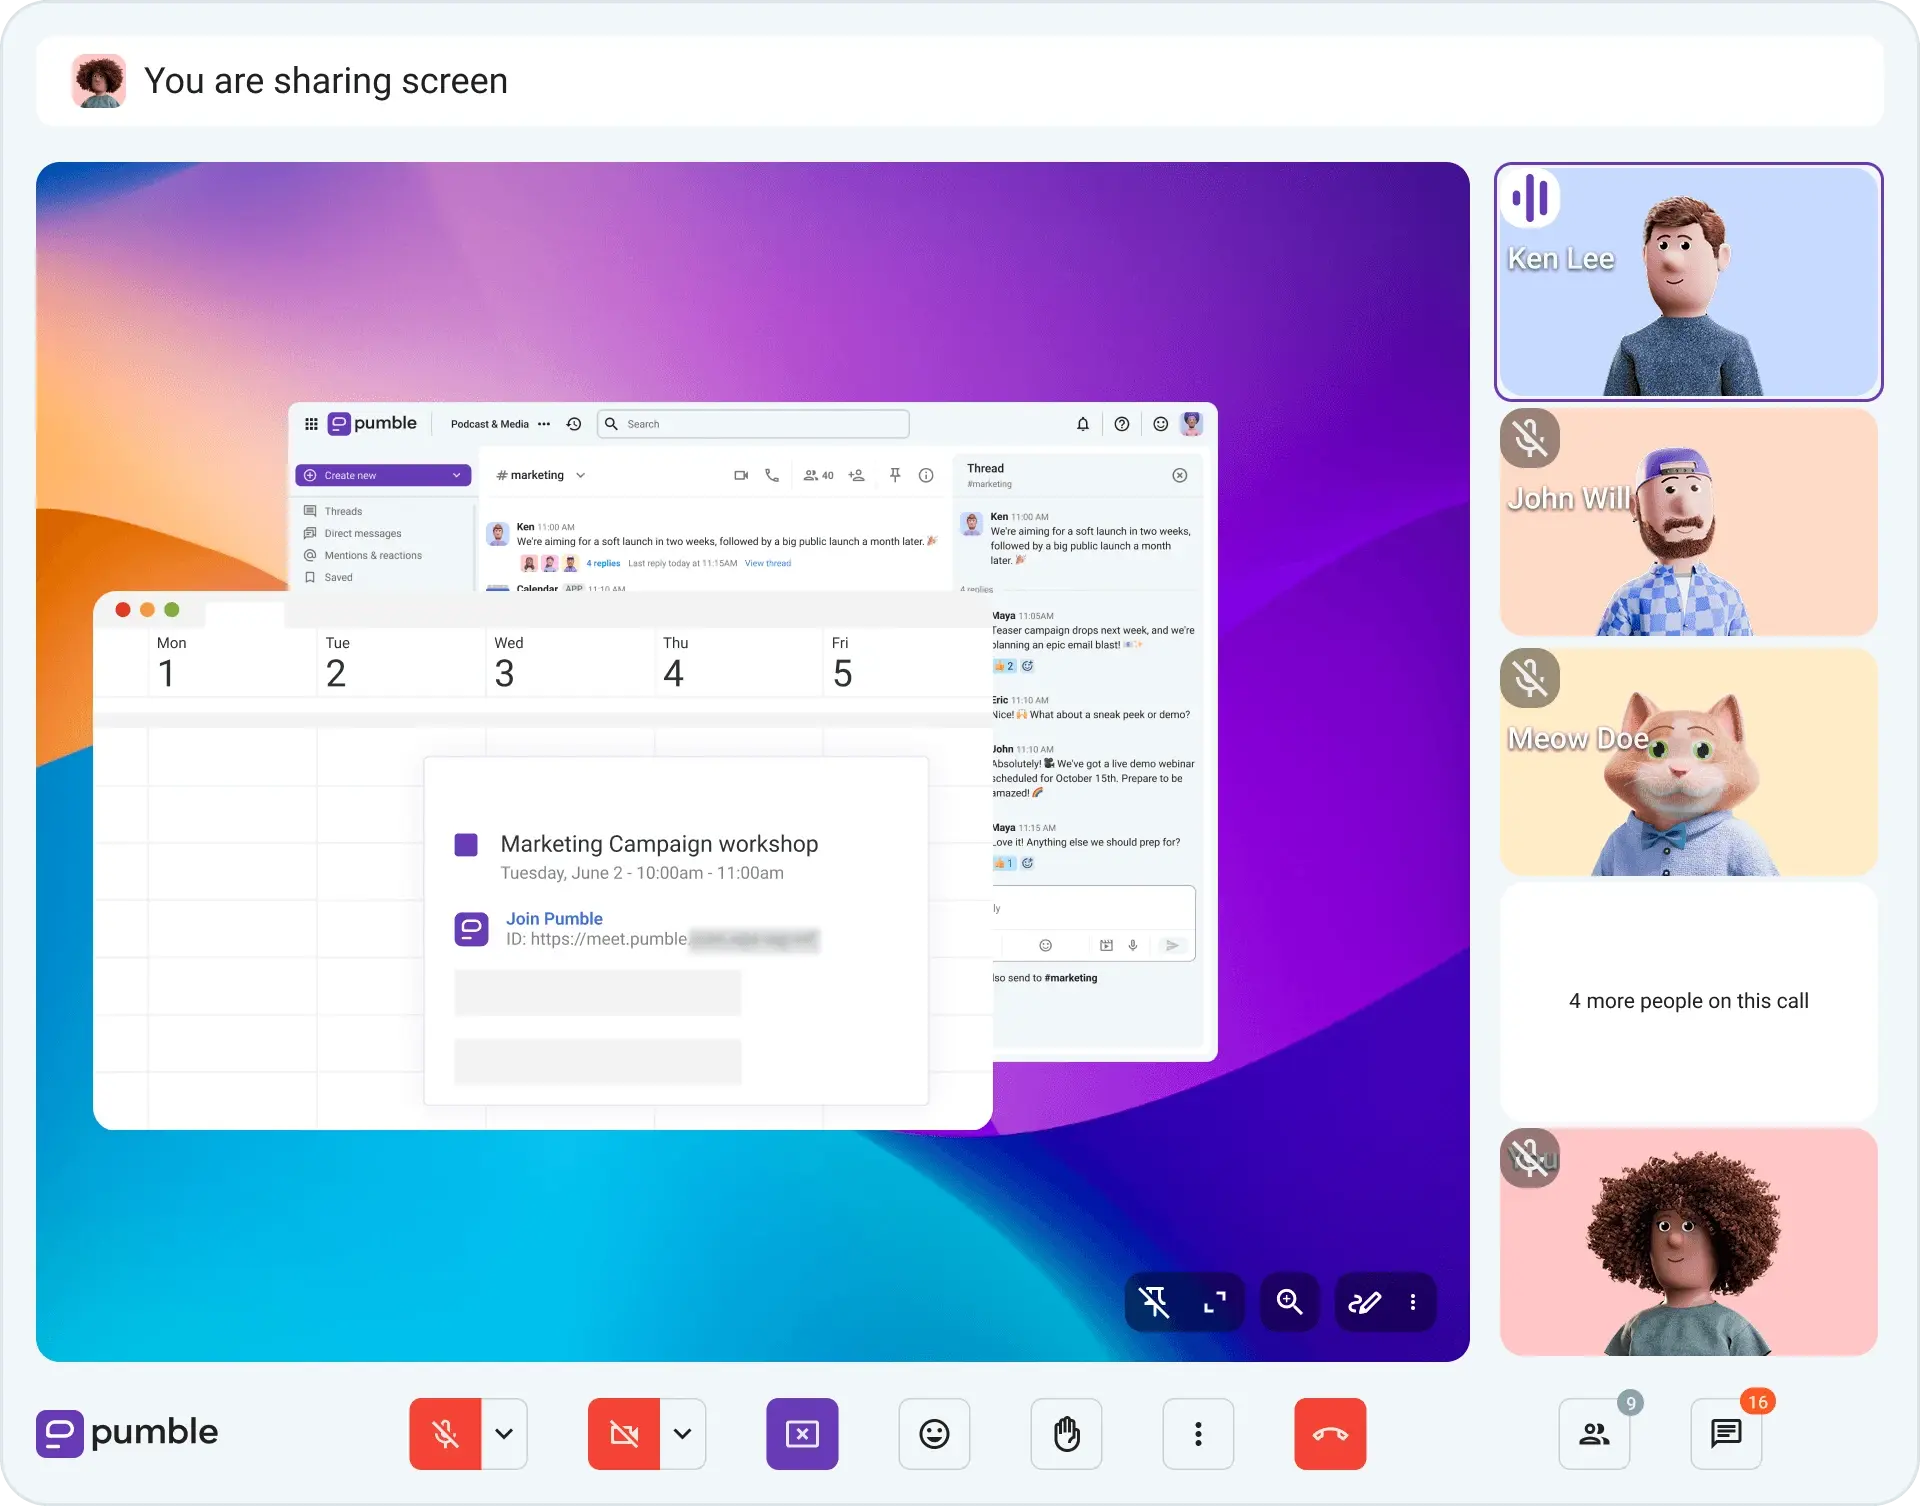
Use Pumble, best Slack alternative
How to move from Slack to Pumble?
To avoid workspace attrition during the migration, you’ll need to:
- Put together a strategy to announce the transition.
- Schedule frequent reminders about the timeline for the switch.
- Add clear instructions about how members can join Pumble.
Now, let’s walk through the step-by-step process you can follow to ensure a smooth migration from Slack to Pumble.
#1: Set up your Pumble workspace
Before you can import your Slack data, you need to create a Pumble workspace. To do so, go to the registration page, and enter your email address and workspace name.
However, before taking this step, you should give your team a heads-up about the upcoming migration and ask for their feedback. Let your members know that you are evaluating alternatives to Slack, and walk them through the:
- Challenges you are facing with Slack
- Benefits of switching to Pumble
- Timeline for the actual move
Plan to set aside at least a few weeks for this process. Once your team is informed about the migration, you can officially create your Pumble workspace and initiate the move.
#2: Export your Slack archive
Slack lets workspace administrators export data such as messages, channels history, and links. However, your available export options will depend on your Slack plan.
If you’re on Slack’s Free or Pro plan, you’ll have limitations on what you can export. Other paid plans allow access to a more detailed export, including messages from public and private channels. Still, you may need to ask Slack support about exporting your direct messages.
Here’s a closer look at Slack’s export limits by plan:
| Slack’s plan | What you can export | Export requirements & nuances |
|---|---|---|
| Free | Messages and file links from public channels only (limited to past 90 days of message history) | Workspace owners and admins can export. |
| Pro | Messages and file links from public channels only (unlimited message history) | Owners and admins can export. |
| Business+ | Messages and file links from public and private channels, direct messages, and a detailed list of channels | Full content exports require workspace owners to apply and demonstrate legal or corporate policy eligibility. You can also schedule recurring exports. |
| Enterprise+ | Messages and file links by conversation type, member or for a specific workspace, and data from all conversations for a single user | Organization owners can export all data and use the Discovery API for automated exports and third-party data loss prevention (DLP) tools. |
To export your Slack archive, you need to be an Admin for the Slack workspace you want to export.
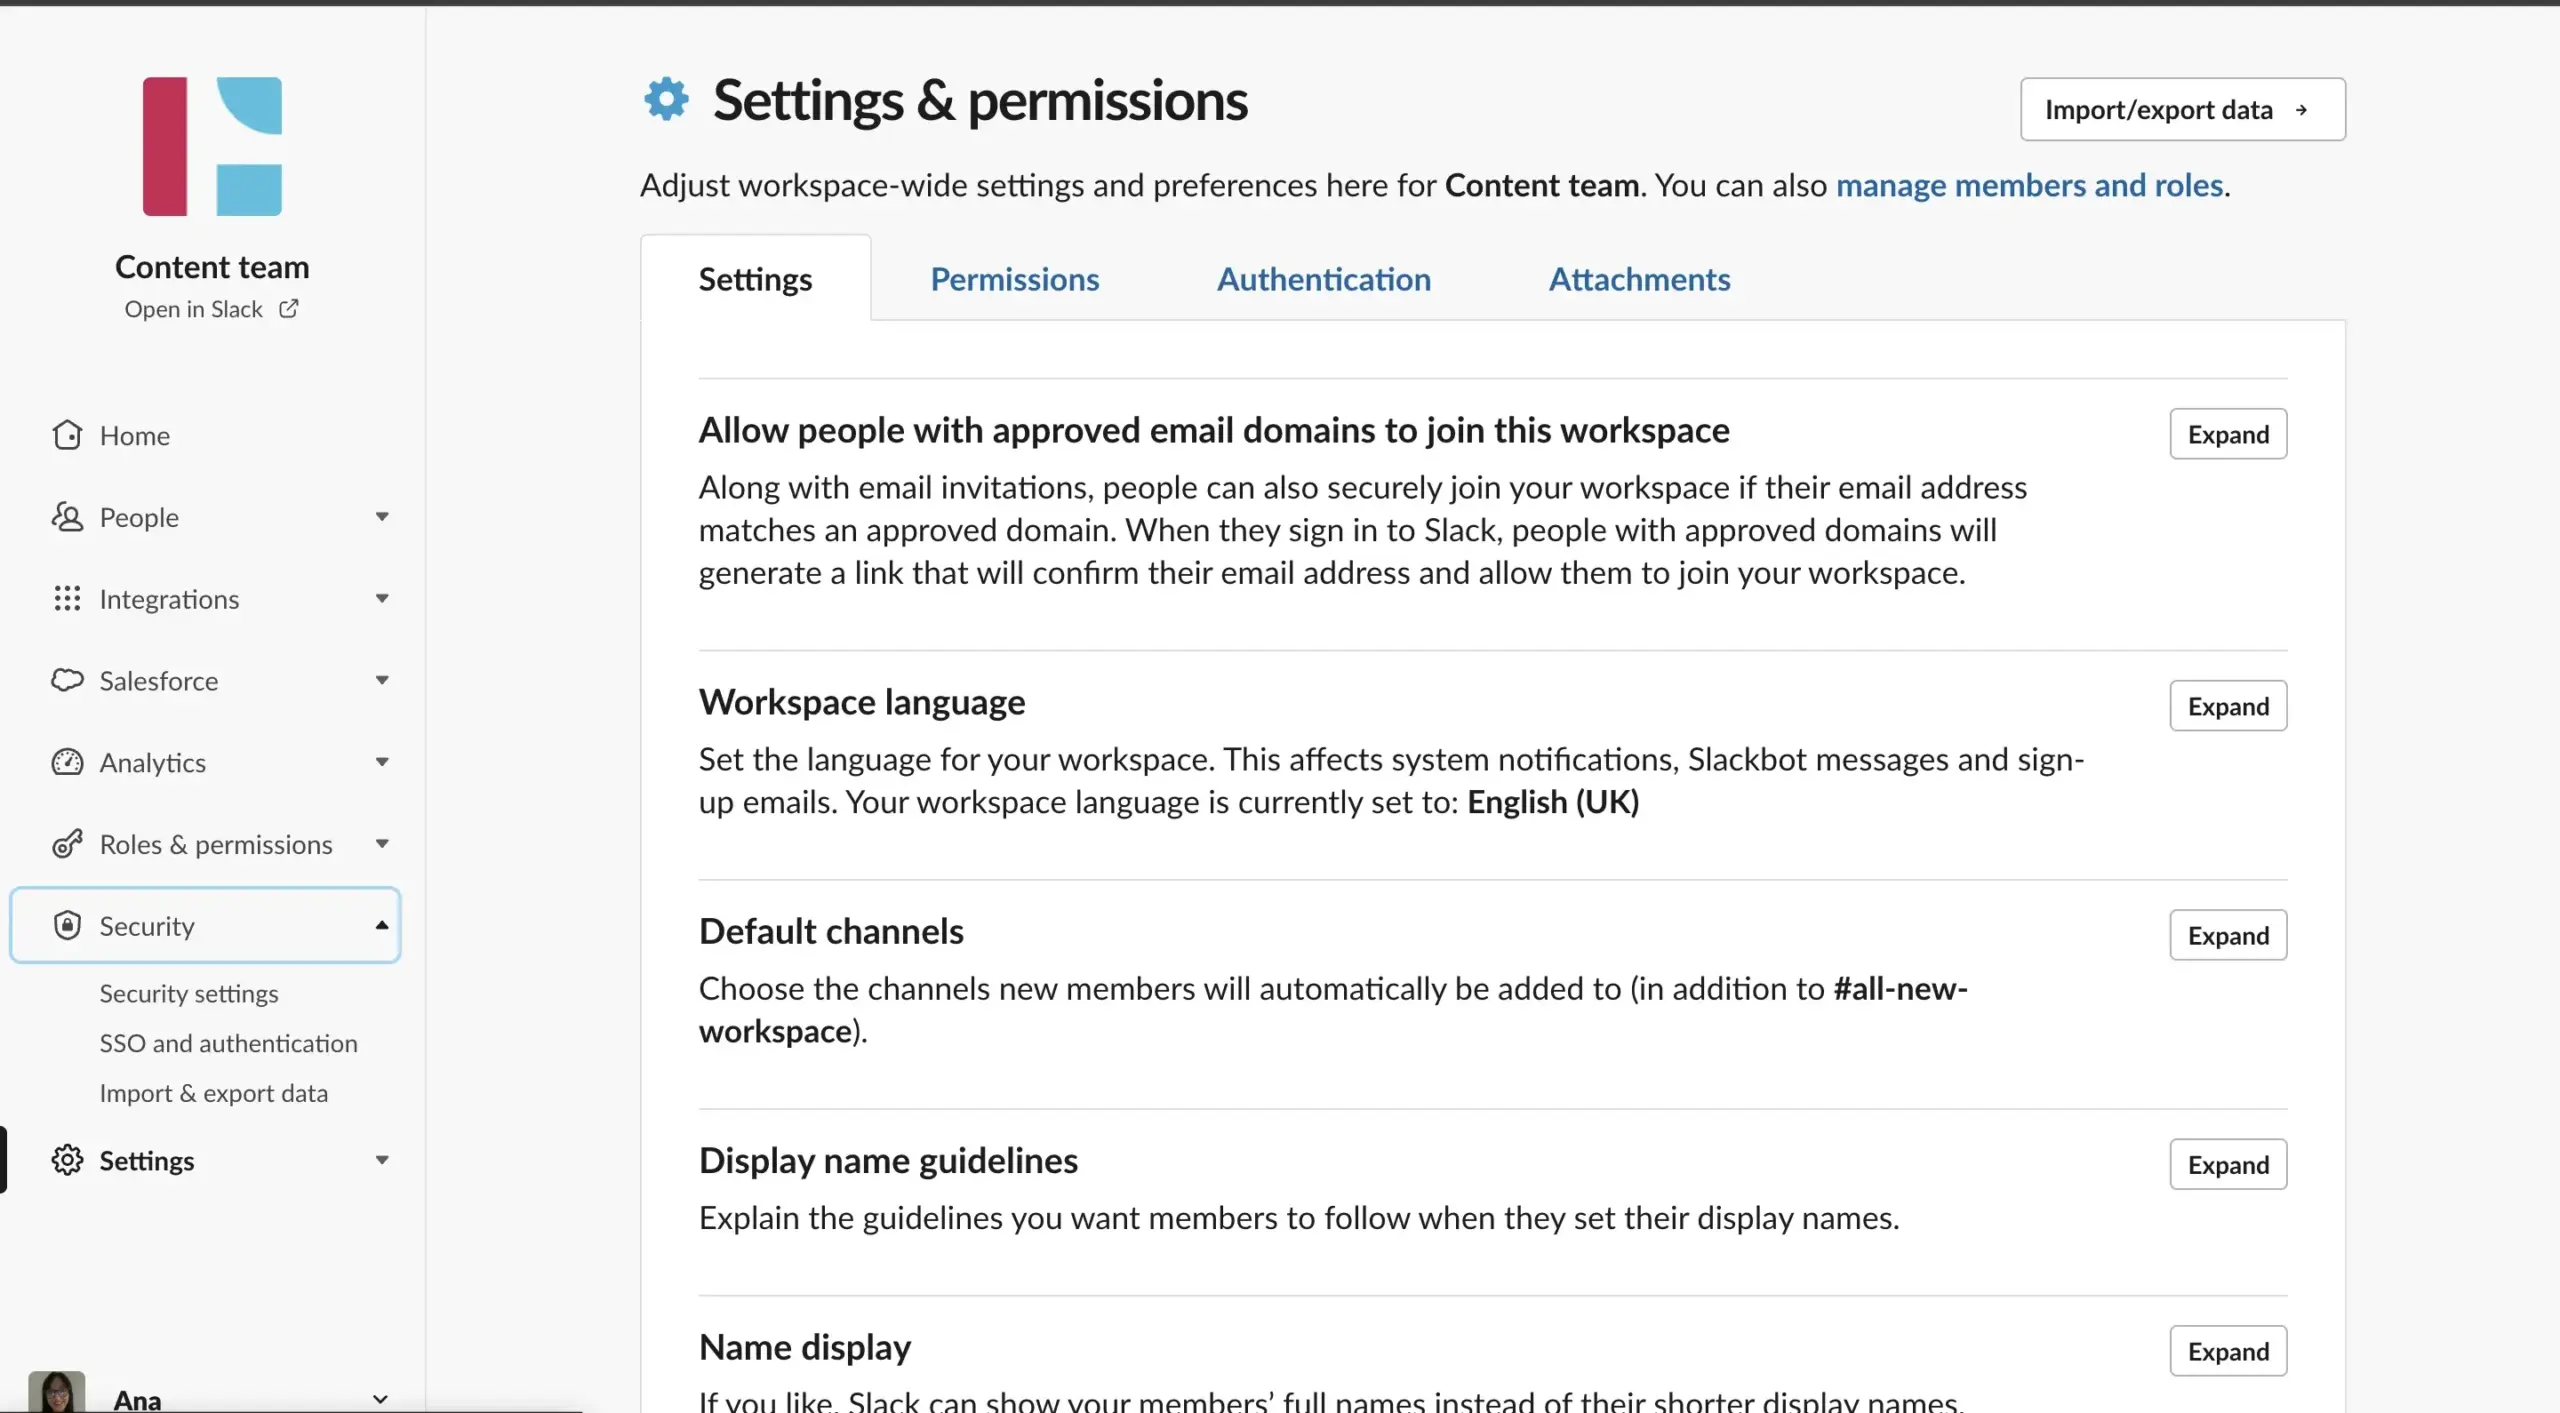
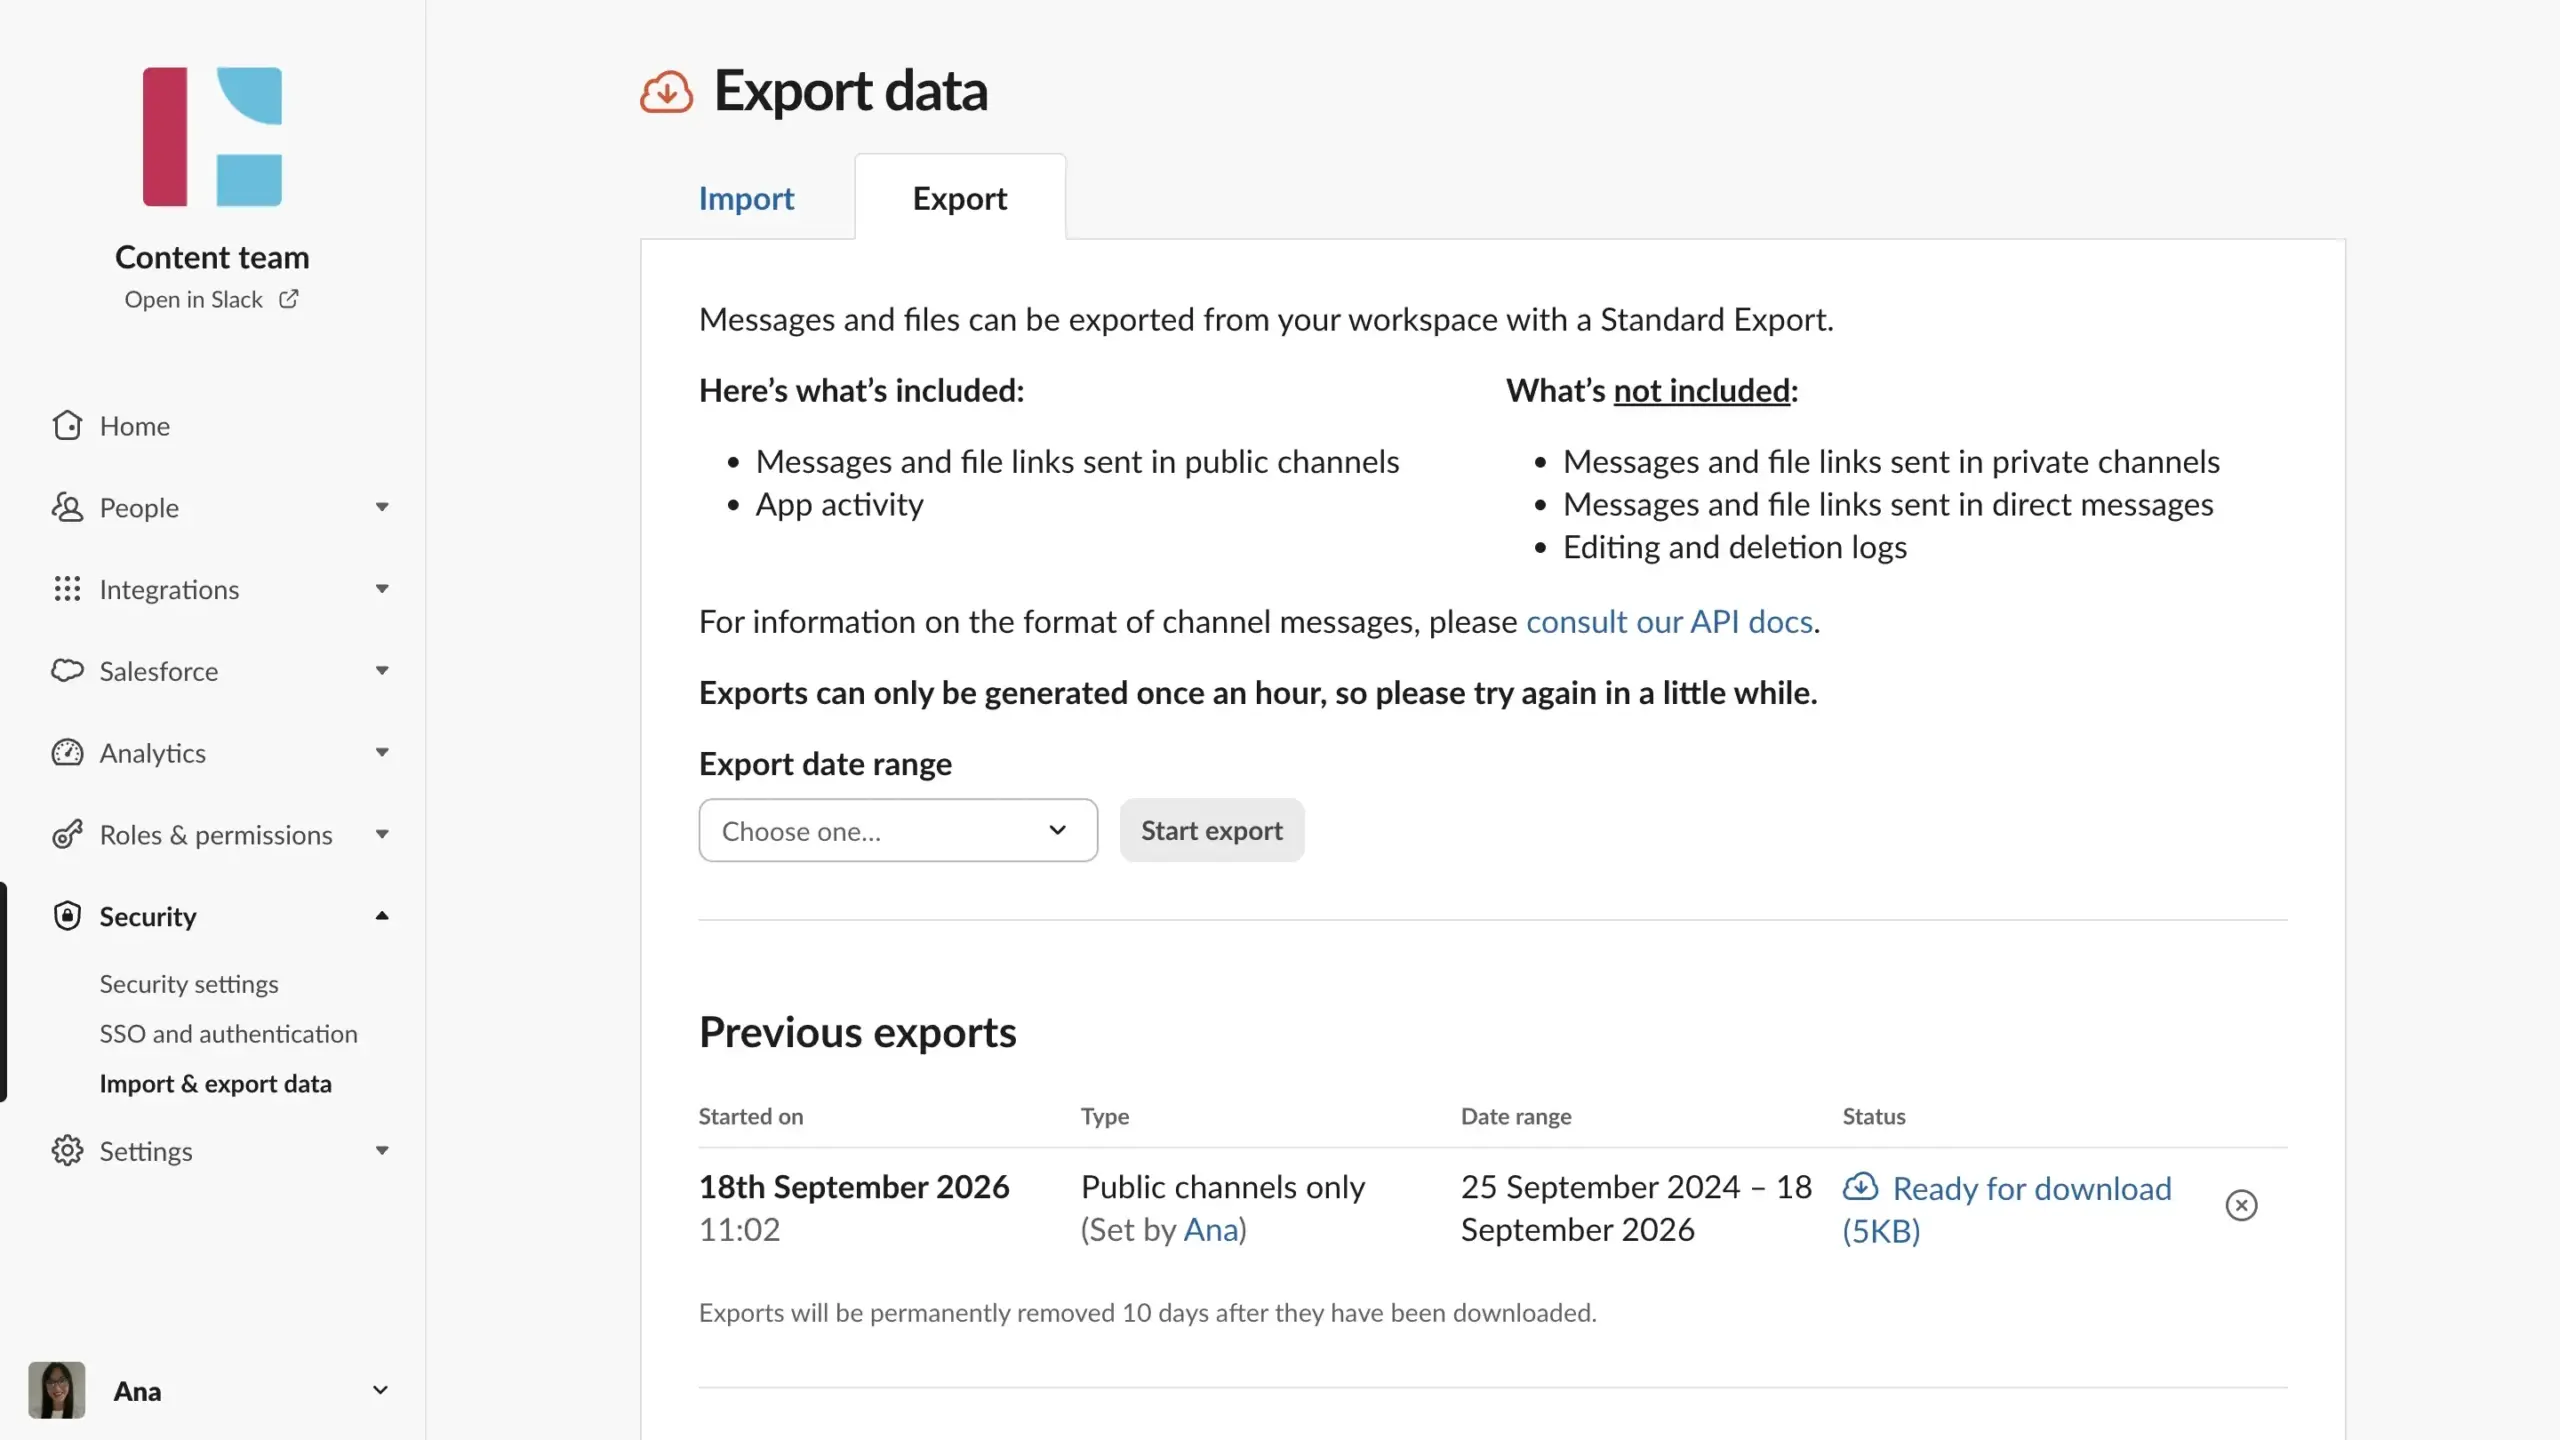
- From your Slack workspace hover over the Admin option in the sidebar and select Workspace Settings from the menu.
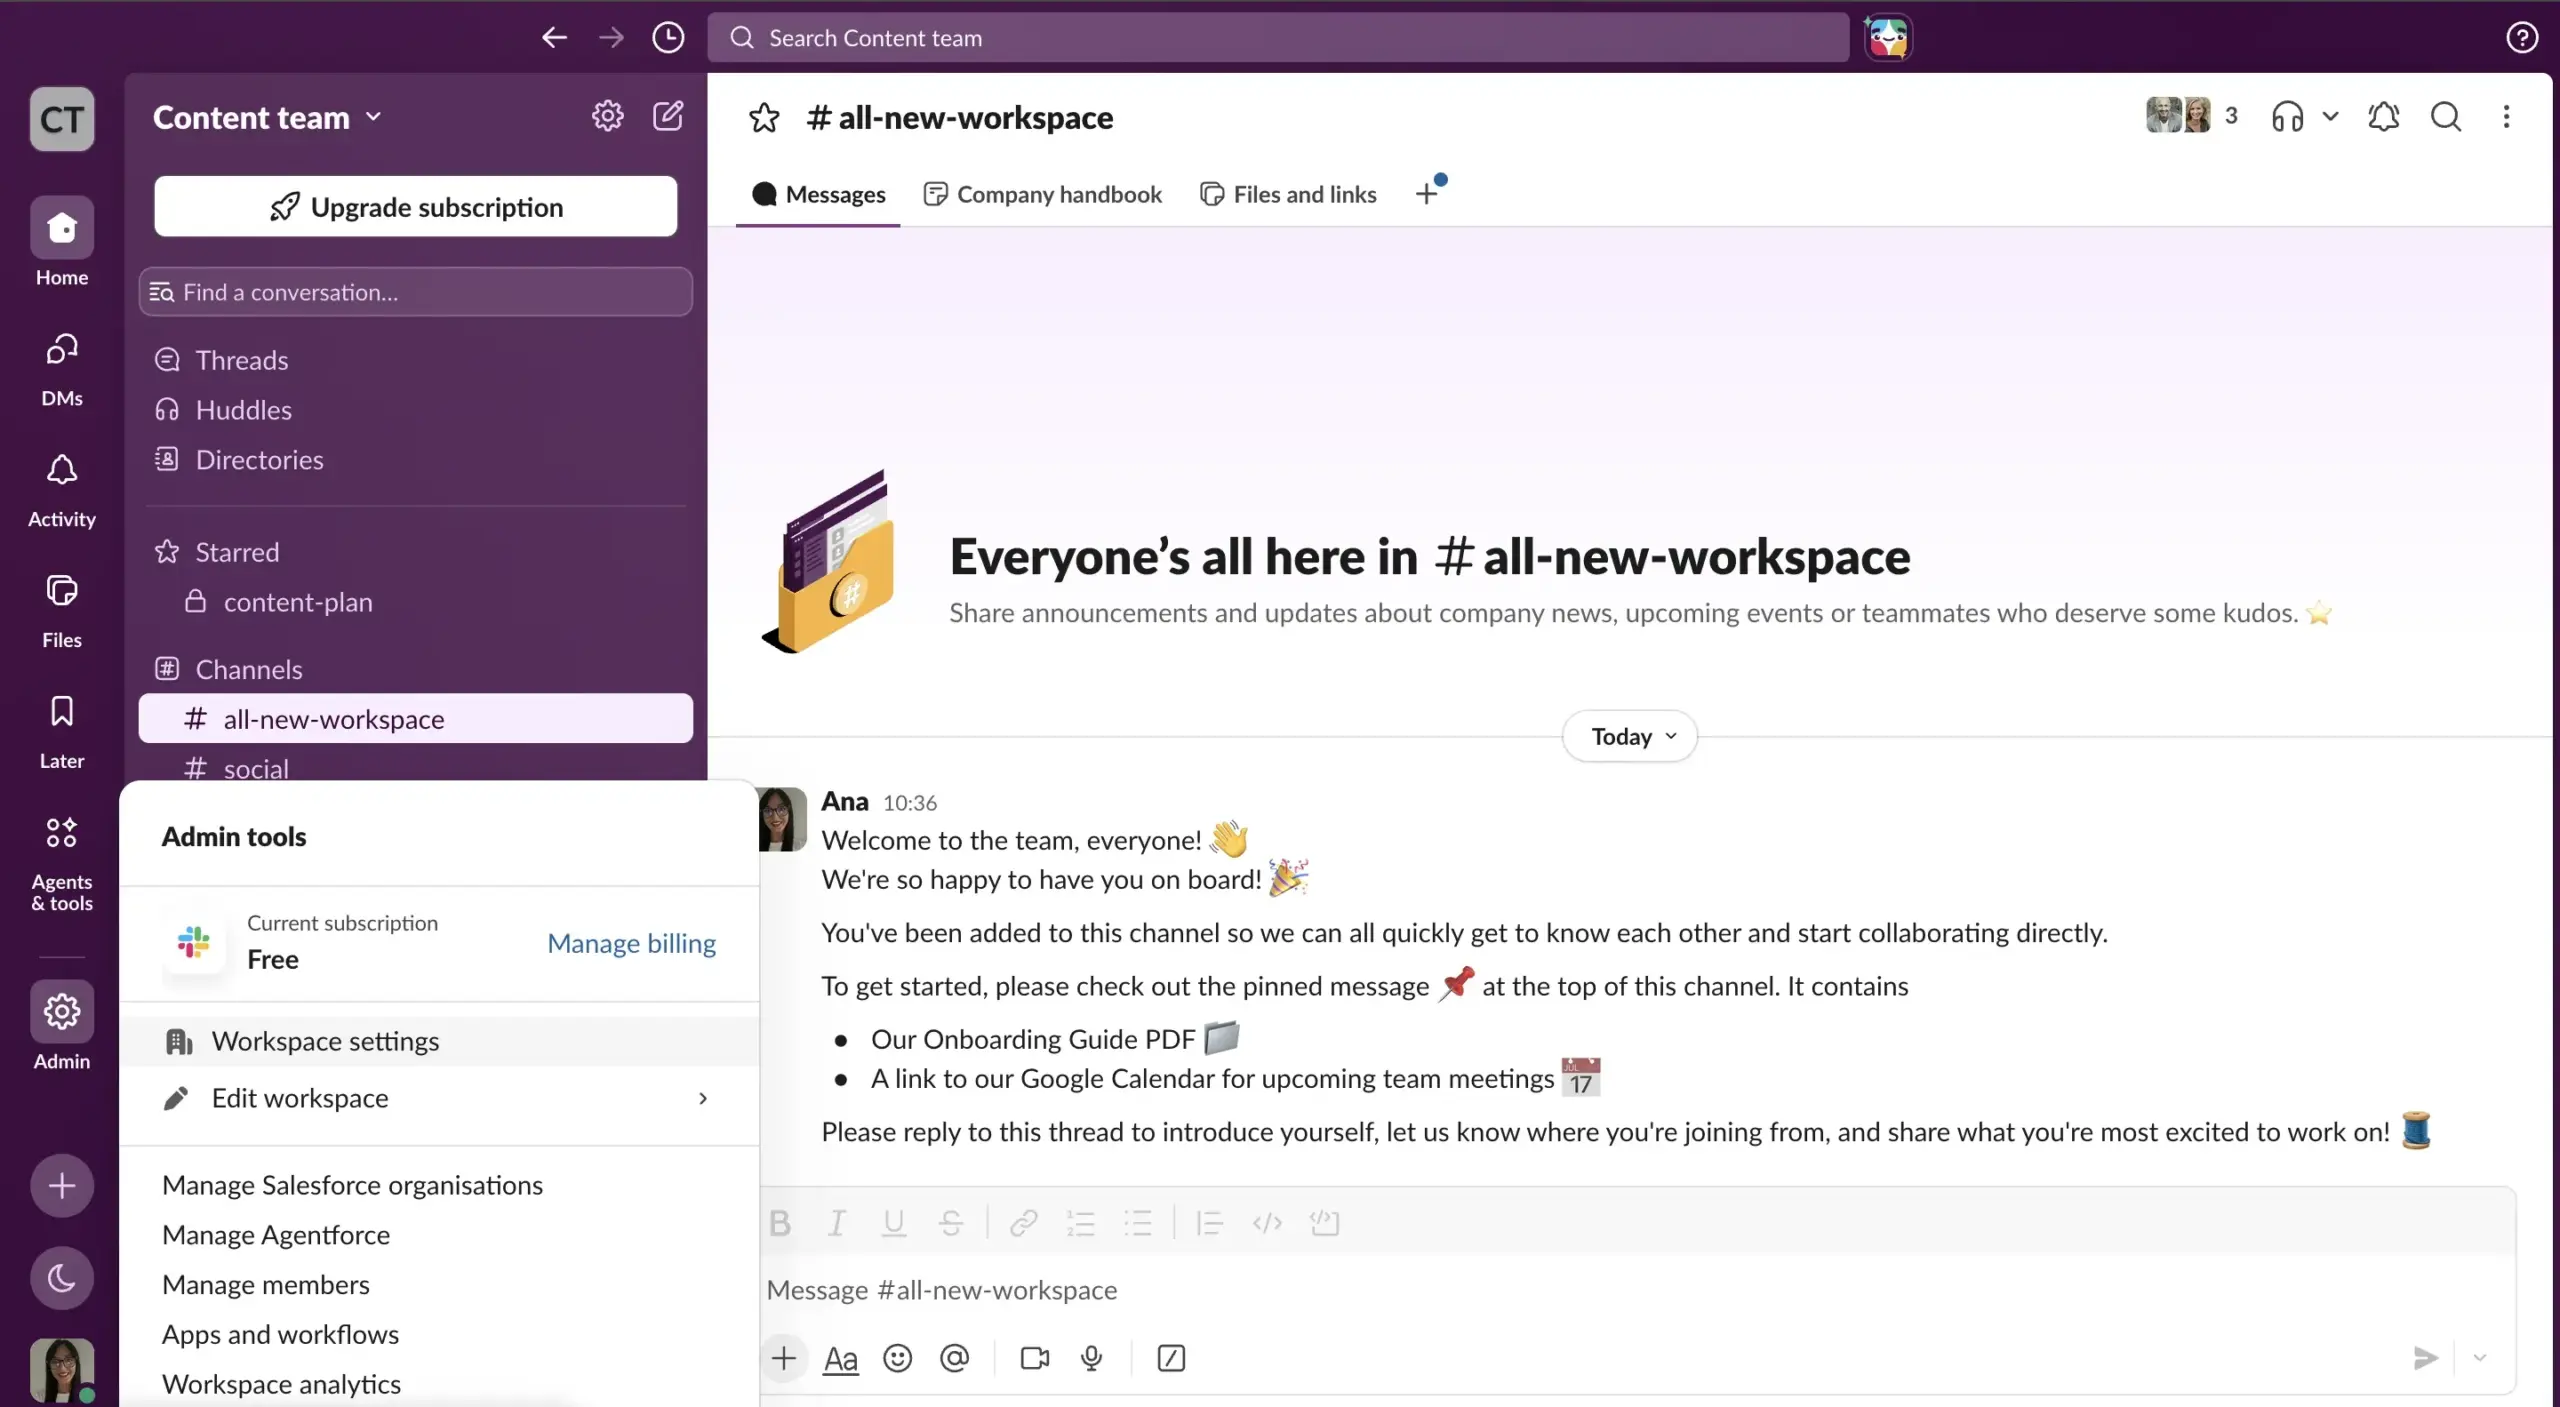
- From the Settings & Permissions page, click Security.
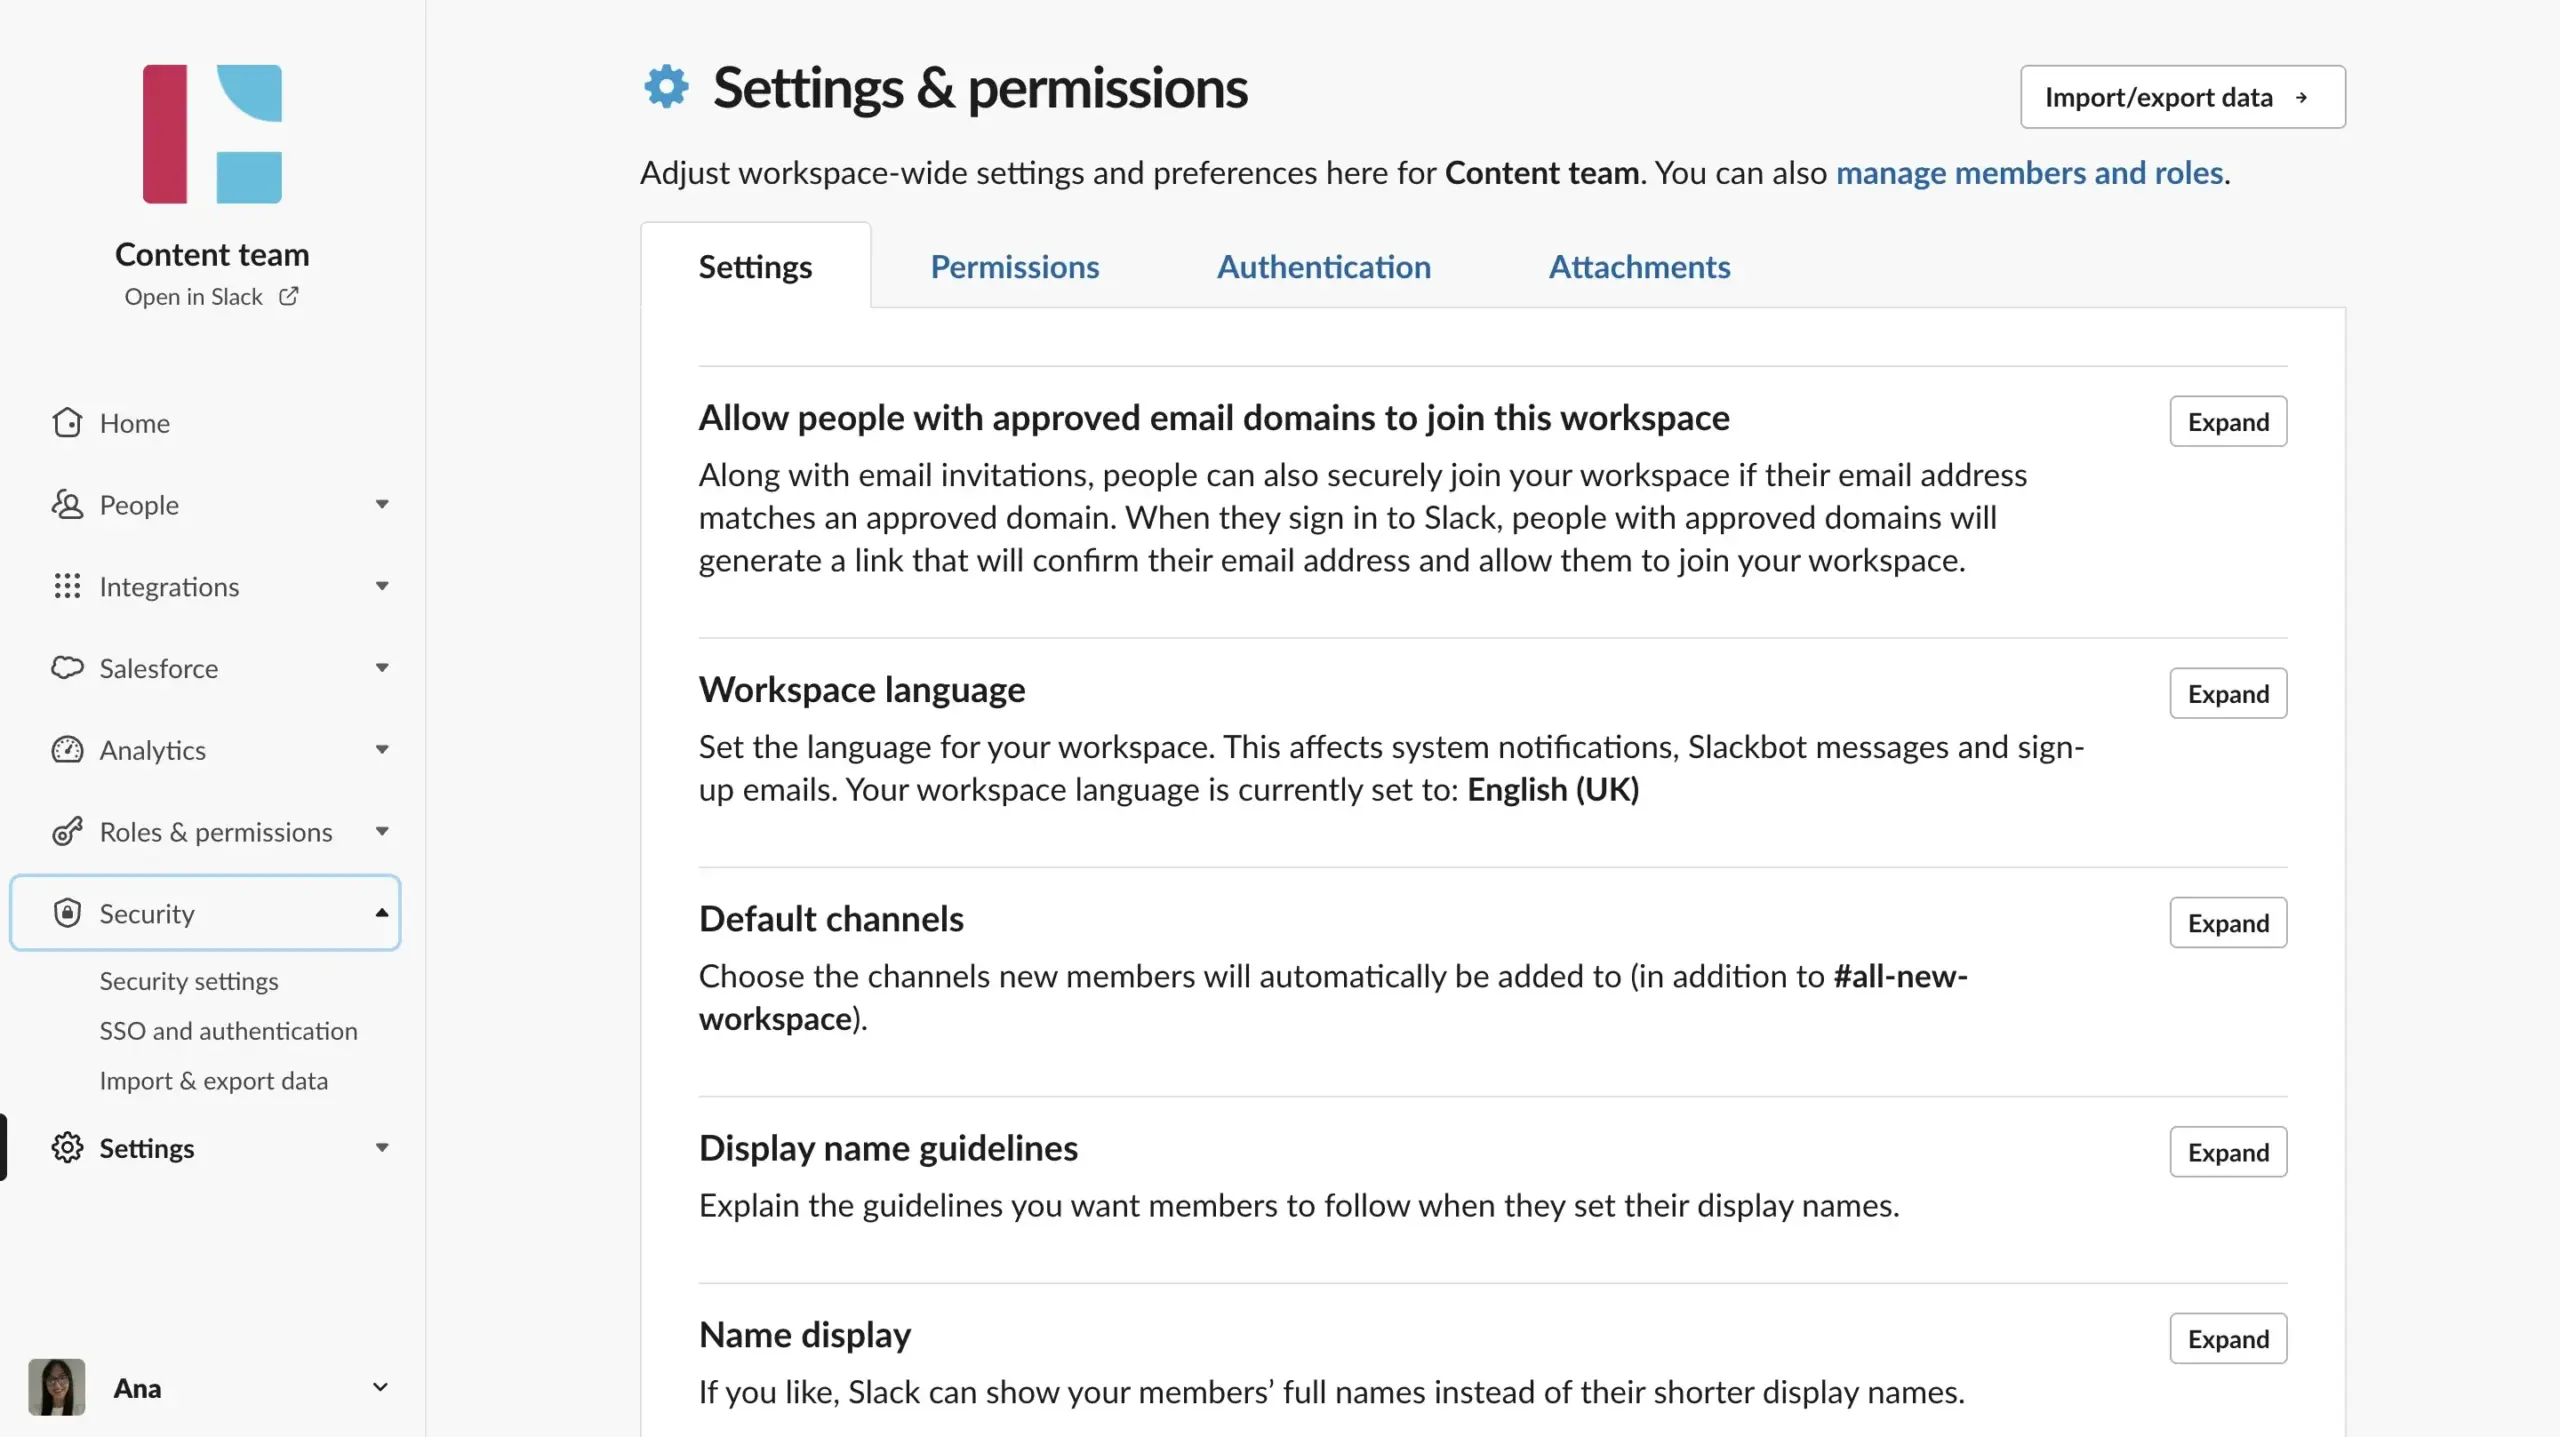
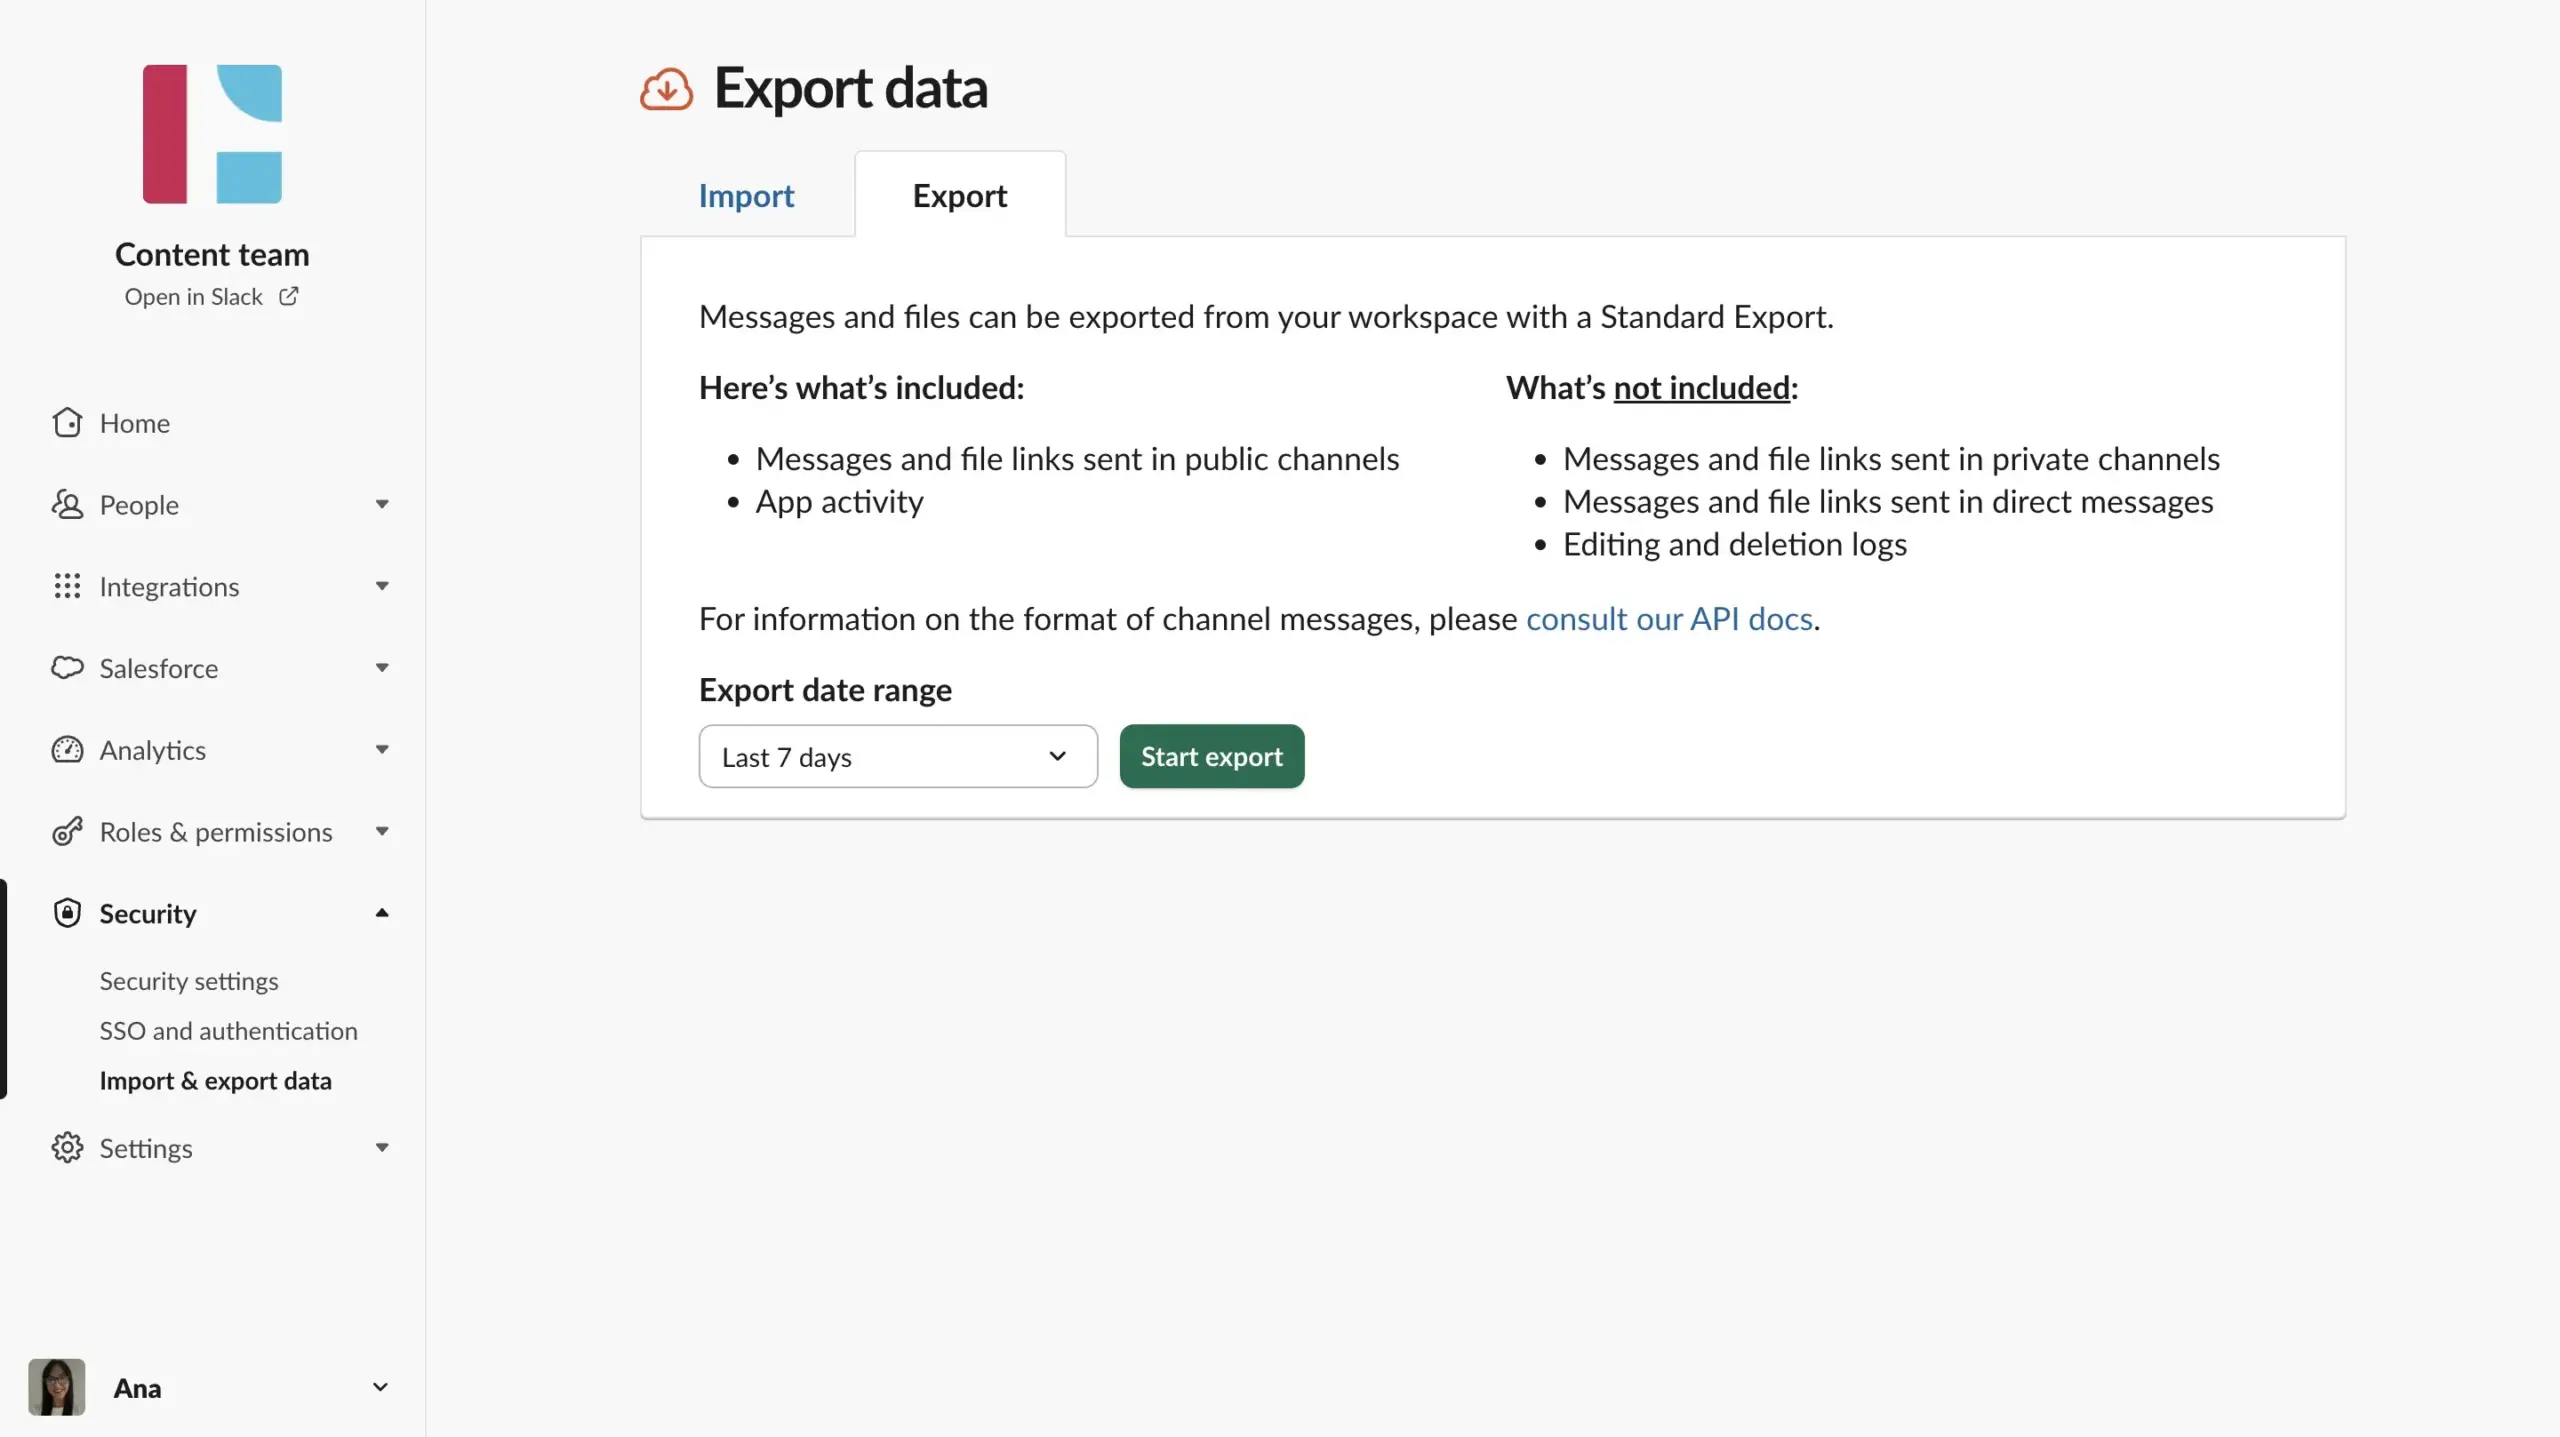
- Select Import & export data from the menu, and click the Export tab.
- Select the date range you want to export, and click Start Export.
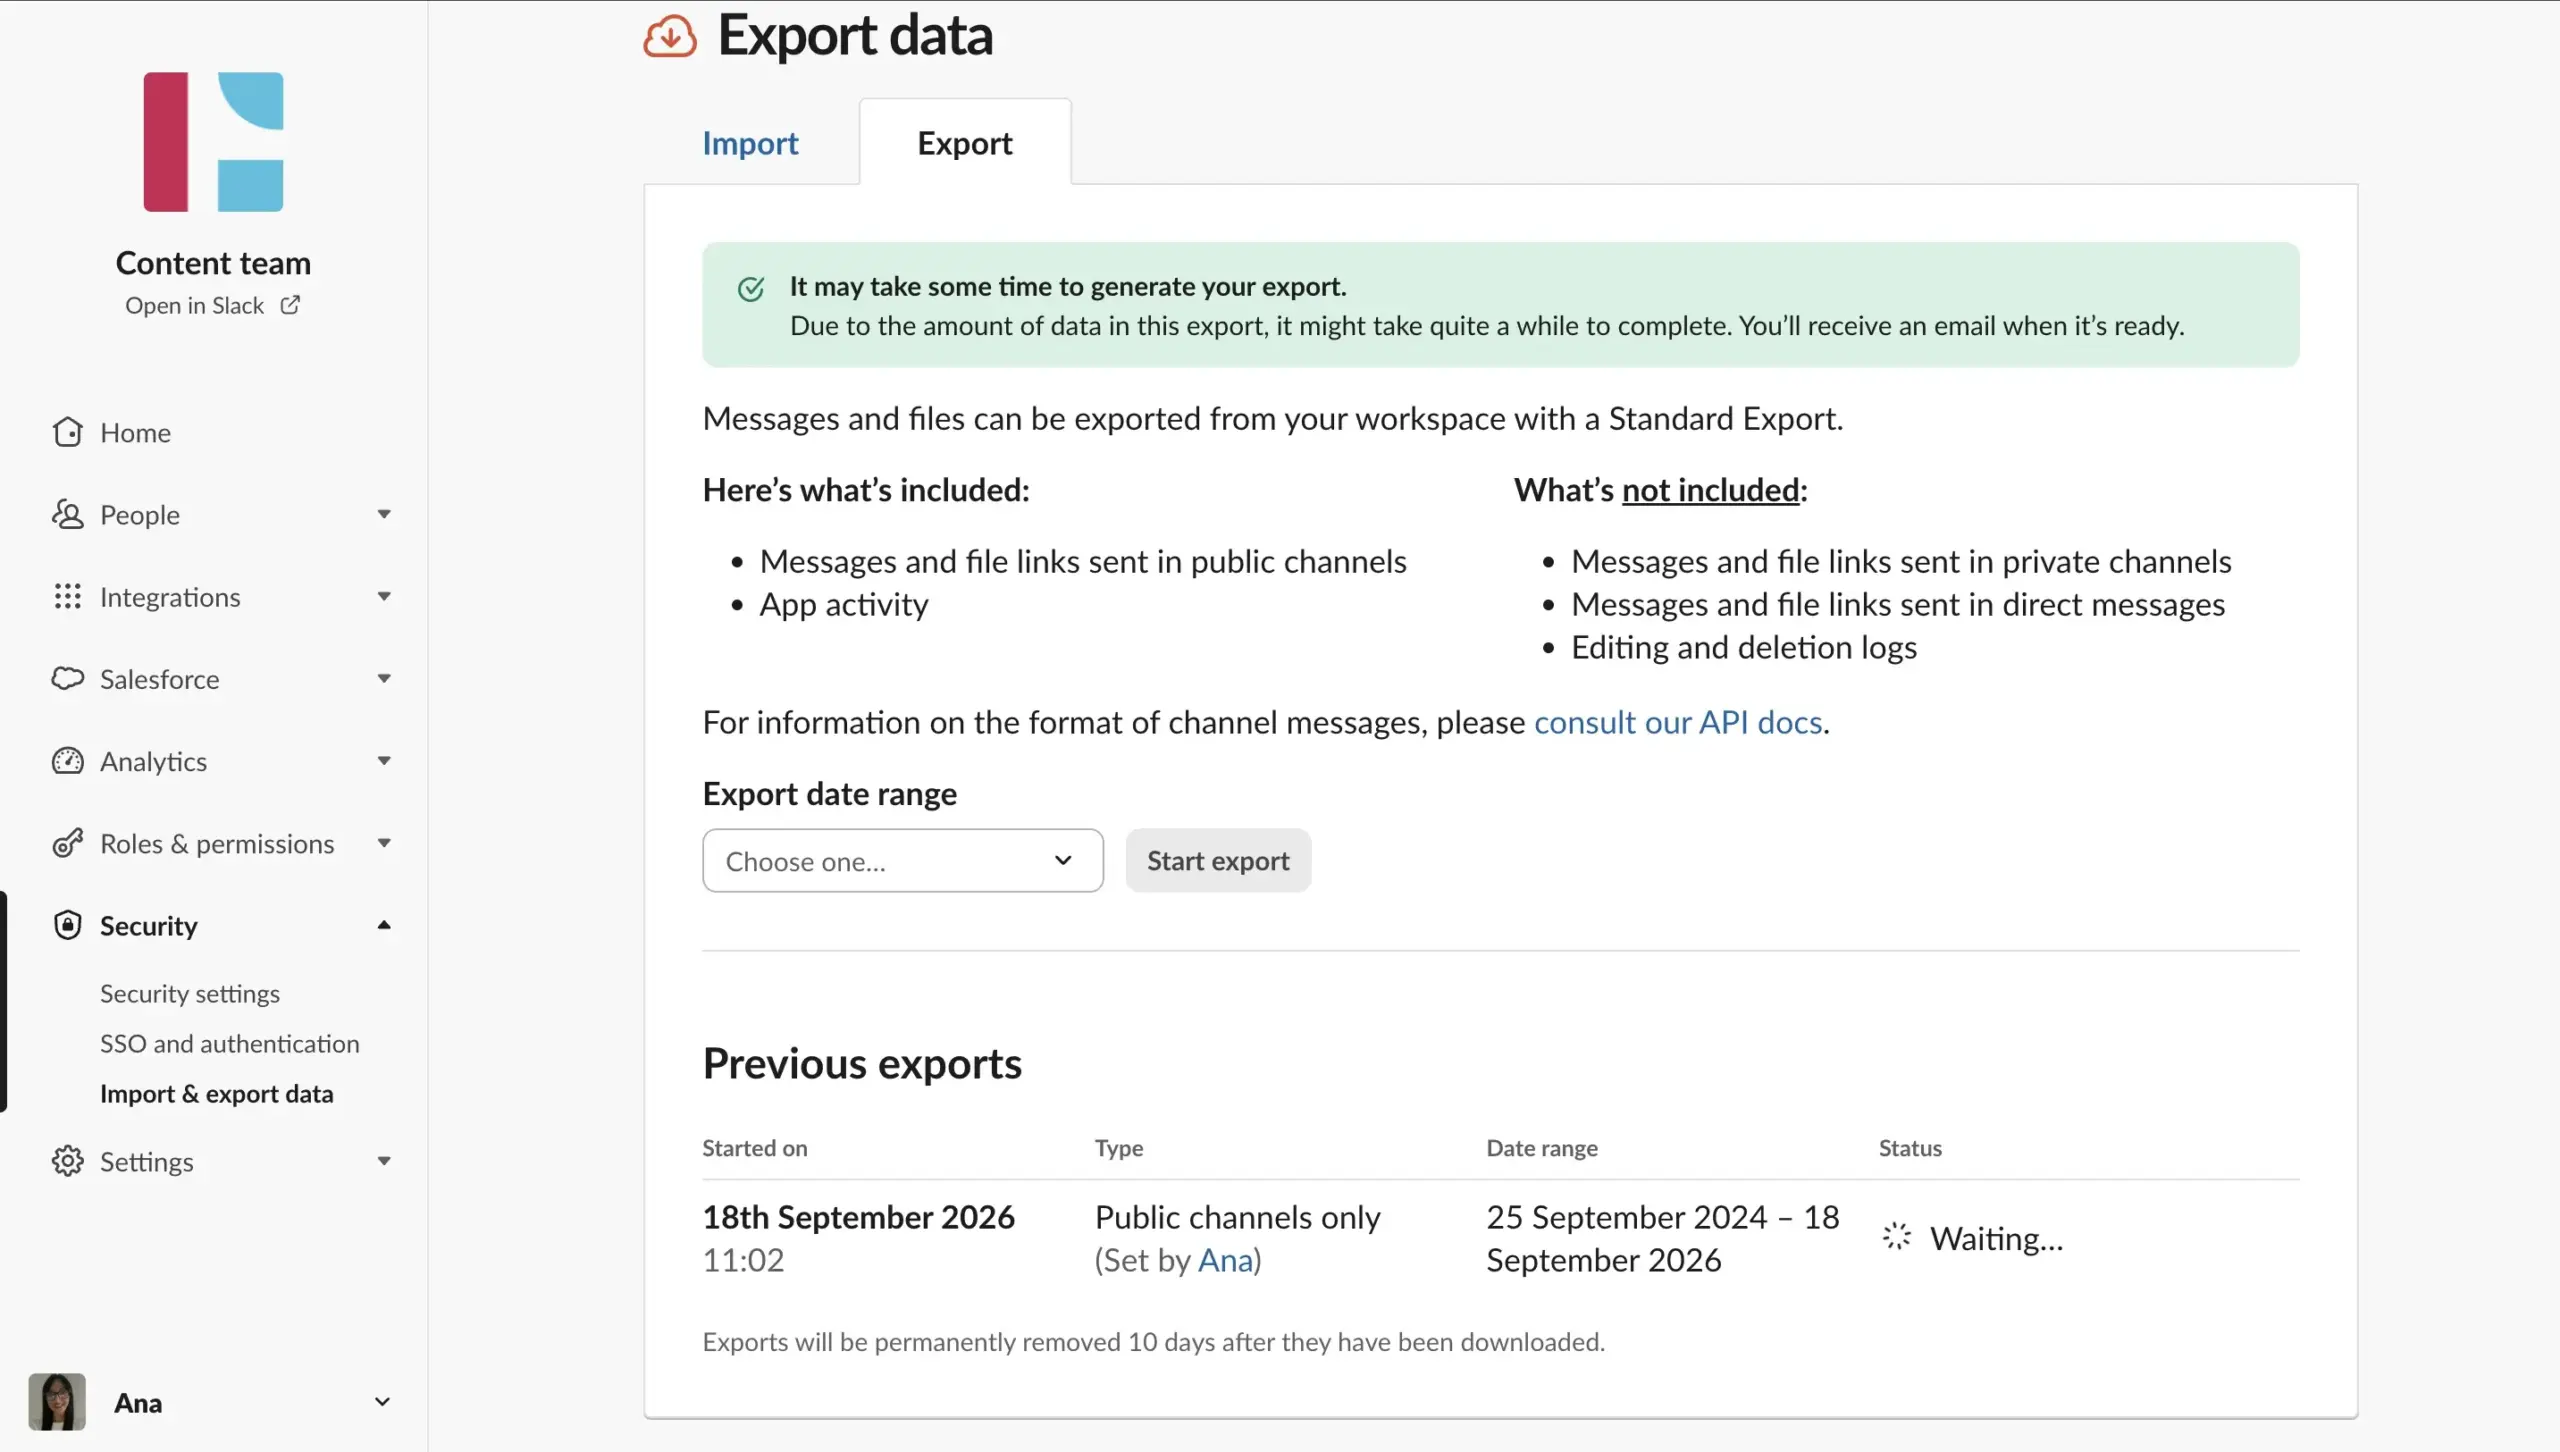
The export process could take anywhere from a few minutes to a couple of hours, depending on how big your Slack archive is.
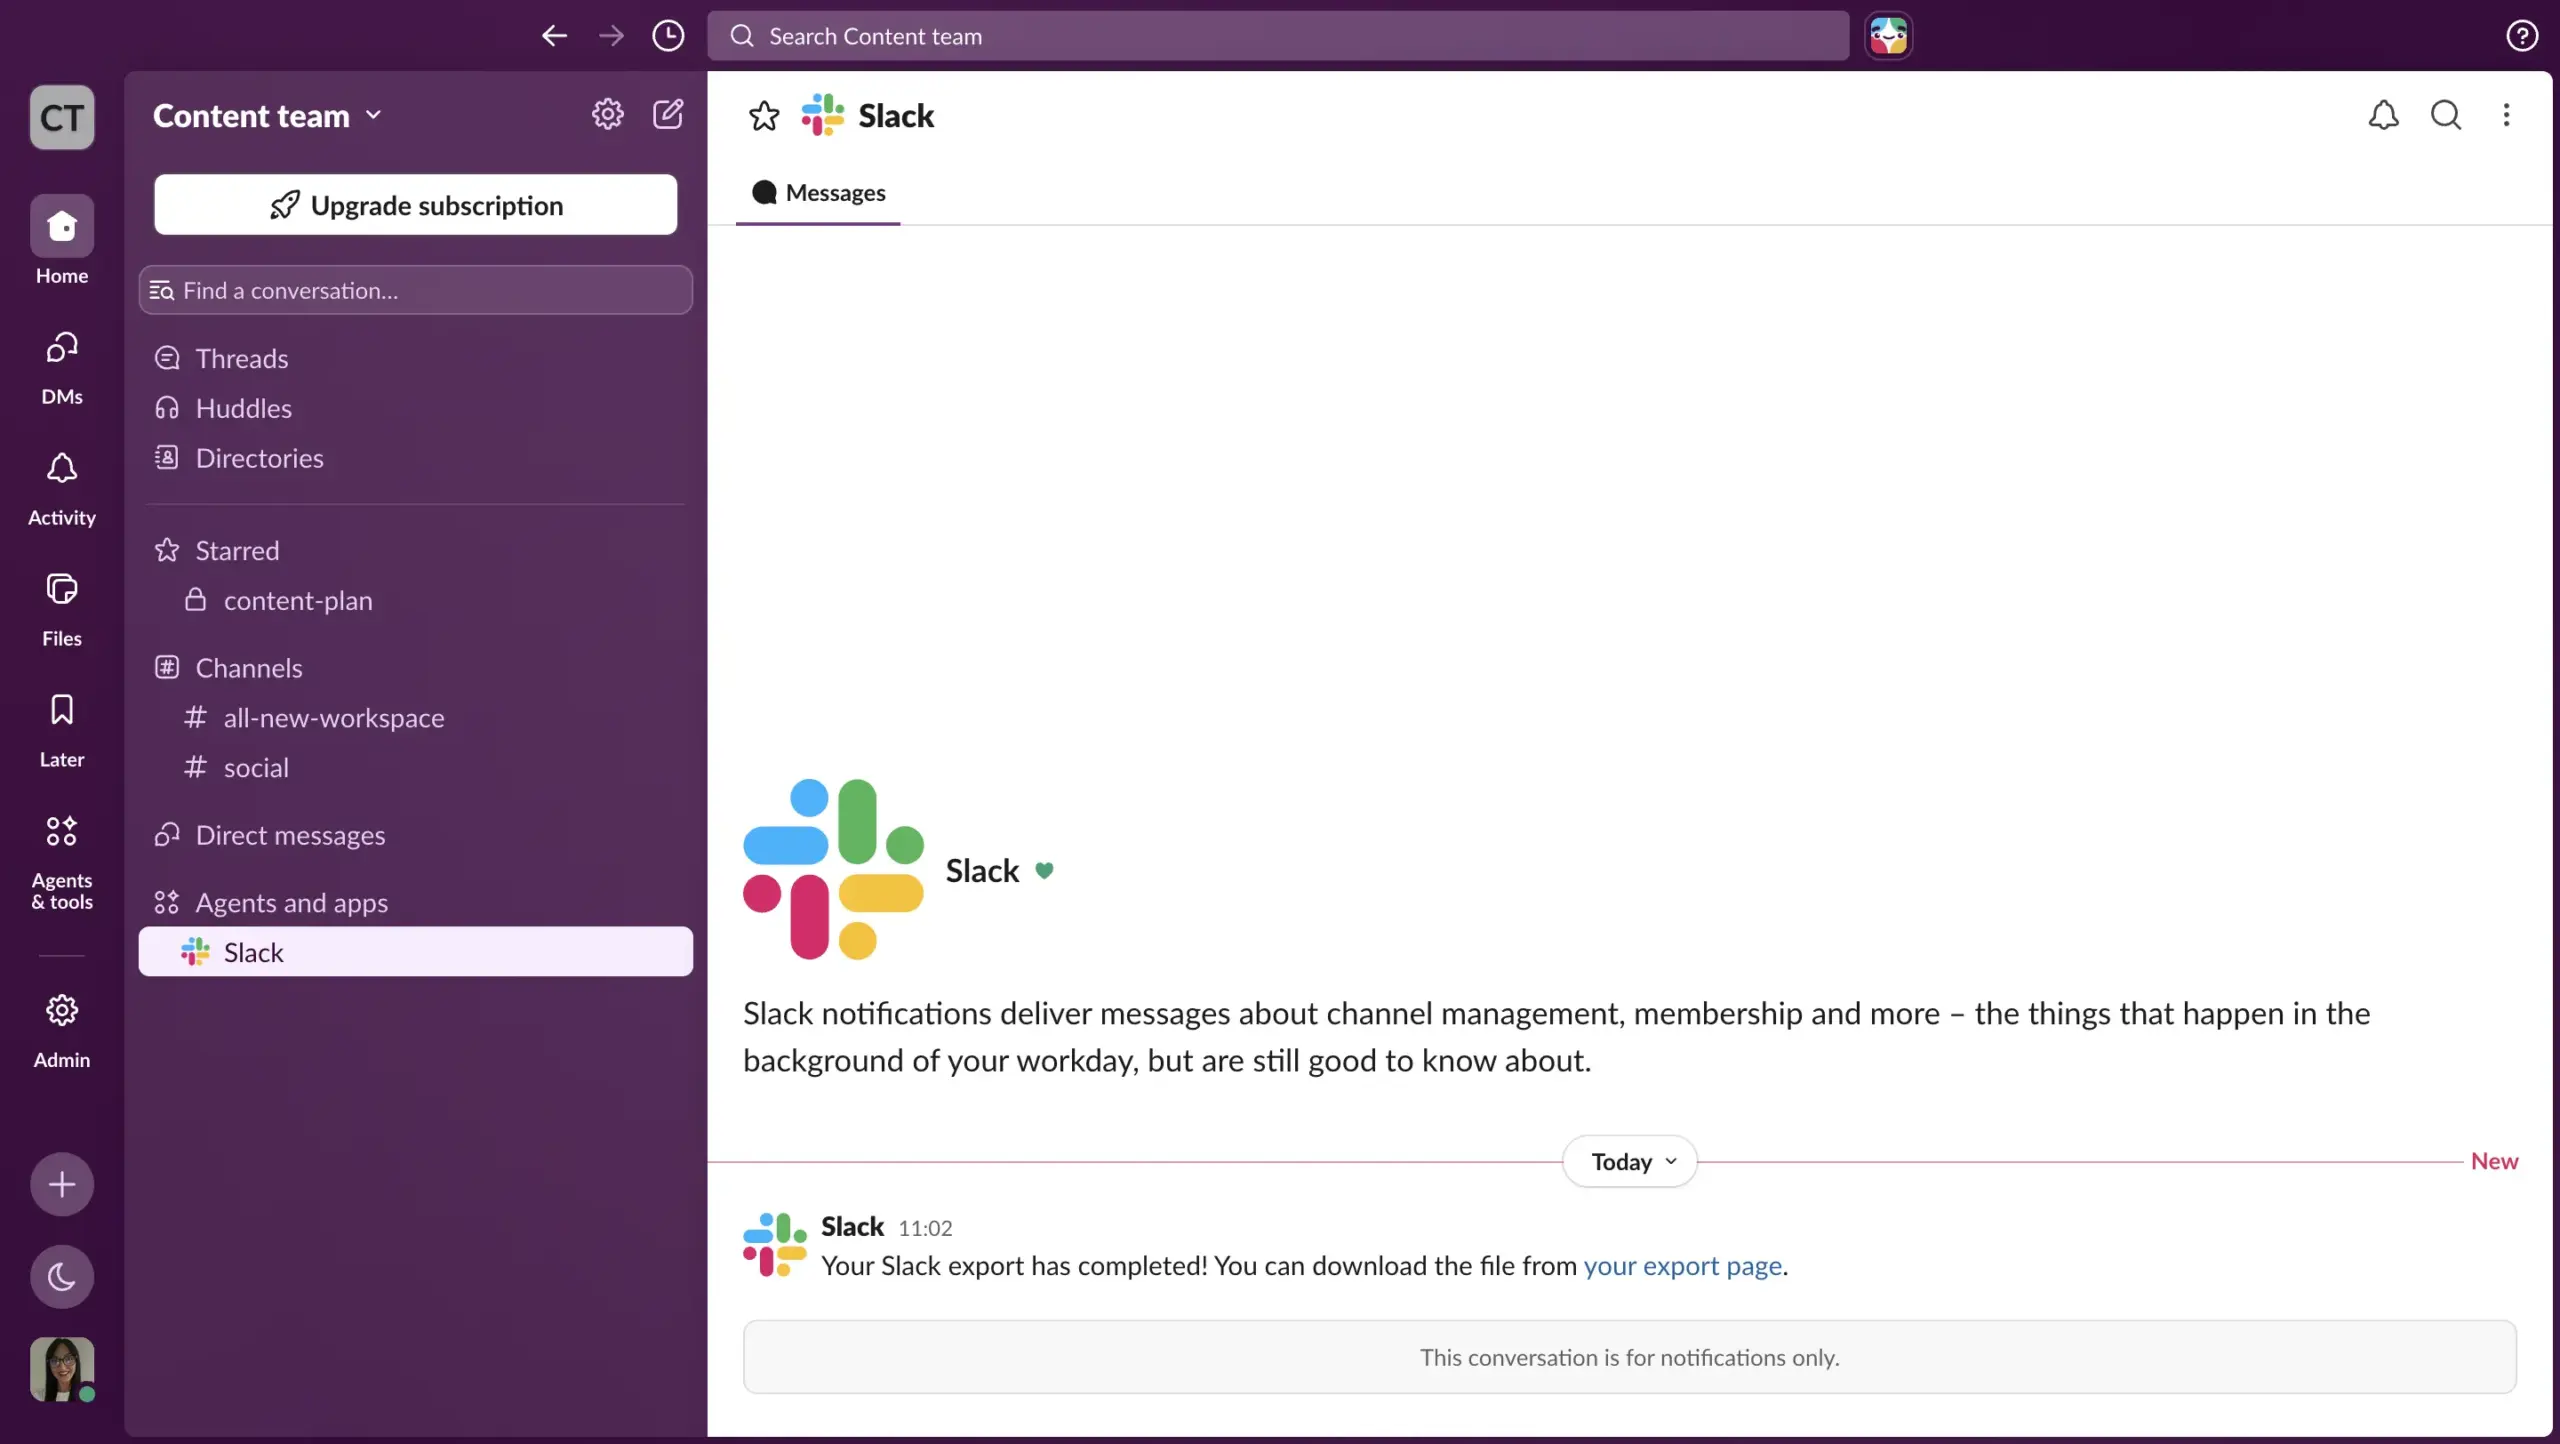
You will get a Slackbot DM and an email when this process is done.
When it’s ready, the archive will be a ZIP file in your Downloads folder.
It’s important that you don’t edit the file before importing it to Pumble, as it will disrupt the import process.
What happens to your Slack message history and files?
Before walking you through the import process, it’s important to note that your active message and file history continues to exist in your Slack workspace based on the subscription plan you’re on. If you’re on the free plan, you can still only access the last 90 days of your messages within Slack, whereas paid plans offer unlimited access.
When it comes to your exported files and messages, they will be generated in a ZIP file on your workspace’s export page. This file is only available for 10 days, after which Slack permanently deletes it from their servers, so be sure to manually save the file on your local device or internal storage.
Exported messages are compiled into structured JSON files organized by channel and date. Raw files and media attachments aren’t downloaded directly into the archive. Instead, the archive contains links to file attachments. The original files remain on Slack servers, and you have to use the exported URLs to download them individually if you need offline copies.
Easily import your data to Pumble
#3: Import data into Pumble
Once you’ve downloaded your data from Slack, you can import it into Pumble.
Pumble’s automated import tool recreates your communication by bringing over:
- Public channel histories
- User profiles and account information
- Complete message logs
This lets you keep all important information without losing context. And, if you need assistance, Pumble’s 24/7 support team can guide you through the process.
So, to import data into Pumble:
- Click your Pumble workspace name in the top left corner, and then go to Workspace settings.
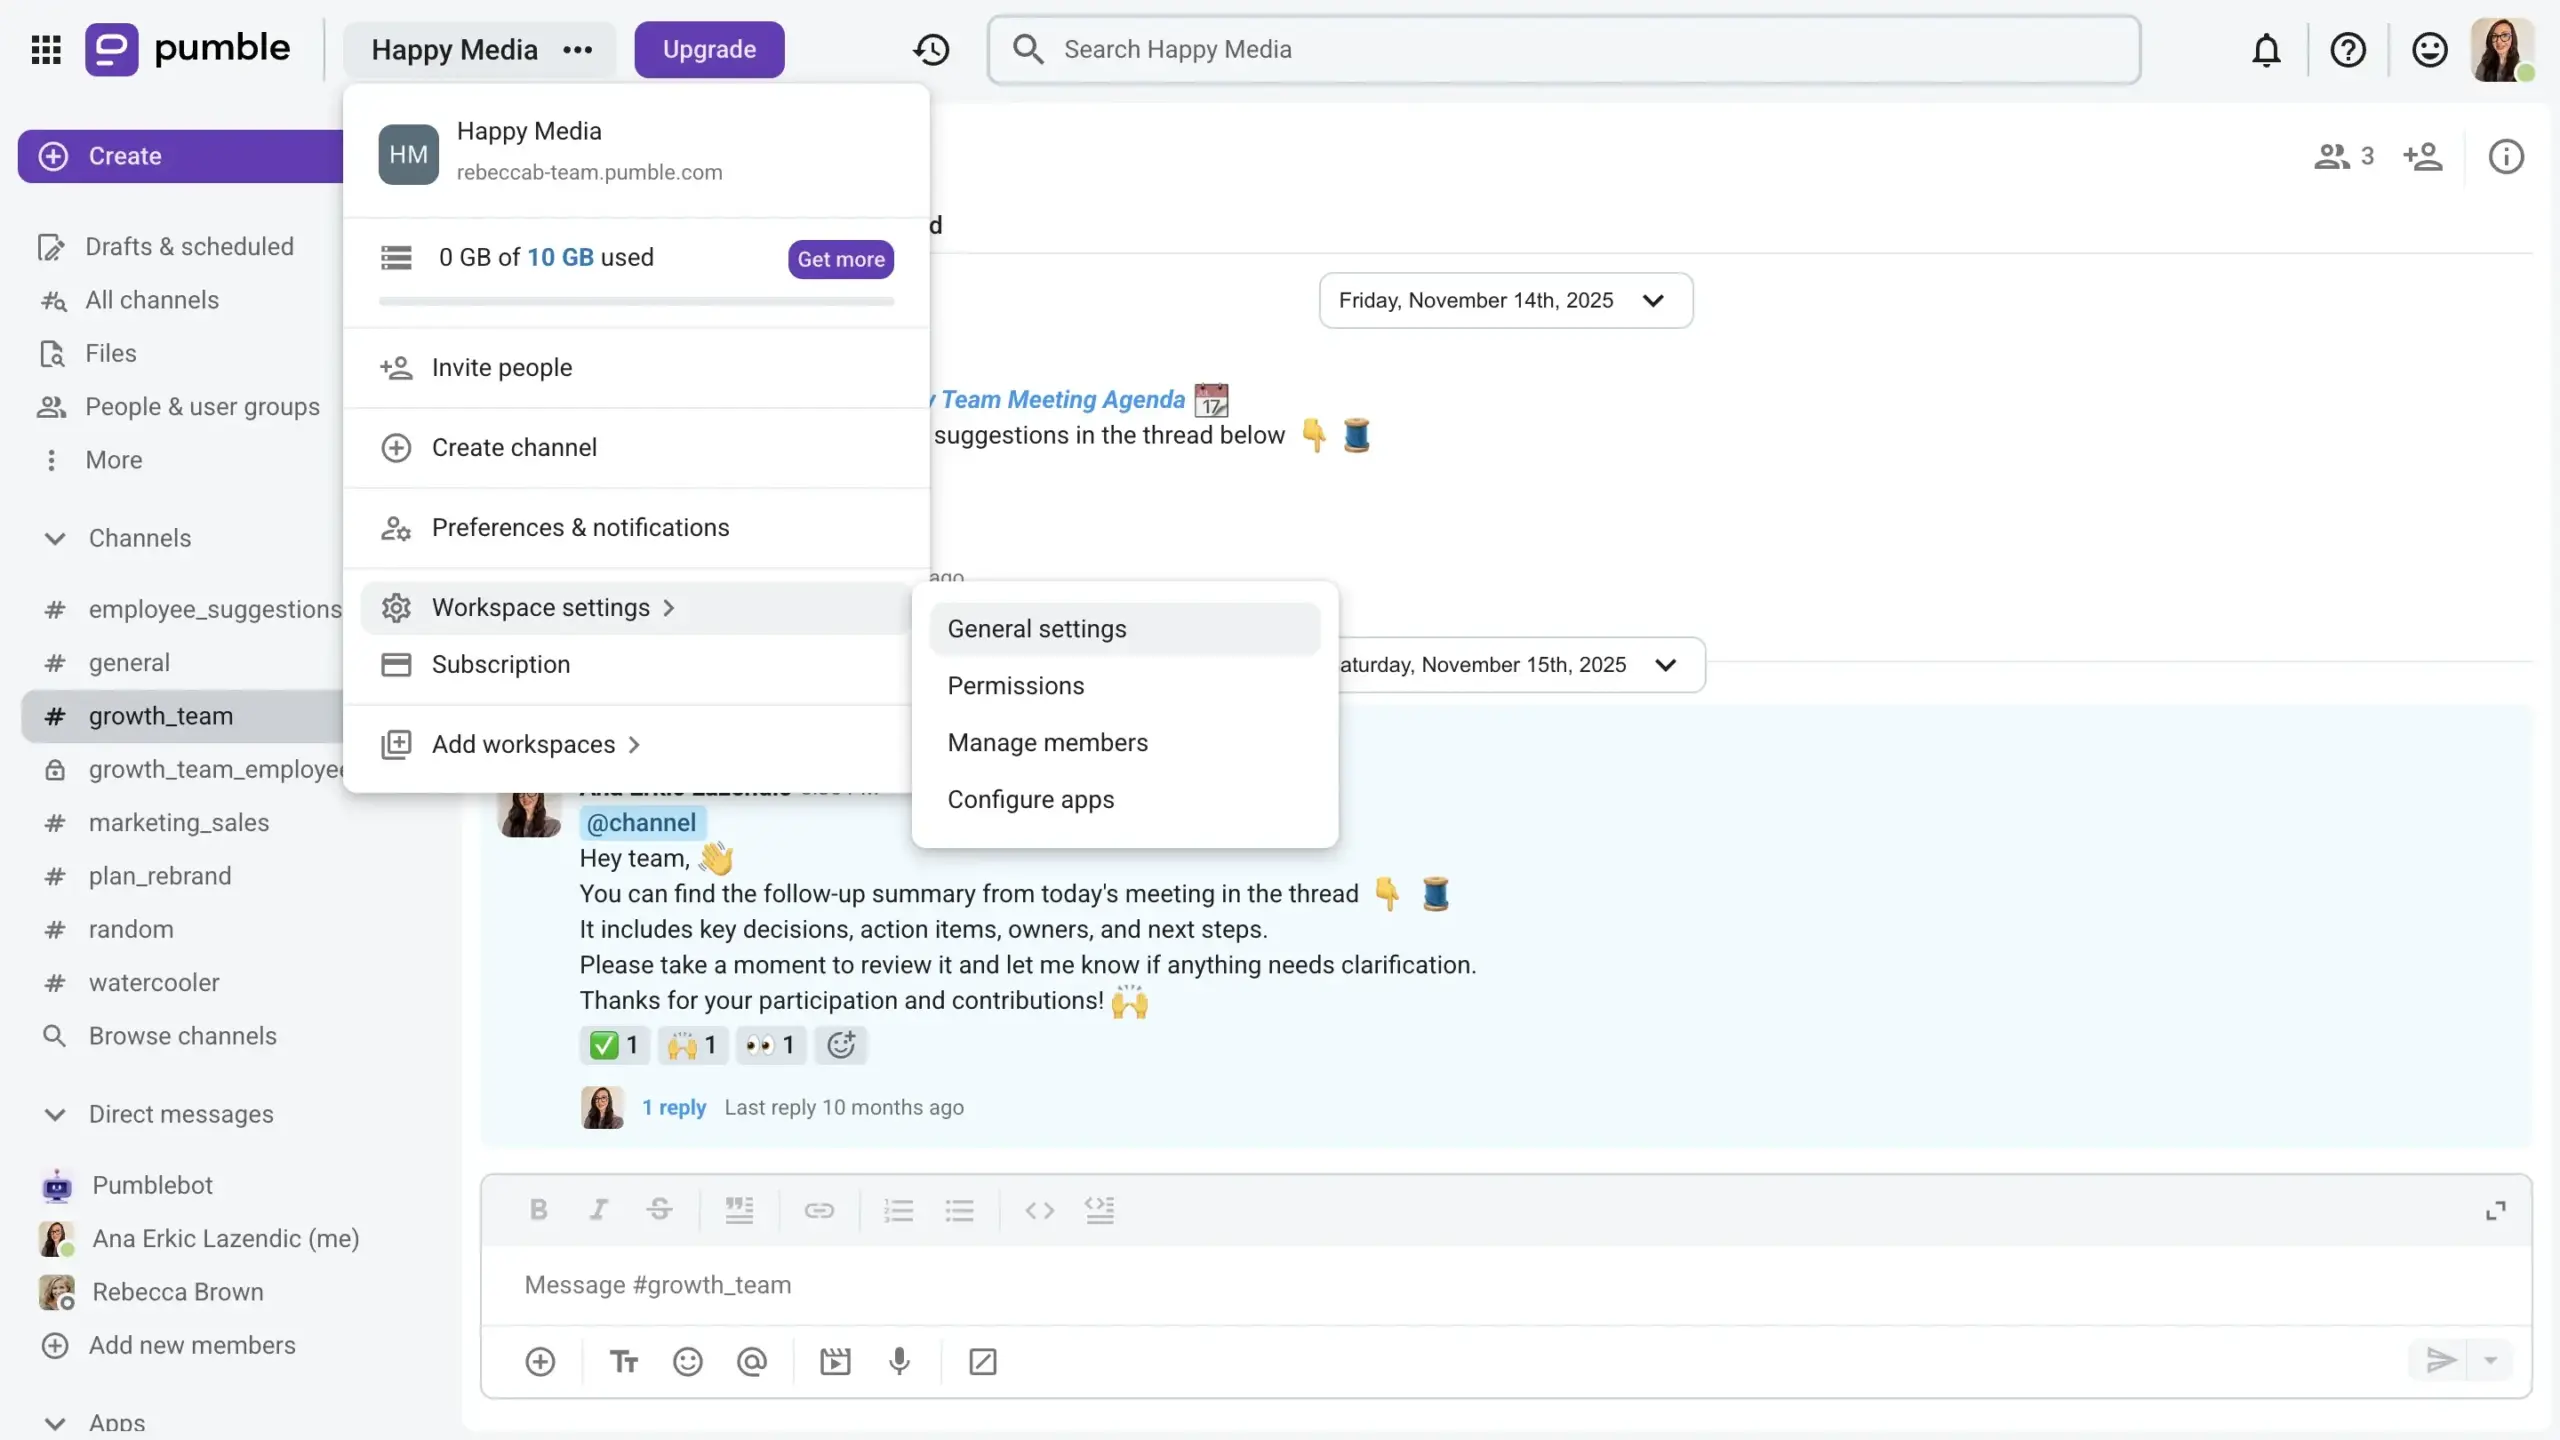
- Select General settings, and you’ll see the Import and Export tab on your left sidebar — click on it, and select the option to import data from Slack.
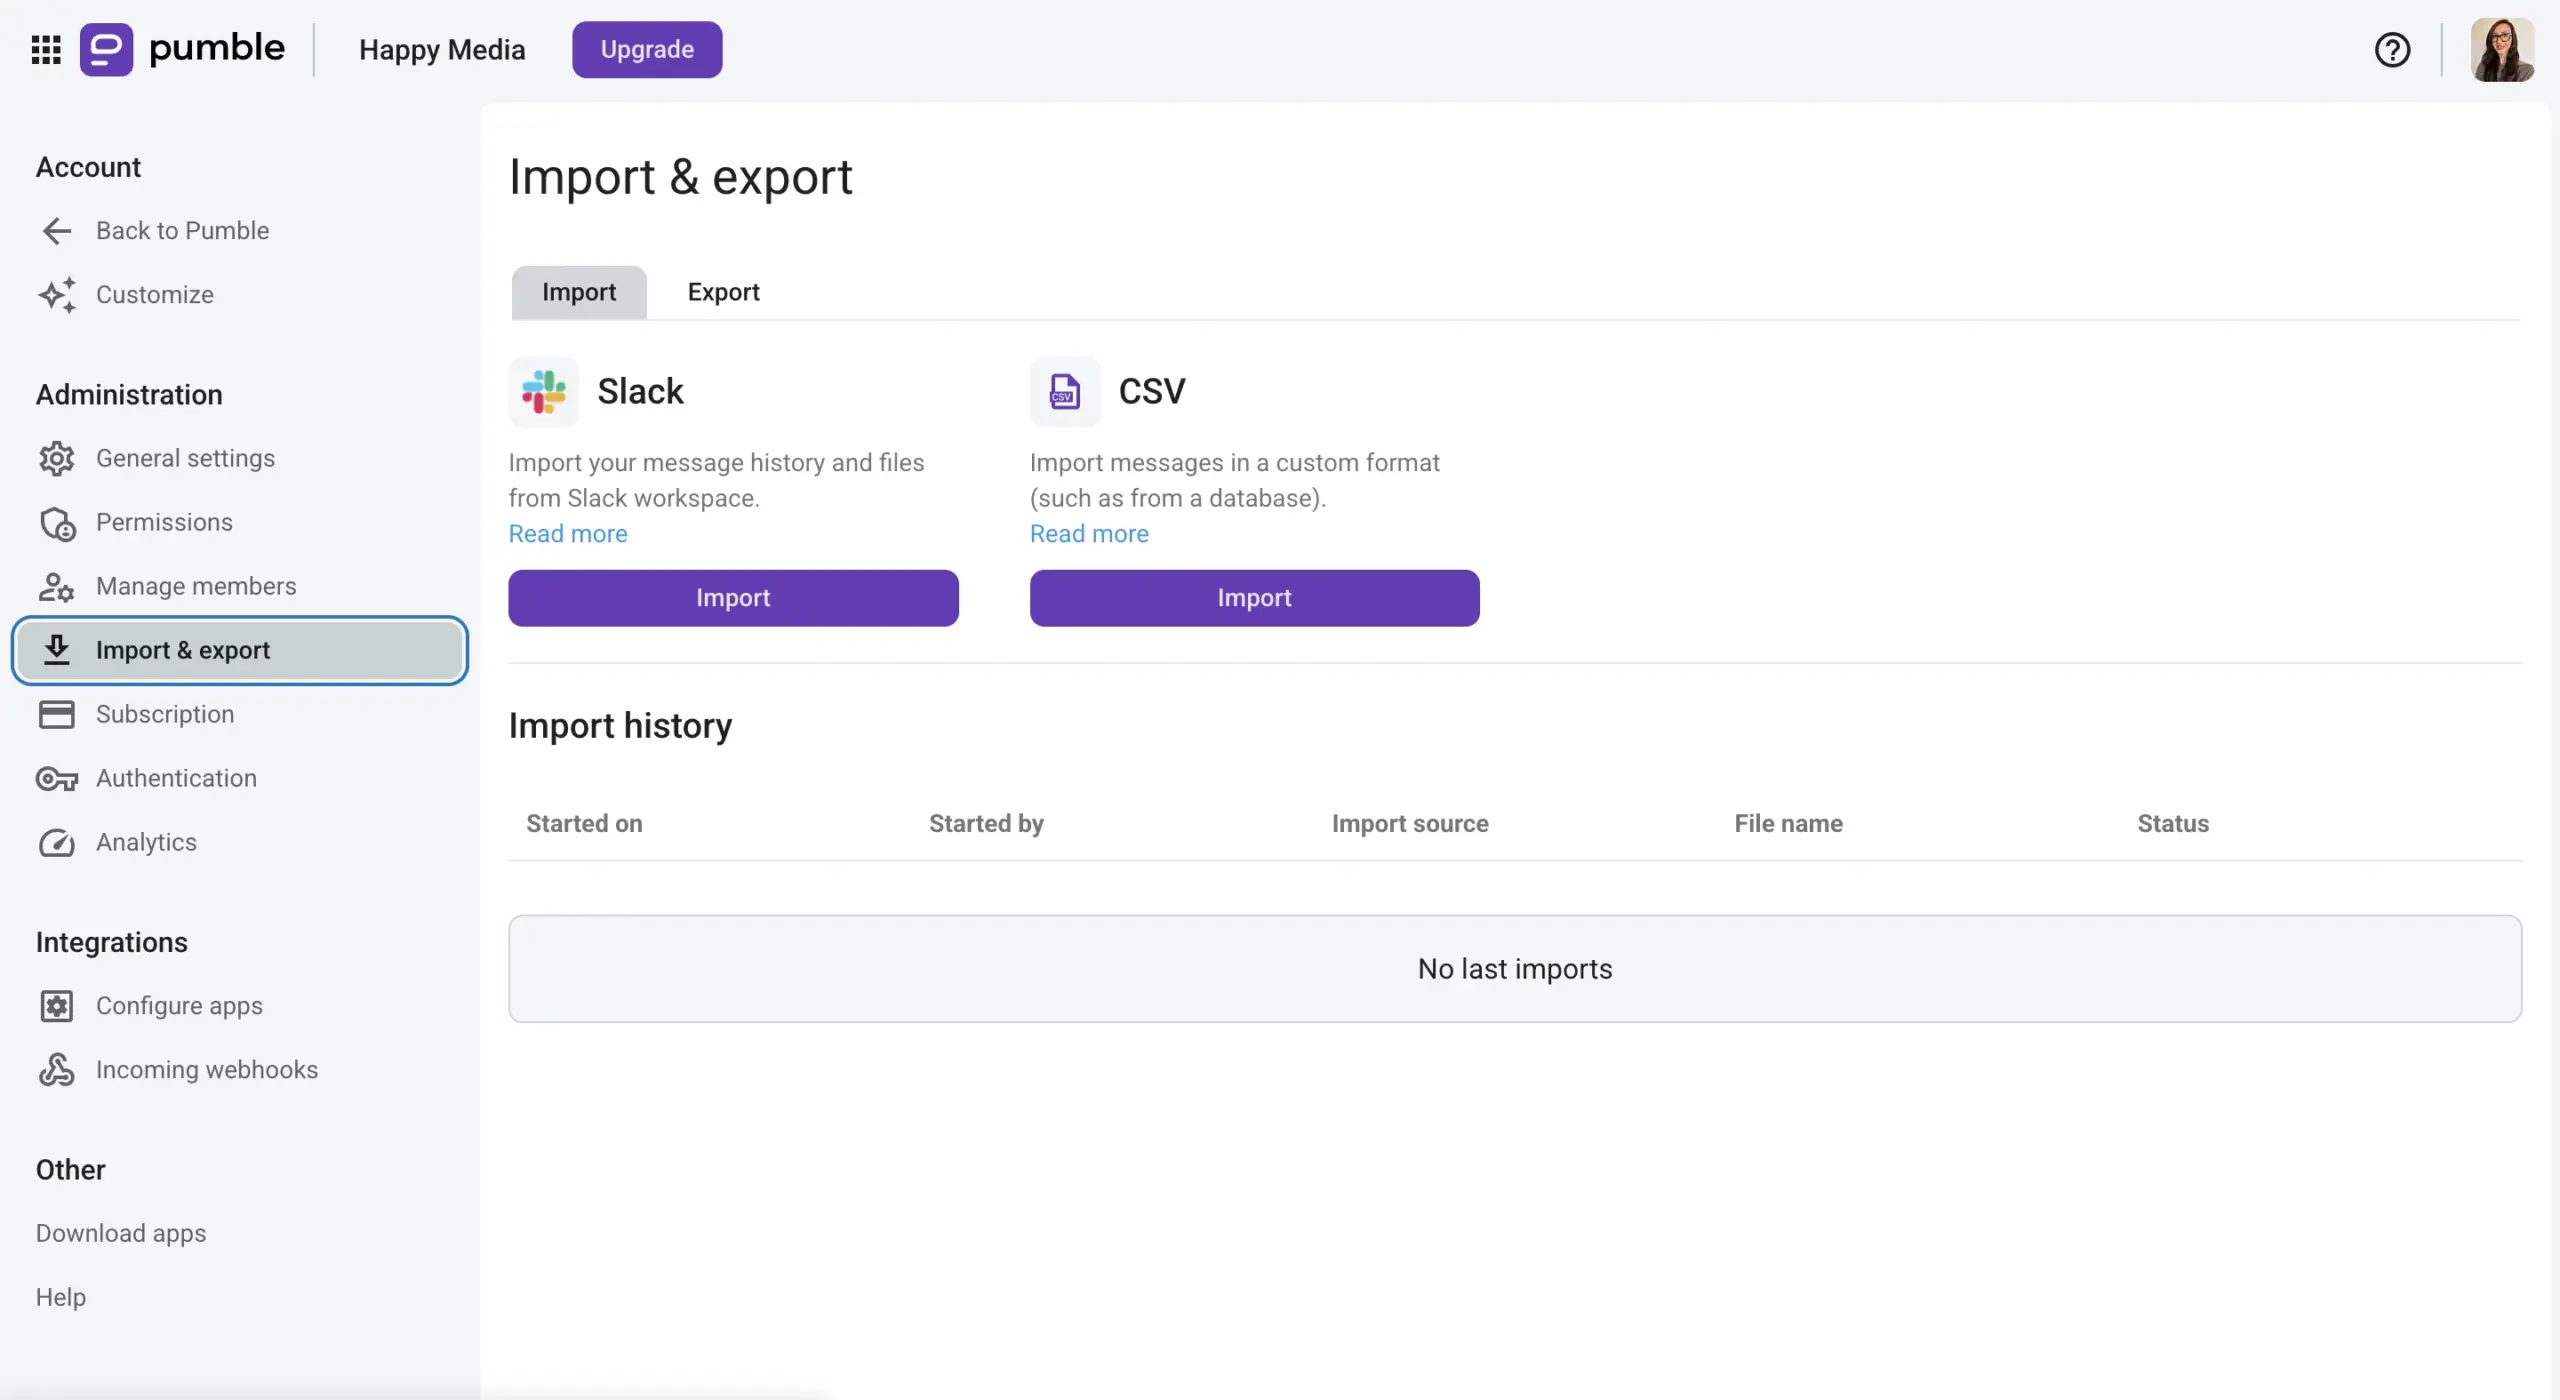
- Choose the ZIP file option, and select the file you’ve downloaded previously from Slack.
- Confirm the file, and click Start import.
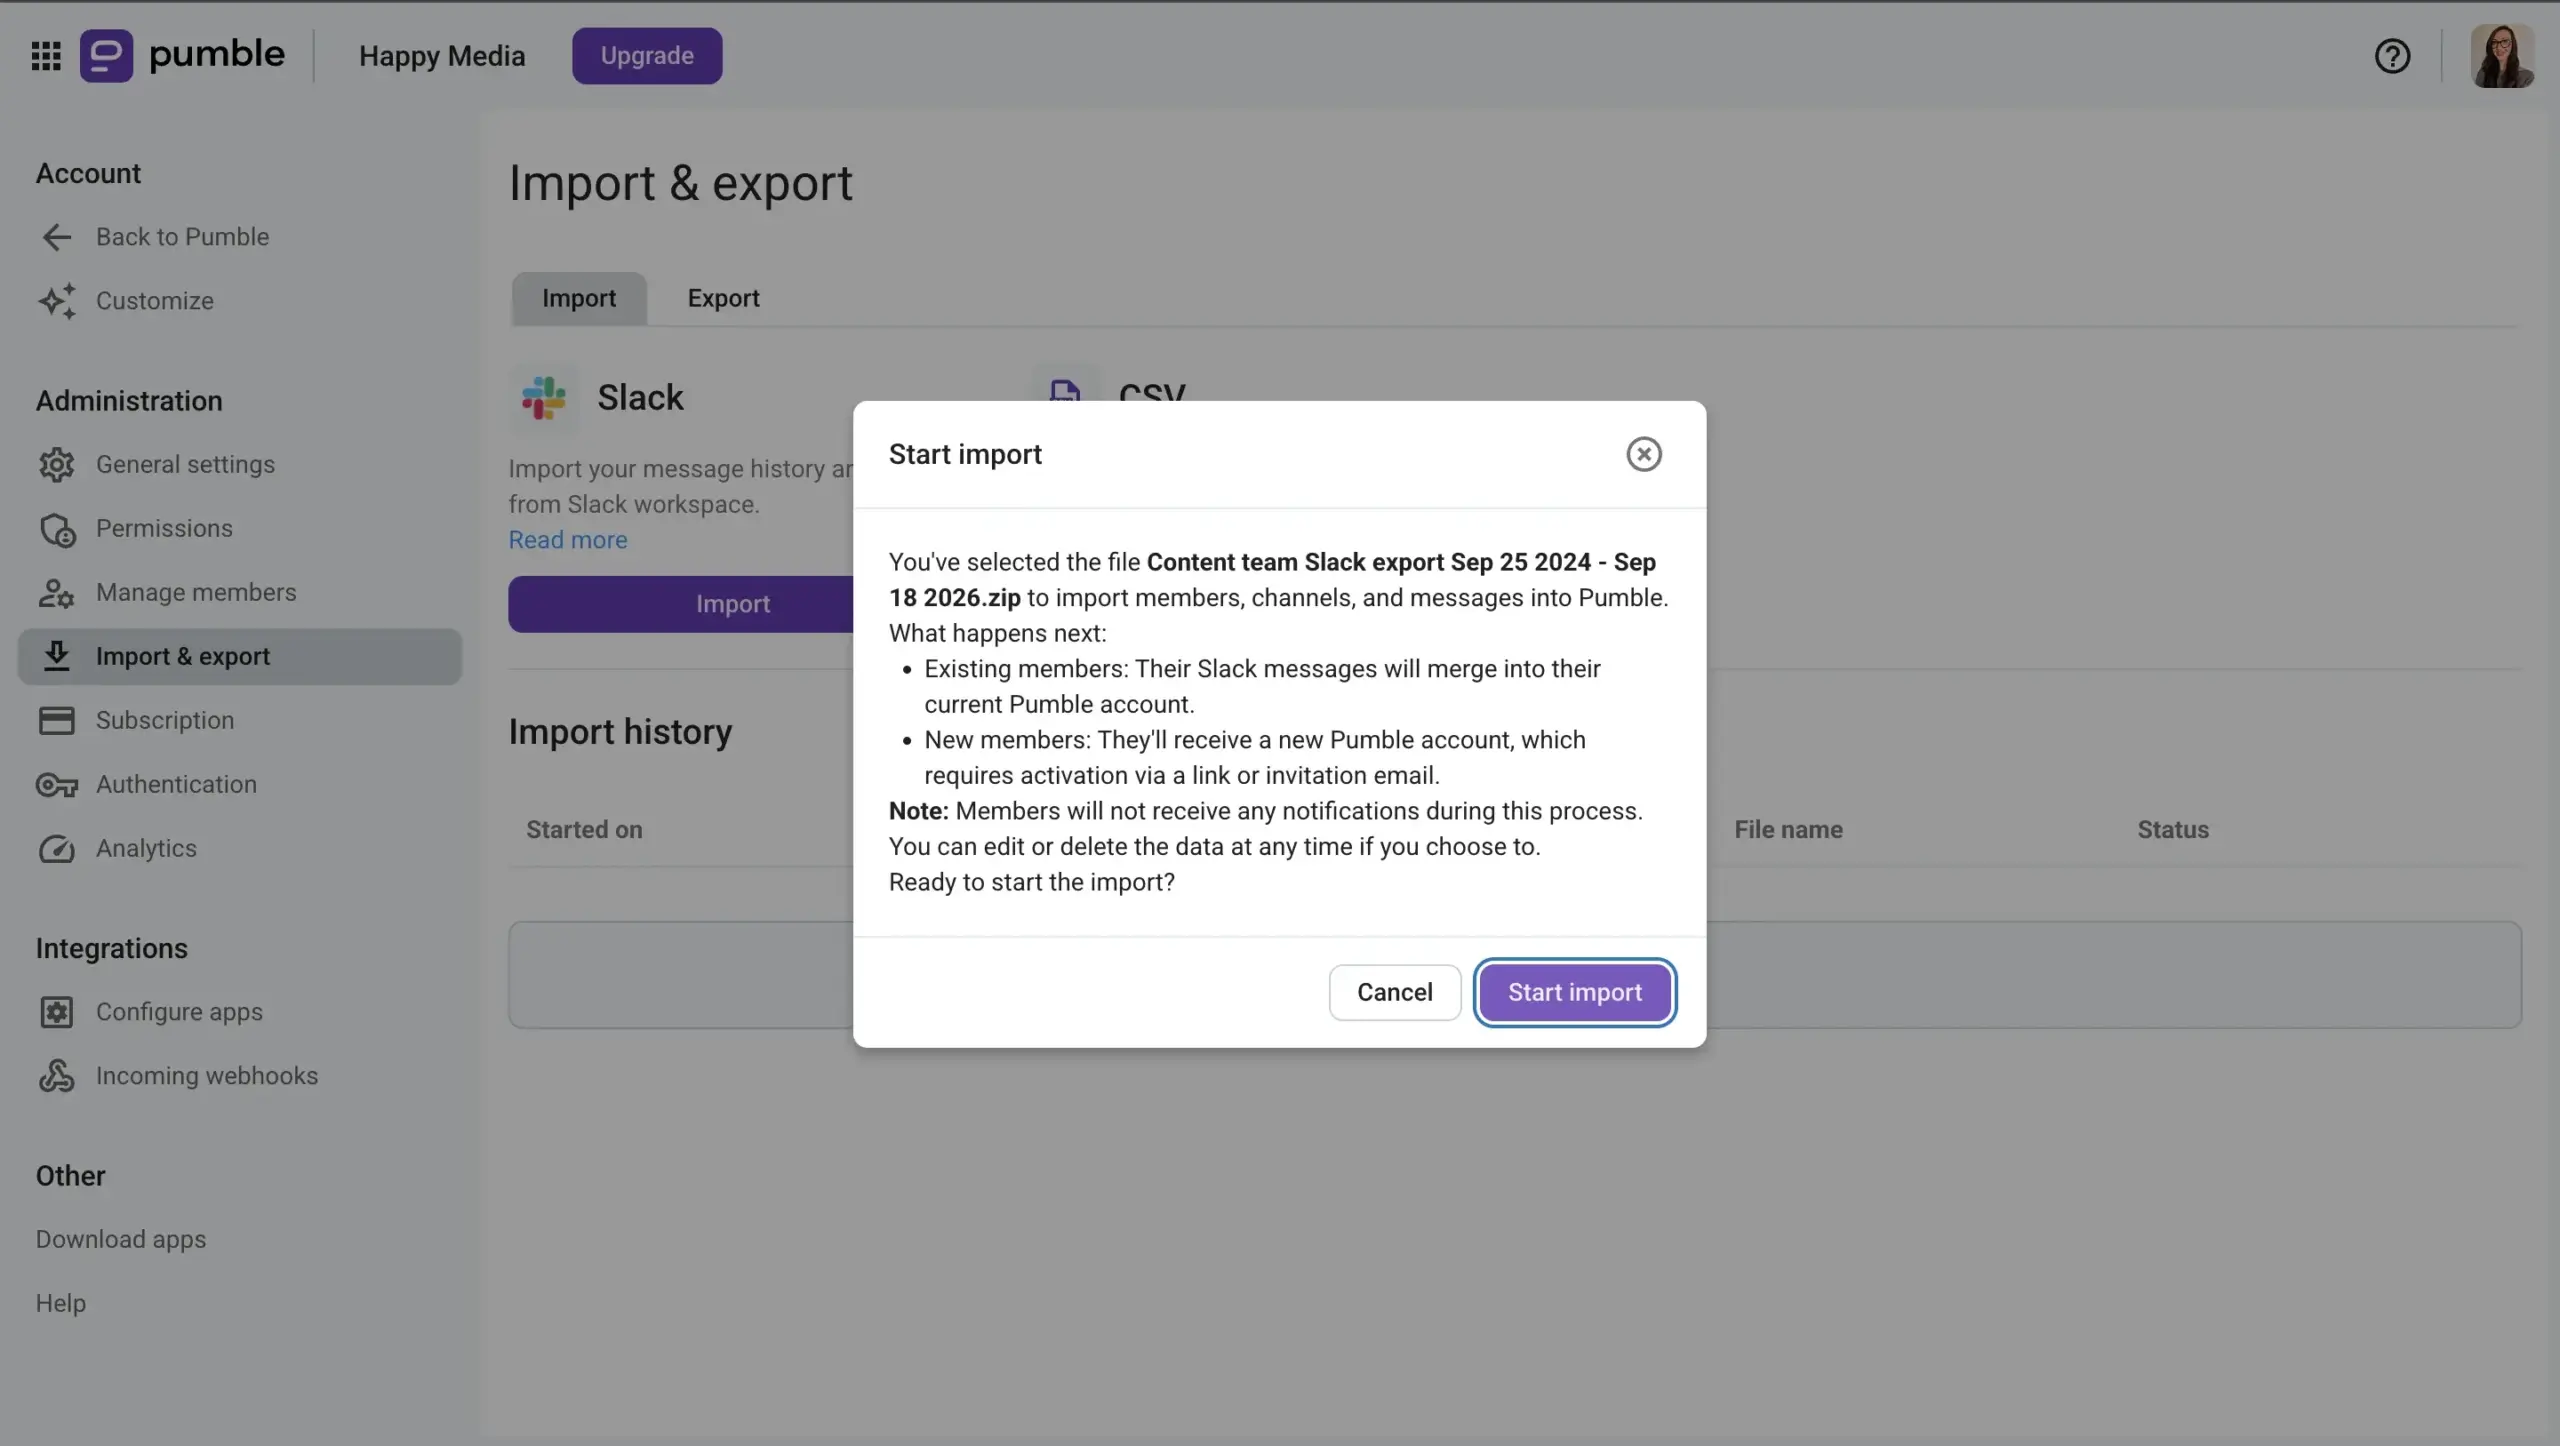
Depending on the amount of data in your file, importing it might take some time. You’ll receive an email when your workspace is fully ready.
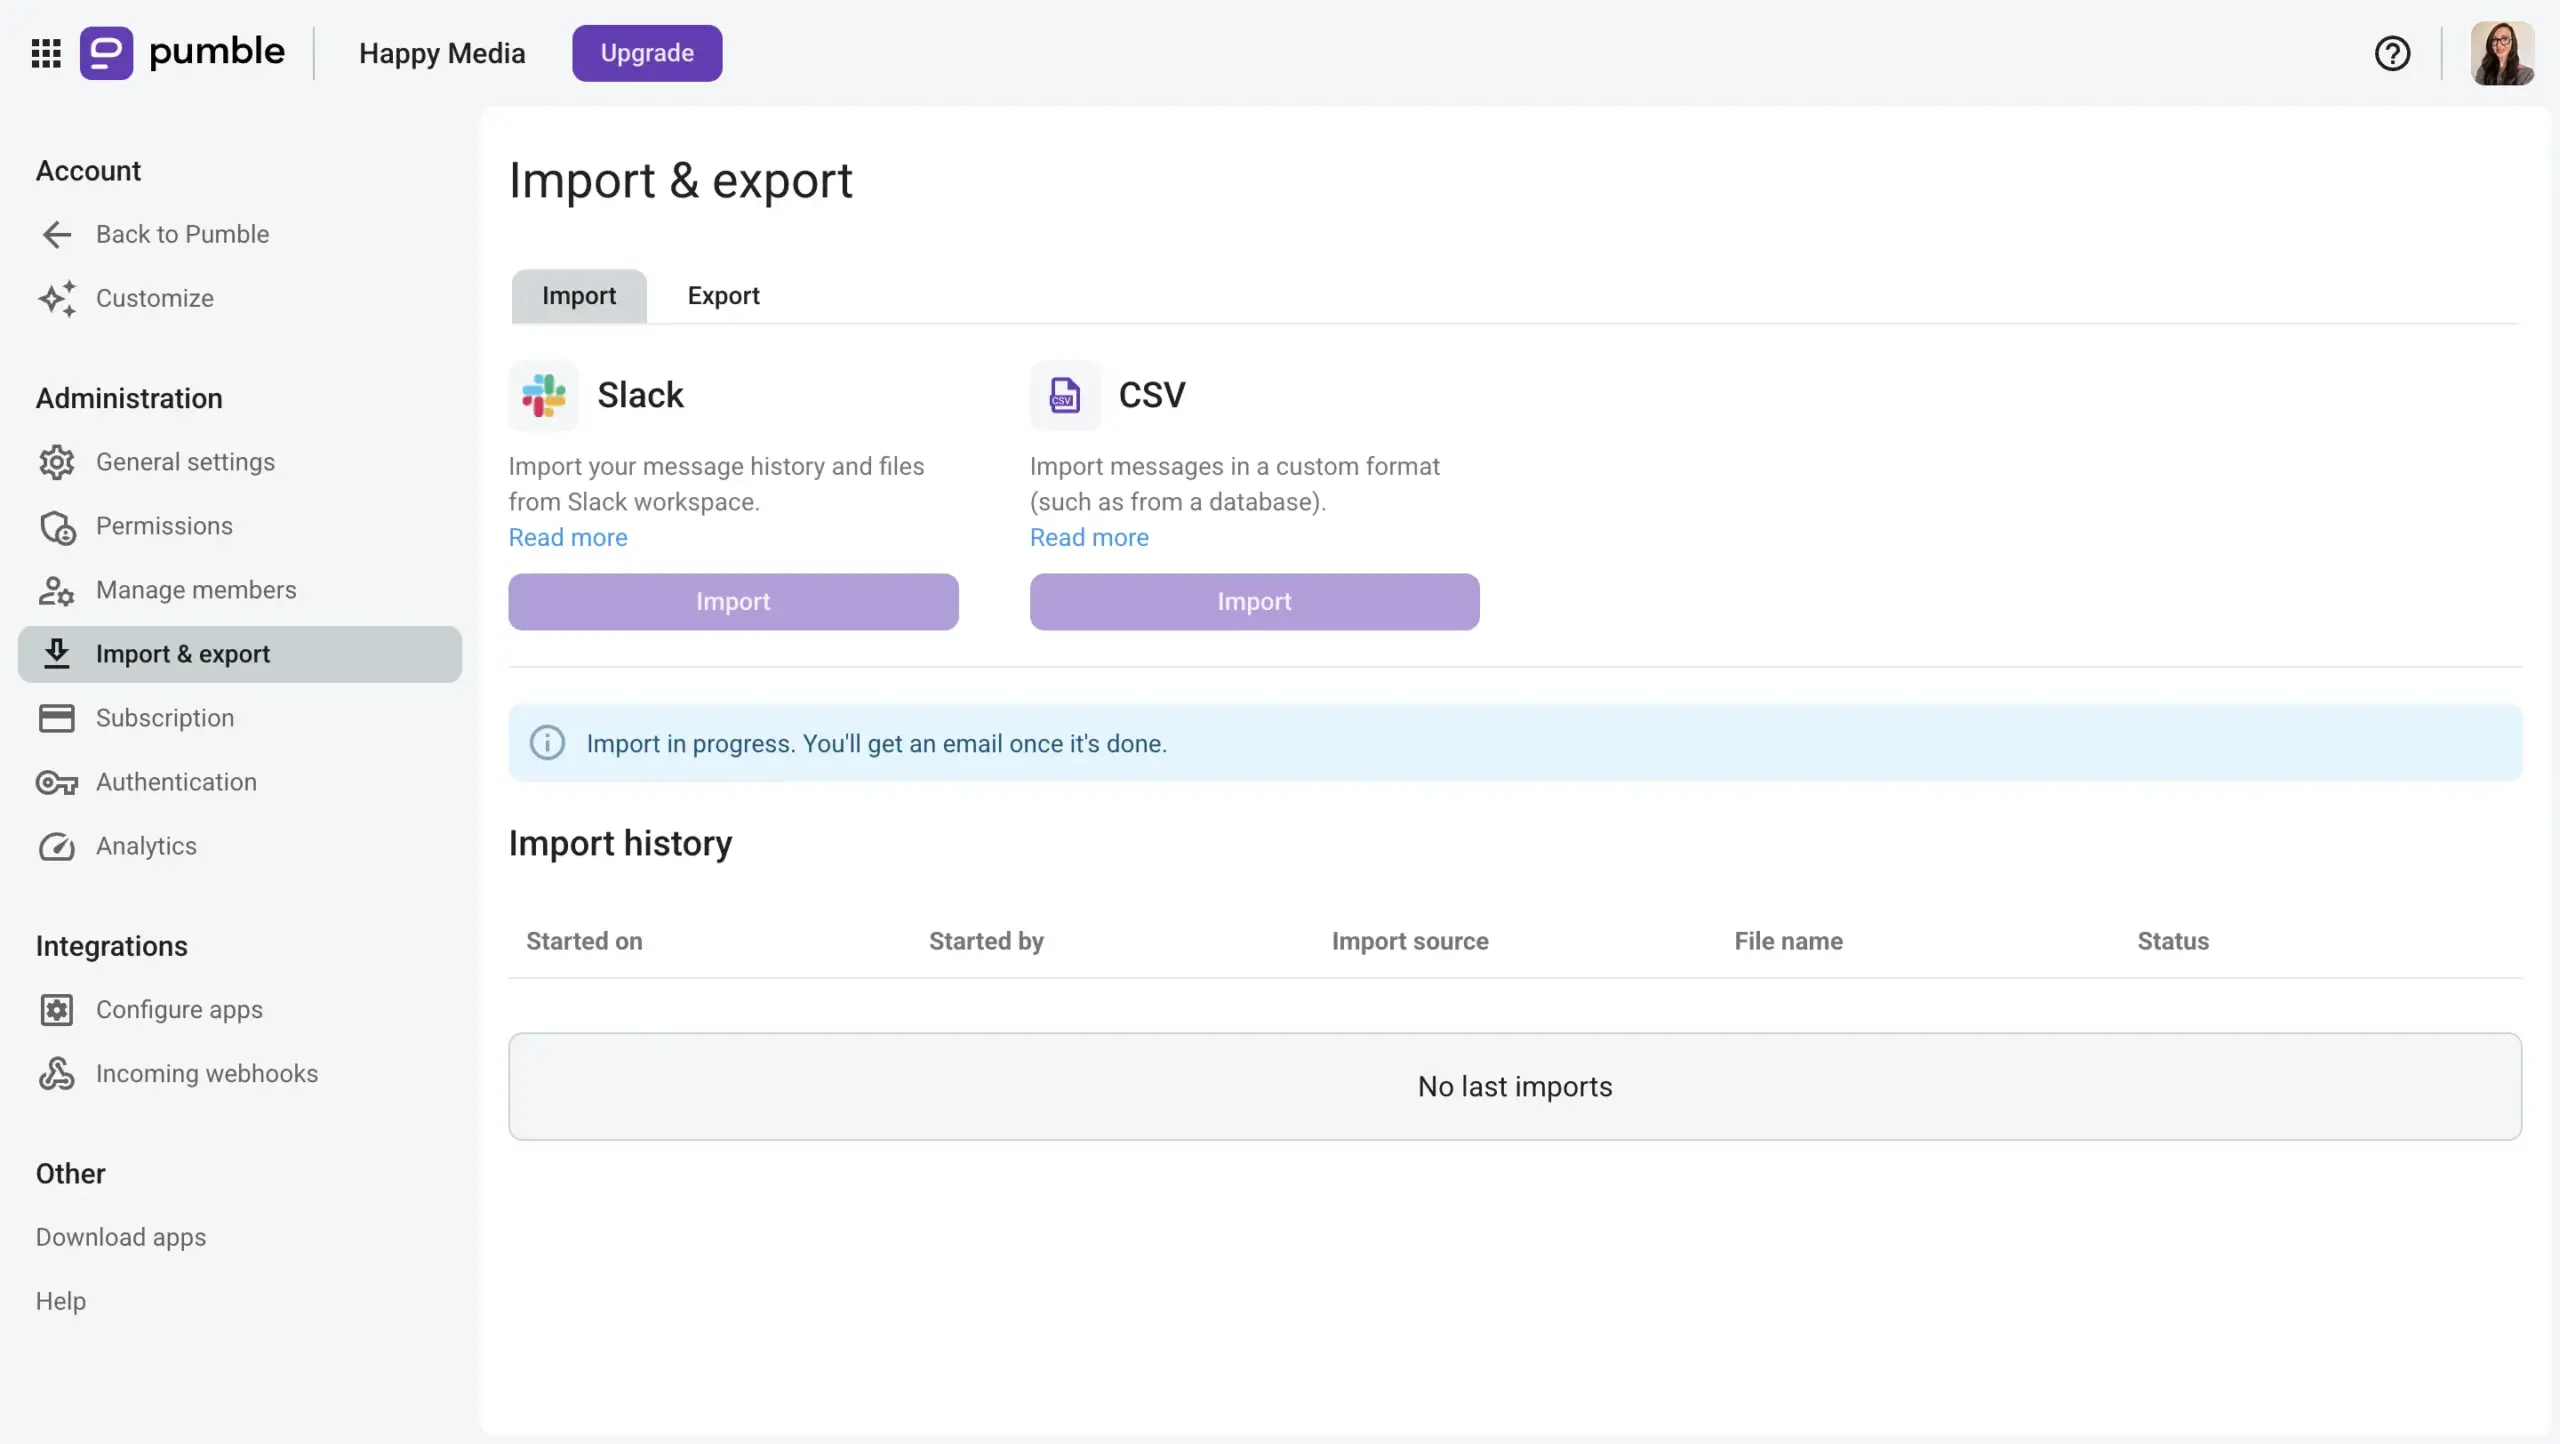
As previously mentioned, the files shared on Slack will not be imported to Pumble, only the links will be preserved and imported.
Moreover, if a member already exists in your Pumble workspace, their Slack messages will be merged into their Pumble account. If a member isn’t on Pumble, they will receive a new account invitation that they need to activate to join your Pumble workspace.

#4: Organize channels and permissions in Pumble
When you enter your Pumble workspace, you’ll find that all your members and public channels have been successfully imported.
To ensure a secure and productive environment, you can customize your workspace:
- Switch specific Pumble channels from public to private. This step is crucial for protecting sensitive information, maintaining security, and mirroring the communication structure you had in Slack. You can also archive or clean up unused channels and customize sections in your sidebar.
- Audit roles and permissions. Navigate to your Workspace Settings and Permissions to review user access levels. Use this opportunity to update administrative roles, restrict creation privileges, or adjust global notification defaults.
- Test search and direct messages. To verify that your imported data is fully searchable, run a few quick searches through your channel history, and try sending a DM or two to make sure your team profiles and roles are fully functional.
For more on how to organize Pumble channels to keep conversations clear and easy to follow, check out the video below.
#5: Train your team for a smooth transition
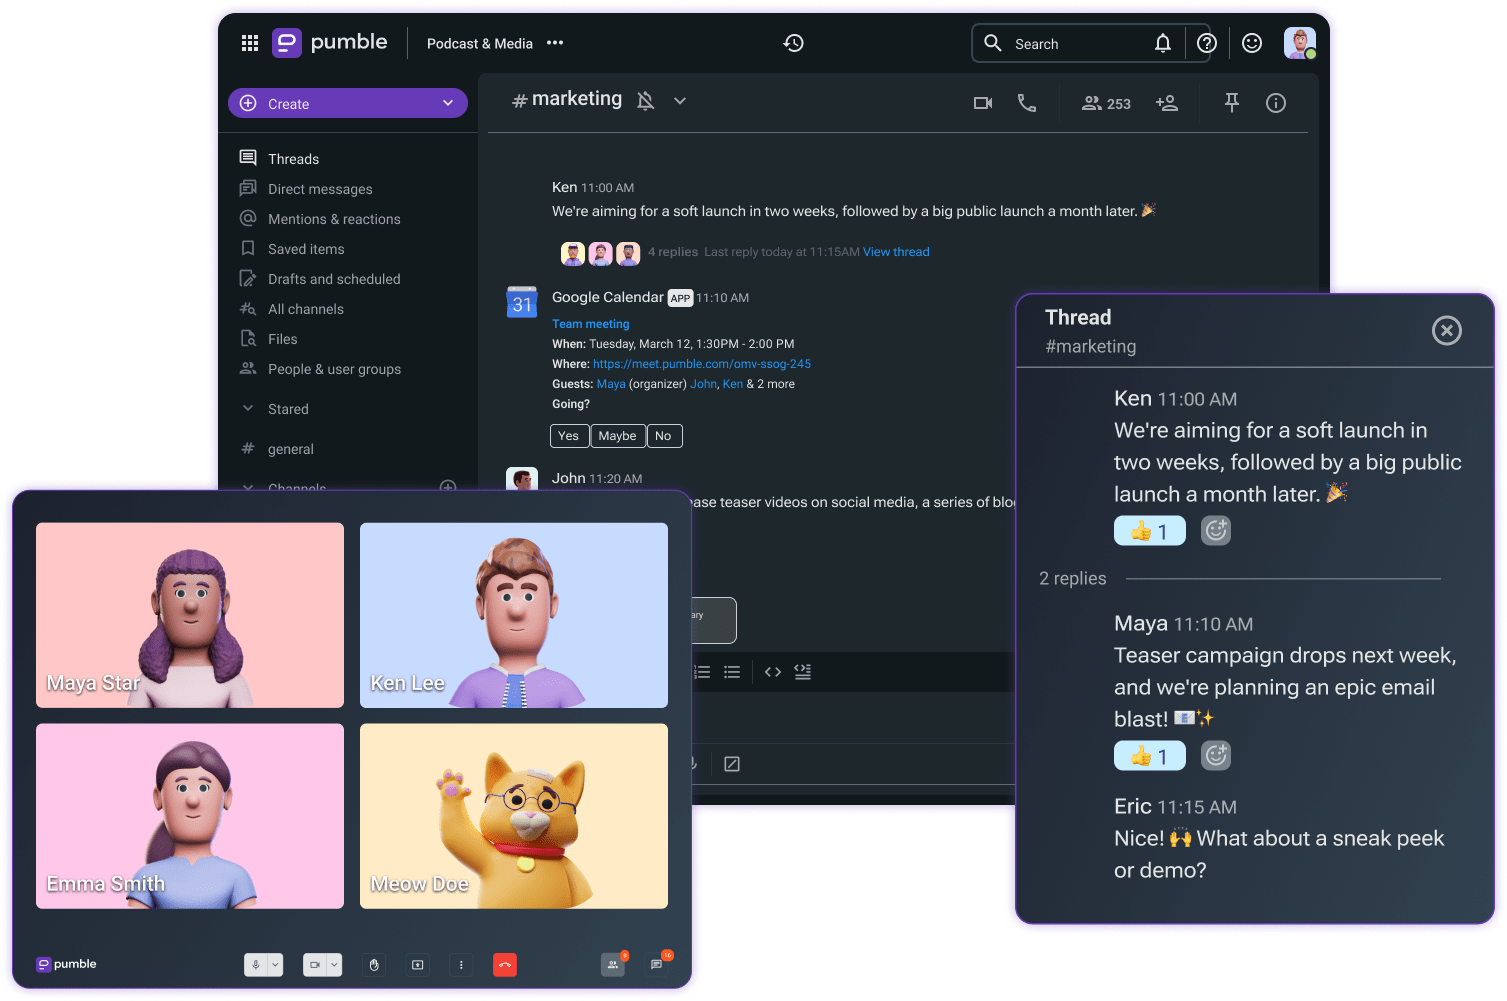
To help your team adapt to the new collaboration environment faster, be sure to guide them through Pumble’s core communication features, including direct messaging, video conferencing, and third-party integrations.
Making sure your team is ready for the change involves a couple of key steps.
First and foremost, you need to announce the switch. And, use Pumble for the announcement to show the team how it works in real time. You can create a dedicated public channel and post a friendly welcome message explaining why the company is moving to Pumble.
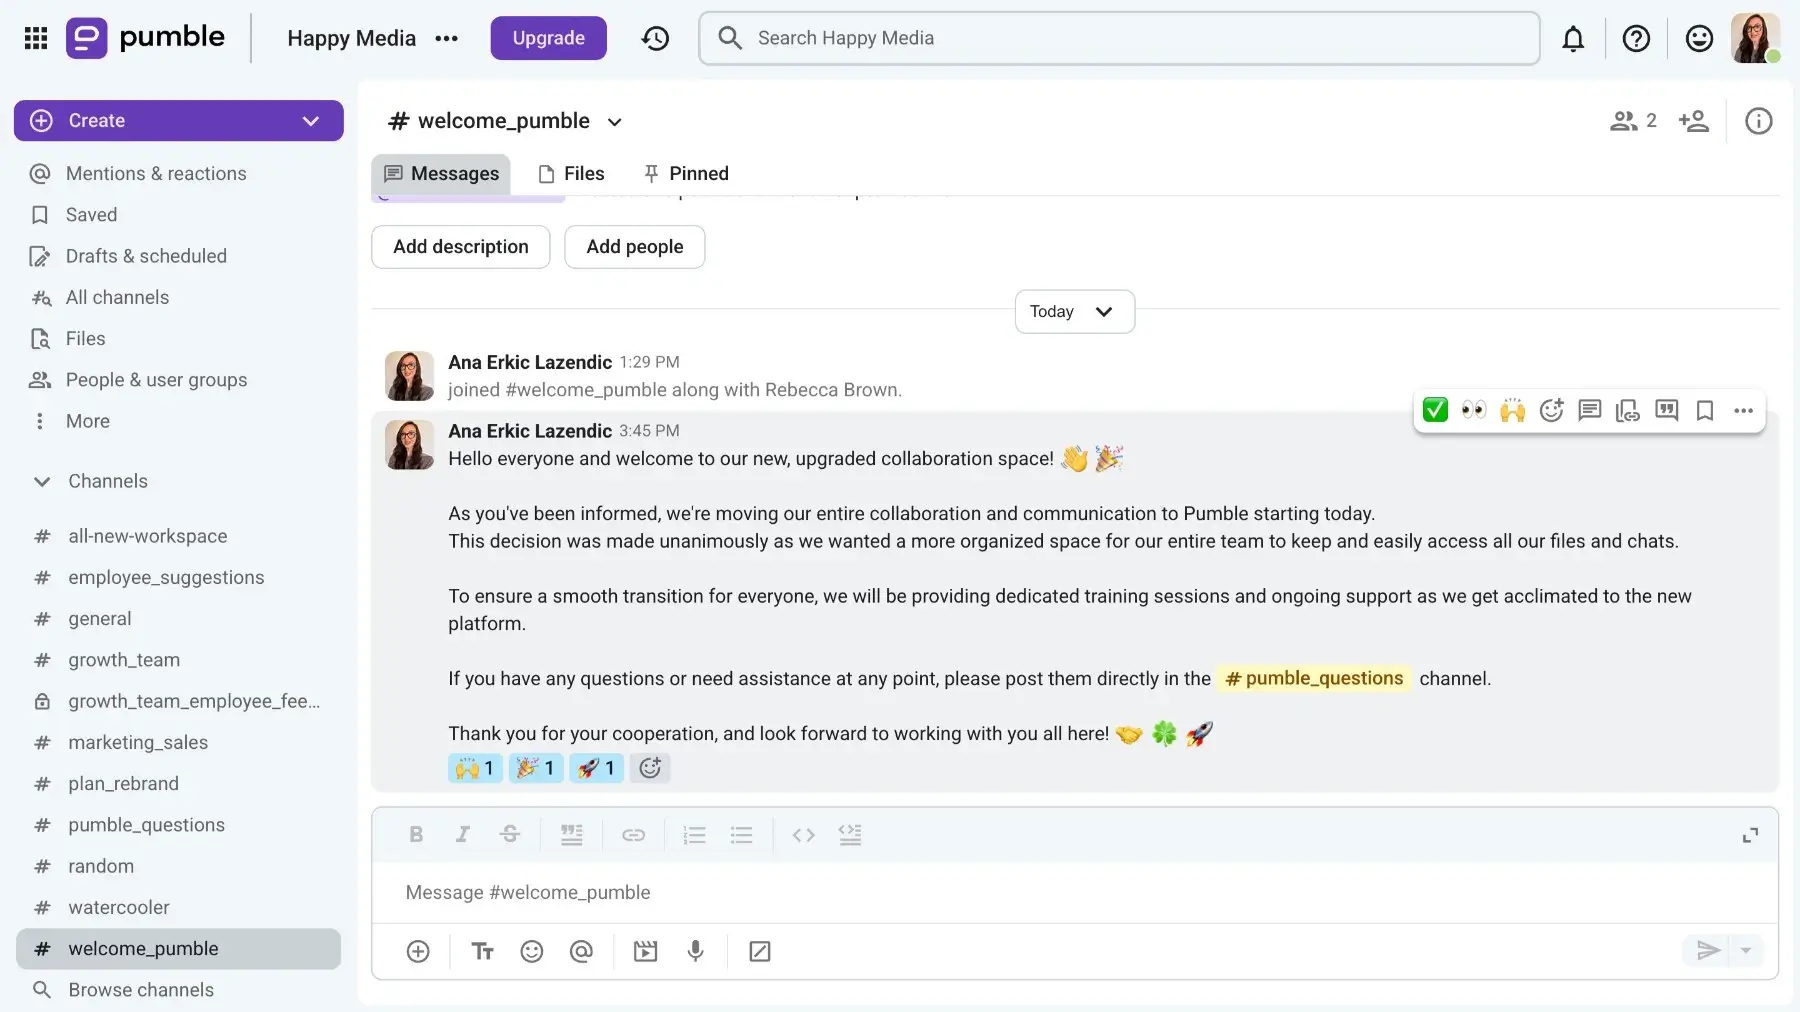
Moreover, you can use pin messages to highlight your welcome announcement, migration timeline, and links at the top of the channel. This ensures nobody misses it, even if they log in late.
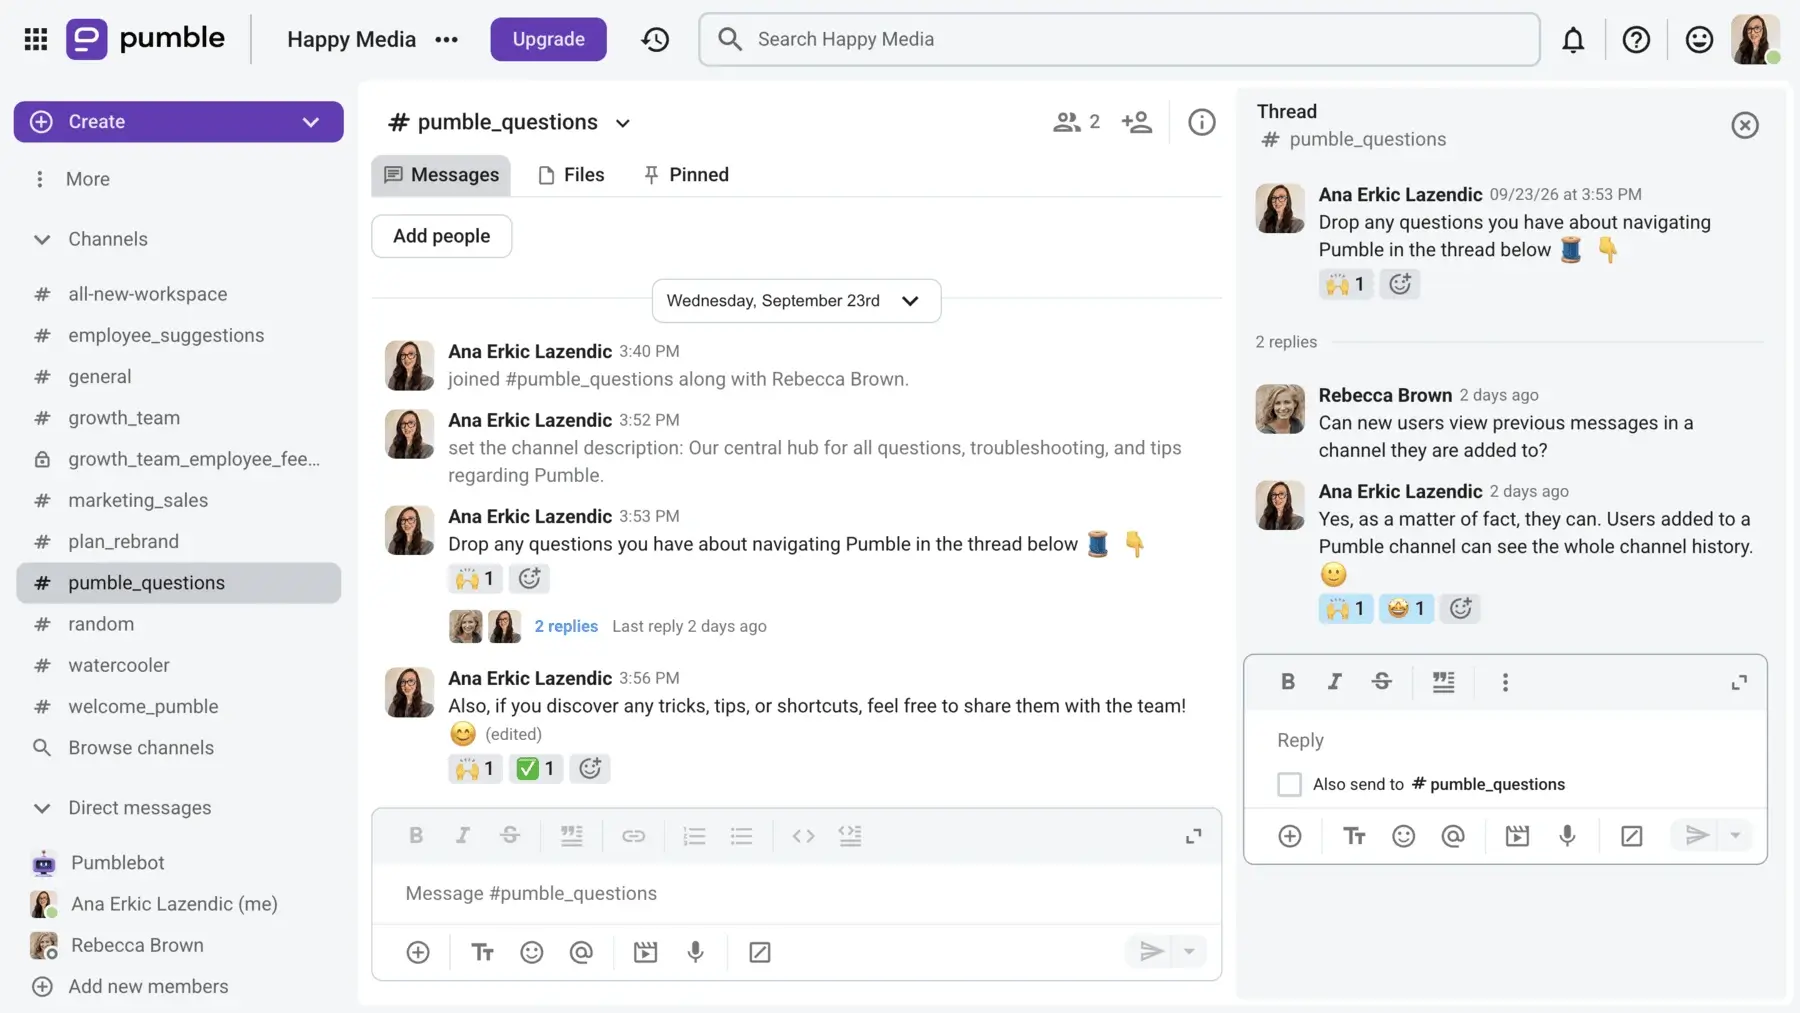
Next up, you need to make a plan on handling pushback, as there will most certainly be some team members who will resist changing from their old habits. You can give them a designated, safe space to ask questions and air their grievances. Set up a dedicated Pumble channel where people can post their doubts. Use threaded answers to address specific questions and keep the main channel clean.
Additionally, introduce your team to Do not disturb (DND) and custom statuses early on so they know their personal time and boundaries will be respected on Pumble.
If you need a quick reminder during your team’s first week, here’s a reference cheat sheet you can use:
| Task/Goal | Pumble feature to use | How it helps |
|---|---|---|
| Share company news | Public channels | Keeps everyone informed |
| Keep important information visible | Pinned messages | Saves time and no one has to scroll to find links |
| Quick check-in | Video/Voice calls | Replaces long typing sessions with a one-click call |
| Organize side conversations | Threads | Prevents main channels from getting cluttered |
| Protect focus time | Do not disturb (DND) | Stops notifications outside of working hours |
Consider setting up a training session with Pumble’s success team if you’re on one of the paid plans to help your team adapt to the new environment. Encourage team members to explore Pumble’s features and ask questions to ensure a more comfortable transition.
FAQ
Here are the answers to the most common questions about migrating from Slack to Pumble.
How can I export all messages from a Slack channel?
You can export all messages from a Slack channel using the built-in Export tool.
- Select Admin from your Slack sidebar, click Workspace settings, and Security.
- Select Import & export data, then click Export.
- Select an option in the Export date range drop-down menu.
- Click Start export, and you’ll receive an email once your export file is ready.
- In the email, click Visit your workspace’s export page and then Ready for download to access the ZIP file.
Can I export Slack conversations without an admin account?
Slack’s official built-in export tool requires workspace owner or administrator credentials. However, there are a couple of manual routes you can take as a non-admin if you want to export smaller amounts of text. You can either copy your text directly from Slack and paste it into a document, or use your browser or app’s print function and save your text as PDF.
Can I export an entire conversation from Slack?
Yes, you can export an entire conversation from Slack, but it depends on your workspace settings permissions and your organization’s Slack plan. For example, as a non-admin in your Slack workspace, you need to be granted specific permissions to be able to export conversations from Slack. Moreover, Free and Pro plan owners and admins can only export data from public channels, whereas Business+ and Enterprise admins can export private channel and DM conversations.
How do I download a file from Slack?
To download an individual file from Slack, hover over the file in the message or preview, and click the Download button. The file will save directly to your computer’s default downloads folder.
If you want to export file data from a workspace as an administrator, you need to open Import and export data from your workspace settings. Select the Export tab, choose your date range, and click Start export. You’ll receive an email with a ZIP file link. It’s important to note that Slack only lets you export links to files and not the actual files.
How do I download a CSV file from Slack?
In Slack, you can download an attached CSV file by using the download arrow icon next to the shared file name. Or, you can export channel data as a CSV file by using the admin export route and choosing Channels and Export CSV.
Give your team a more efficient collaboration experience
There are plenty of benefits to moving from Slack to Pumble. Most notably, Pumble offers:
- Unlimited message history
- Cost effectiveness
- 24/7 customer support
Migration from Slack to Pumble doesn’t have to be complicated. With a structured migration process, Slack users can move their data and continue collaborating without interruptions.
Ready to make the switch? Start the migration of your data from Slack to Pumble today!
For more details, check out our help page, or contact our support team for assistance.
How we reviewed this post: Our writers & editors monitor the posts and update them when new information becomes available, to keep them fresh and relevant.