Pause Notifications
If you require some time to focus or time away from work, it’s possible to pause your notifications in Pumble. Pausing notifications when needed is a good way to help you stay concentrated, and even set a notification schedule for specific times you’d prefer not to be disturbed with notifications.
How it works #
- All notifications and mentions will be paused. Once you resume notifications, you’ll be able to review all the messages you have received while your notifications were paused.
- Members will be able to see a Do Not Disturb icon next to your name. When your team members send you a direct message, you will not receive a sound notification.
Pausing notifications does not imply that you will not receive notifications at all. While Pause notifications mode is on, sound notifications will be disabled, but visual notifications will still be visible to you.
Pausing notifications #
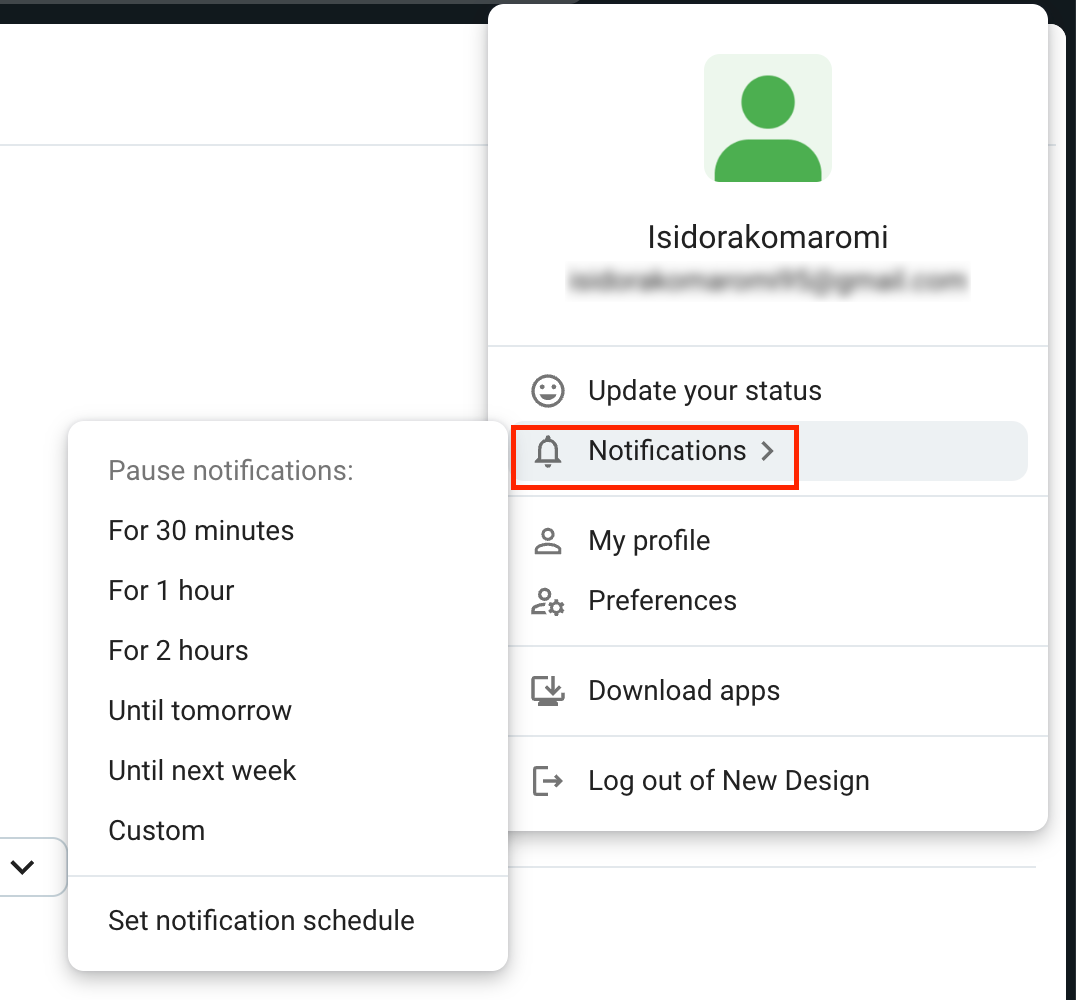
To pause notifications:
- Click on your profile picture at the top right
- Hover over Pause notifications
- Choose a time frame from the dropdown
If you choose the Custom option from the dropdown, you can set the the specific date and time until which you want to pause your notifications.
To resume notifications or adjust the pause:
- Click on your profile picture at the top right
- Hover over Pause notifications
- Choose Resume notifications
or - Hover over Adjust time
- Choose a different time frame
To pause notifications:
- Tap on your profile icon at the top right
- Tap on Pause notifications
- Choose a time-frame from the list
- Tap Save to complete the action
To resume notifications or adjust the pause:
- Tap on your profile icon at the top right
- Tap on Pause notifications
- Tap on Resume notifications or choose a new time frame
- Tap Save to complete the action
To pause notifications:
- Tap on your profile icon at the top right
- Tap on Pause notifications
- Choose a time-frame from the list to complete the action
To resume notifications or adjust the pause:
- Tap on your profile icon at the top right
- Tap on Pause notifications
- Tap on Turn off or choose a new time frame to complete the action
You can also pause notifications when setting your status on Pumble. Check out this text to learn how.
Setting your notification schedule #
If you tend to be offline at the same time routinely, you can set your own notification schedule. When the schedule is in place, you’ll only receive notifications on those days and hours you choose. Notifications will be paused outside that time frame.
- Click on your profile picture at the top right corner
- Click on Preferences
- Underneath Allow notifications, open the dropdown menu
- Choose one of the following options: Every day, Weekdays, or Custom
- If you choose Custom, simply set the time frame per each week day
- Click the X icon when you’re done and it will be saved automatically
- Tap on your profile icon at the top right
- Tap on Notifications
- Tap on Notification Schedule
- Choose one of the following options under Allow notifications: Every day, Weekdays, or Custom
- If you choose Custom, choose the start and end time for notifications for each day of the week
- For Weekdays and Every day, choose the start and end time
- Your settings will be saved automatically